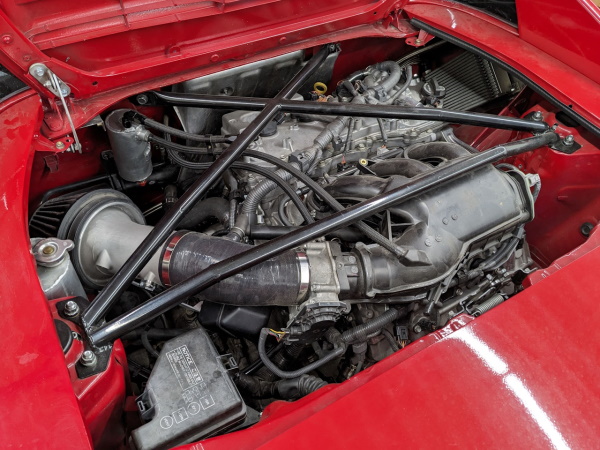
For quite a few years now I have been tempted by the idea of ditching my 3S-GTE turbo 4-cylinder and swapping in one of Toyota's newer v6 motors, namely the 3.5L 2GR-FE. But my 3S was still running great, and I had too much time, money, and effort invested in it over the years to drop it without a good reason.
That is, until a little over a year ago when the head gasket failed on the way home from the track, as described here: Tres Duro 2016 - My Lucky Streak is Broken. That motor had also been burning a fair amount of oil, and since I had to tear it apart anyway to fix the head gasket I was tempted to rebuild the whole thing to fix the oil burning. I almost went down that road of rebuilding it. Again. Fortunately I remembered that I had been telling myself for years that I would go v6 before doing that, so here we go...
Why a V6? Why the 2GR-FE?
For how I mostly use my car, track days and autocross, a larger naturally aspirated motor just makes sense. Compared to a small turbocharged one, the power delivery is much smoother, more linear, and more predictable. This in turn makes it easier to drive the car to it's full potential. Also, turbocharged motors on the track can be a reliability nightmare. I had my setup refined to the point where it was pretty dang good. Even so, in order to achieve that reliability I had the boost turn down significantly from the 20psi where I had dyno'd the car and set my 365whp peak power level. In hindsight, my turbo was probably making under 300whp in it's "track tune".
As for the second question, why the 2GR? It's the largest displacement and most modern motor that easily fits into the MR2. It is new enough and has been used in enough different cars that it is very readily available, and with 3.5L displacement and variable valve timing (VVT-i) it makes great power across the entire RPM range. Swapped cars typically dyno around 280whp. Allowing for 15% drive train loss that is roughly 330hp at the crank. Nearly 100hp per L from a naturally aspirated motor, and if I blow it up I can go to virtually any junkyard in the country, buy a new one for a few hundred dollars, and have it running within a few days. Compare that to a fancy "built" 4-cylinder, where if it blows up I have to "build" another one, which can take several months and thousands of dollars. The fact that the 2GR is all aluminum and therefore a bit lighter than the 3SGTE is a nice bonus as well.
Pre-Swap Considerations
Let me start by saying that I don't intend this to be the be-all and end-all of 2GR swap guides for the MKII. However, I do hope to cover the process in sufficient detail that a reasonably competent car enthusiast could use it as a basic guide. If I miss something, please feel free to send me an email and I will try to clarify, and update this post with the info. Also, if you see any little custom features that you just have to have, I might be able to help you out! I have tried to organized the information into logical categories for reference purposes. If you wish to see it in the chronological order of how I did my swap, check out My 2GR Swap Thread on the MR2oc forum. Also, I cannot stress this enough, the forum is by far the best source of information on this swap. Forget Facebook, if you want to find everything you need to know to put this motor into an MR2, check out the forum.
So, to start with, where do you get the motor? The complete list of cars that came with the 2GR can be found on Wikipedia, but the short answer is that (in the USA) it can be found in the Avalon, Camry, Rav4, Highlander, Sienna and Venza plus the Lexus versions of some of those cars, starting (in the Avalon) as early as 2004. Mechanically, basically any of the transverse mounted 2GR's will do (typically FWD and some AWD cars). However, there are a couple of reasons to chose one version over the others. The Highlander and Sienna with the tow package got a water-to-oil oil cooler which, from what I have read, is sufficient for most peoples' uses including some track use. The Rav4 has a wiring harness that makes the wiring a bit easier (more on that later). I have been told that the 2011+ Sienna motors also have a wiring harness configuration that works well for the swap. They also have the factory oil cooler as an option. There are also some advantages to getting a newer motor, as the early ones had issues with the VVT-i gears, and also with an oil feed line to the VVT-i. I believe most motors should have had these fixed as recall items, but to be sure of getting the newer parts, a 2010+ motor should have the updates from the factory.
Personally, I found mine through car-part.com in a semi-local junkyard. It was from a 2012 Rav4 with ~30k miles on it, and I paid $2000 for the engine with the electronic throttle pedal, wiring harness plus chassis side wiring pigtail, alternator, and A/C compressor. Some of those parts ended up not being too useful to me, but that's OK, they can be sold on ebay. I could have gotten a cheaper motor with more miles on it, but I chose to go newer / lower miles rather than save a couple hundred bucks.
Mechanics of the Swap
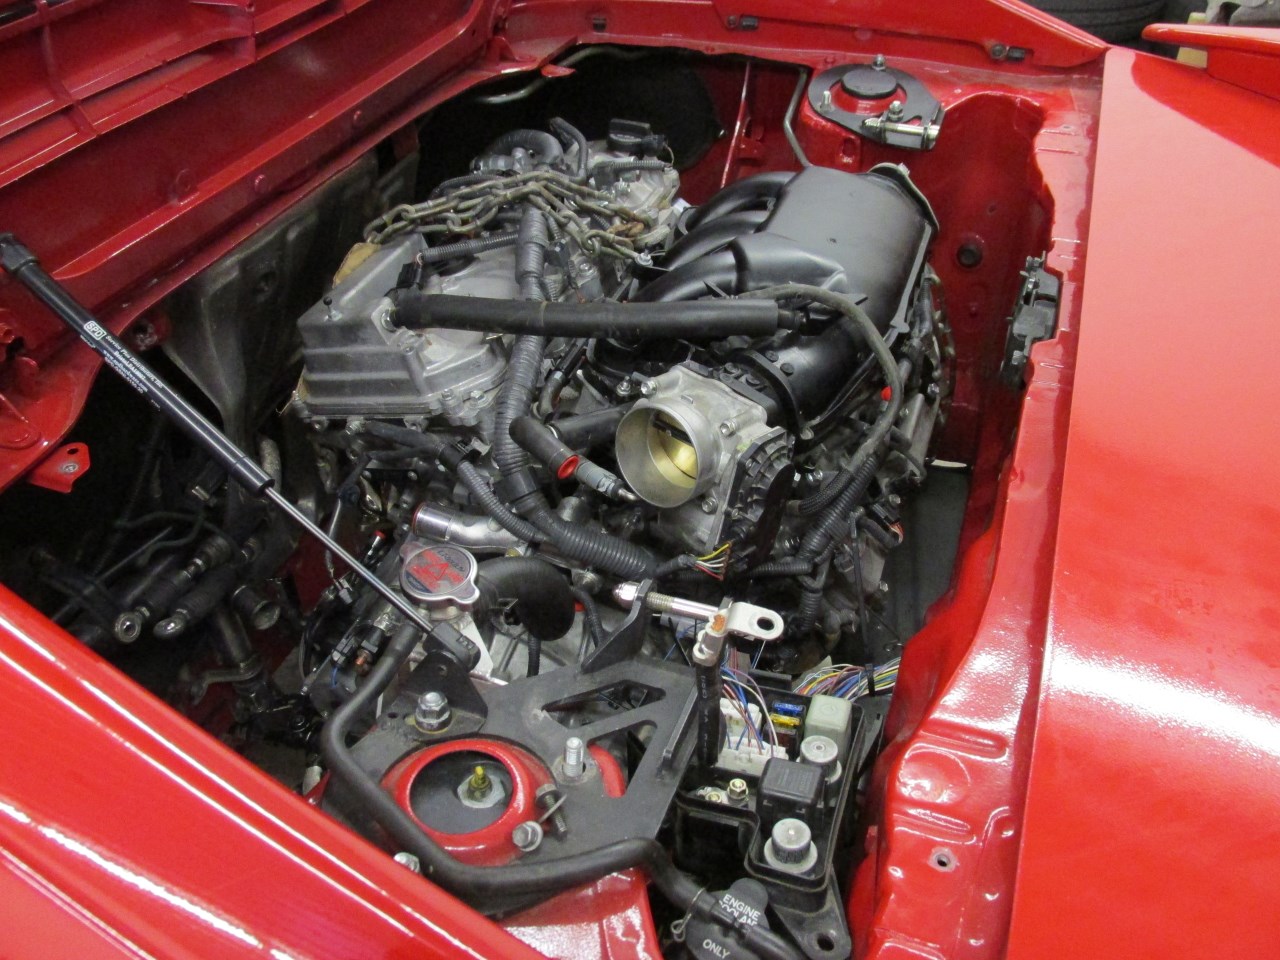
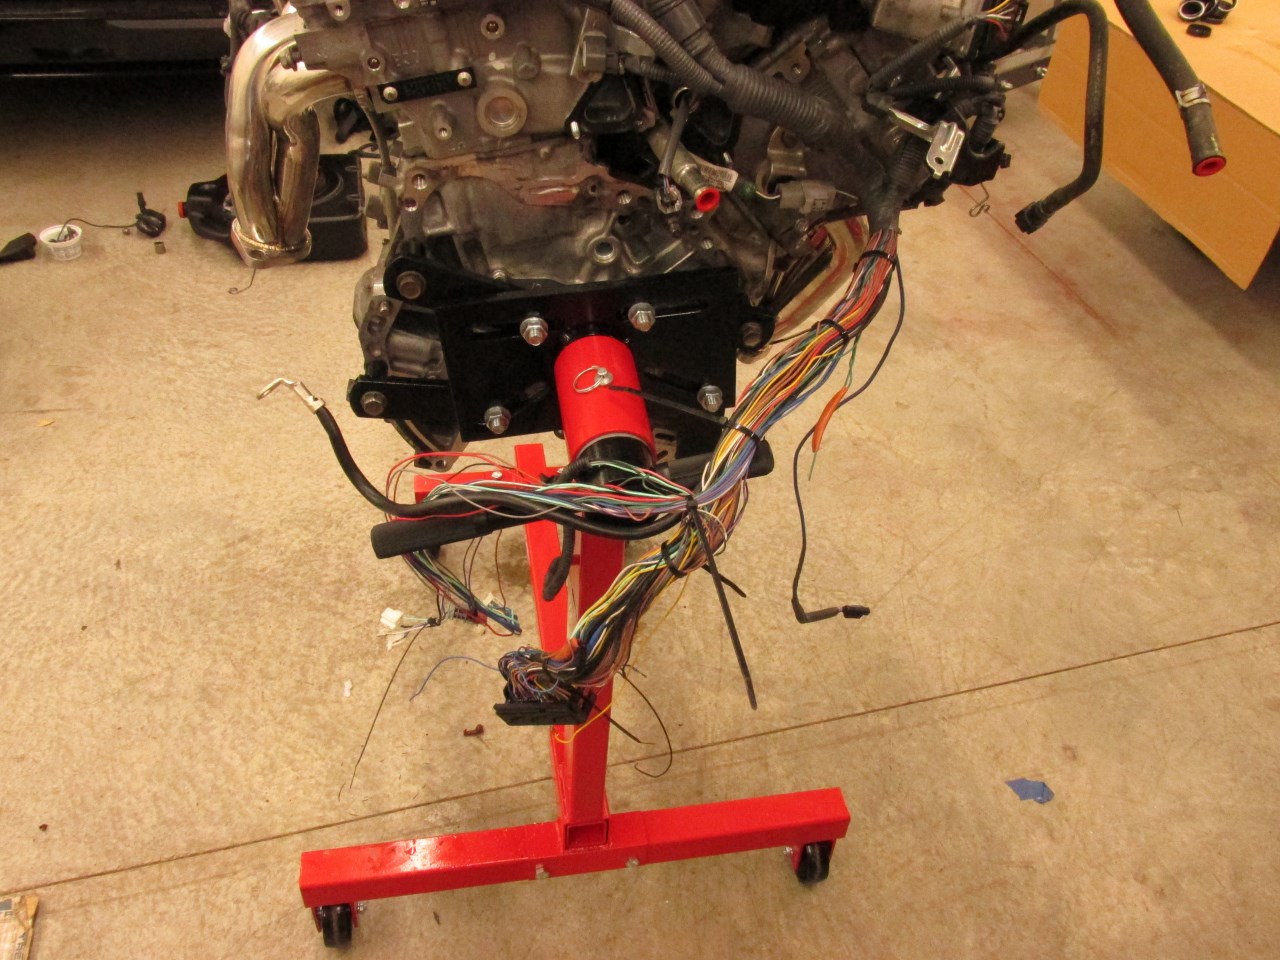
OK, that was a lot of text without any pictures. So, here's the motor cleaned up and on the engine stand shortly after I got it home.
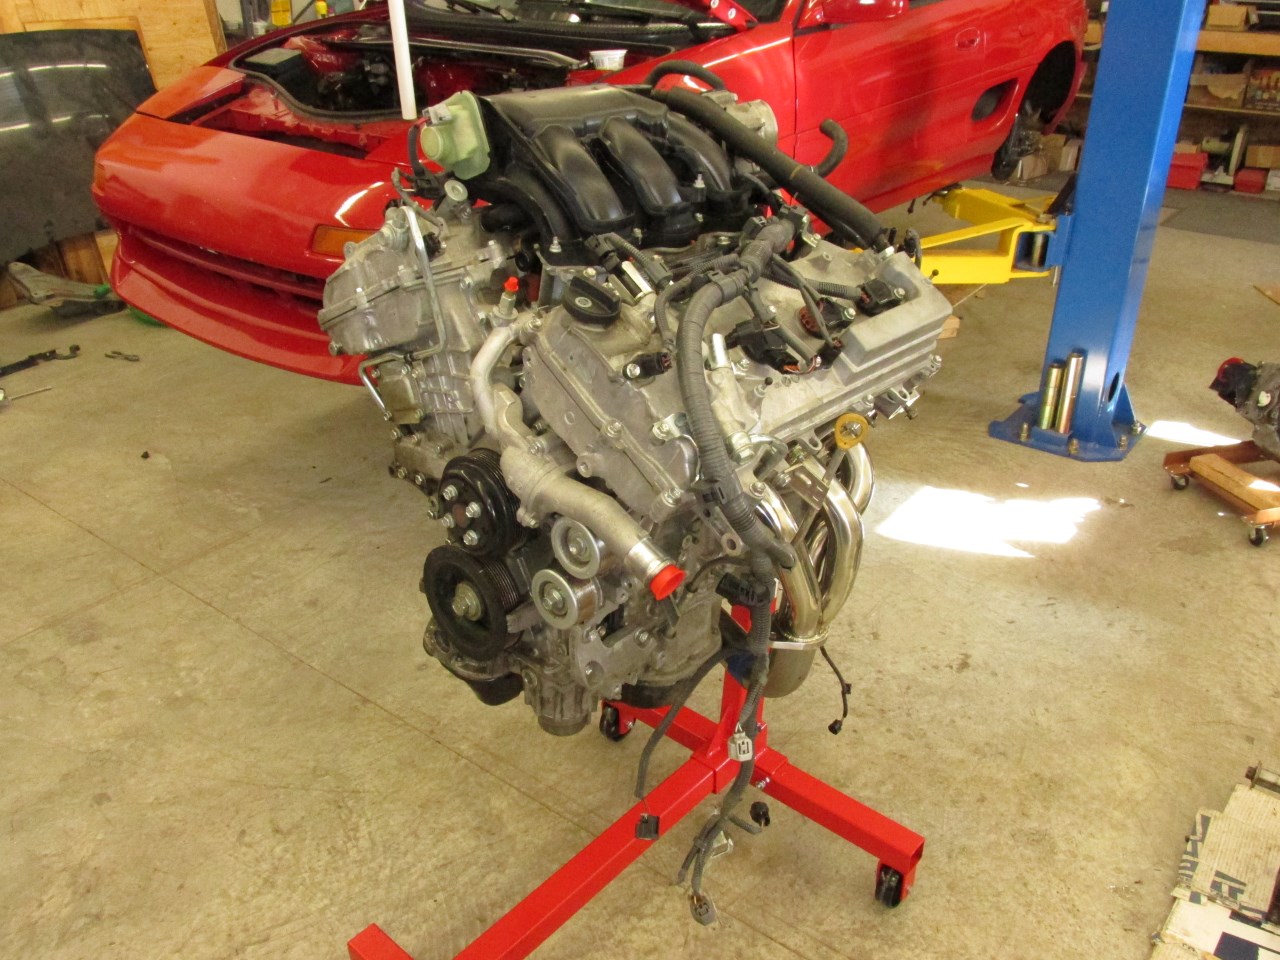
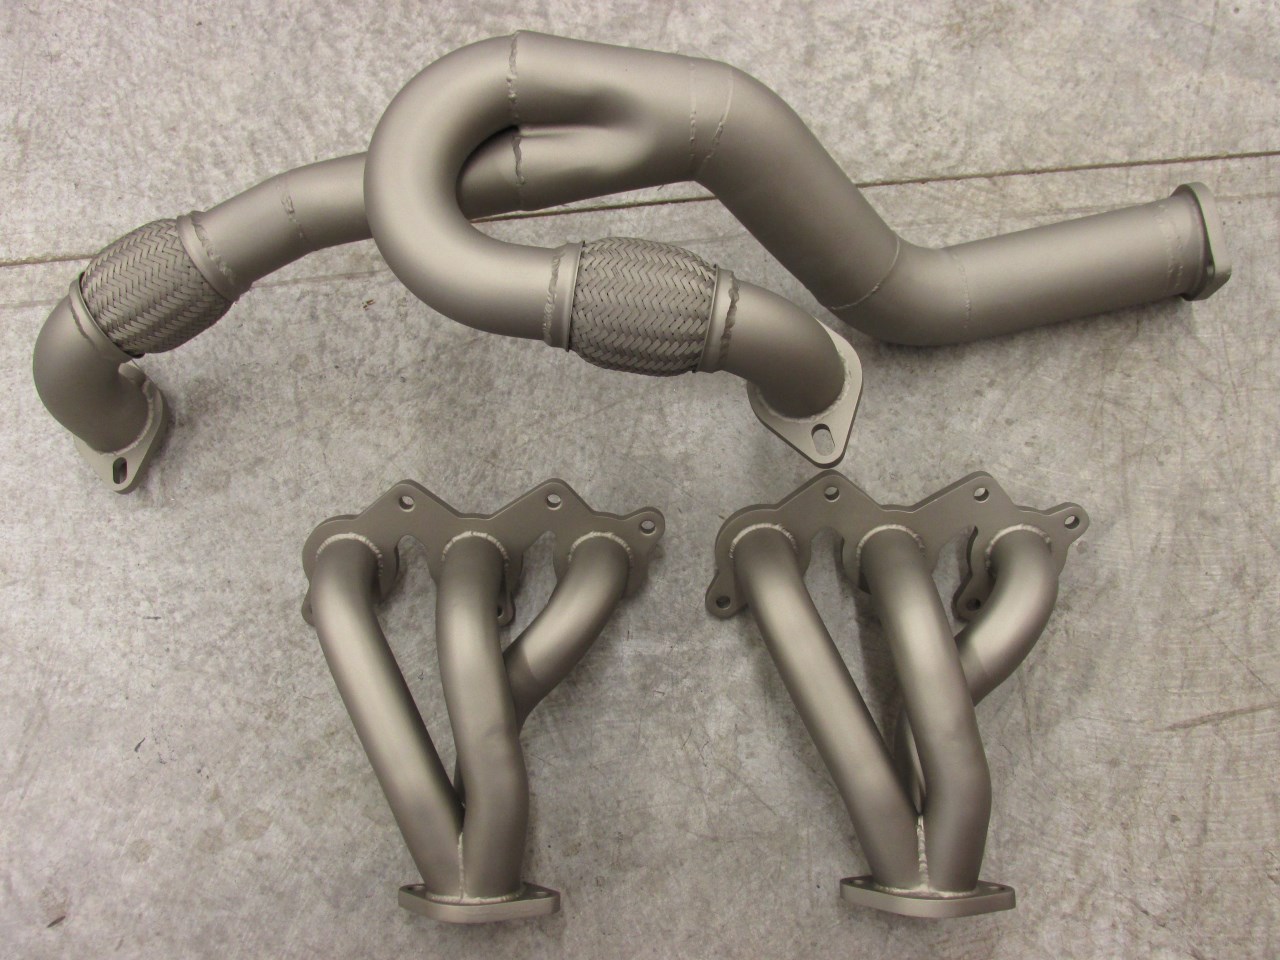
You can see the headers from Frankenstein Motorworks, as well the beginnings of my y-pipe under the motor. Not yet installed is the right hand engine mount, also from Frankenstein Motorworks.
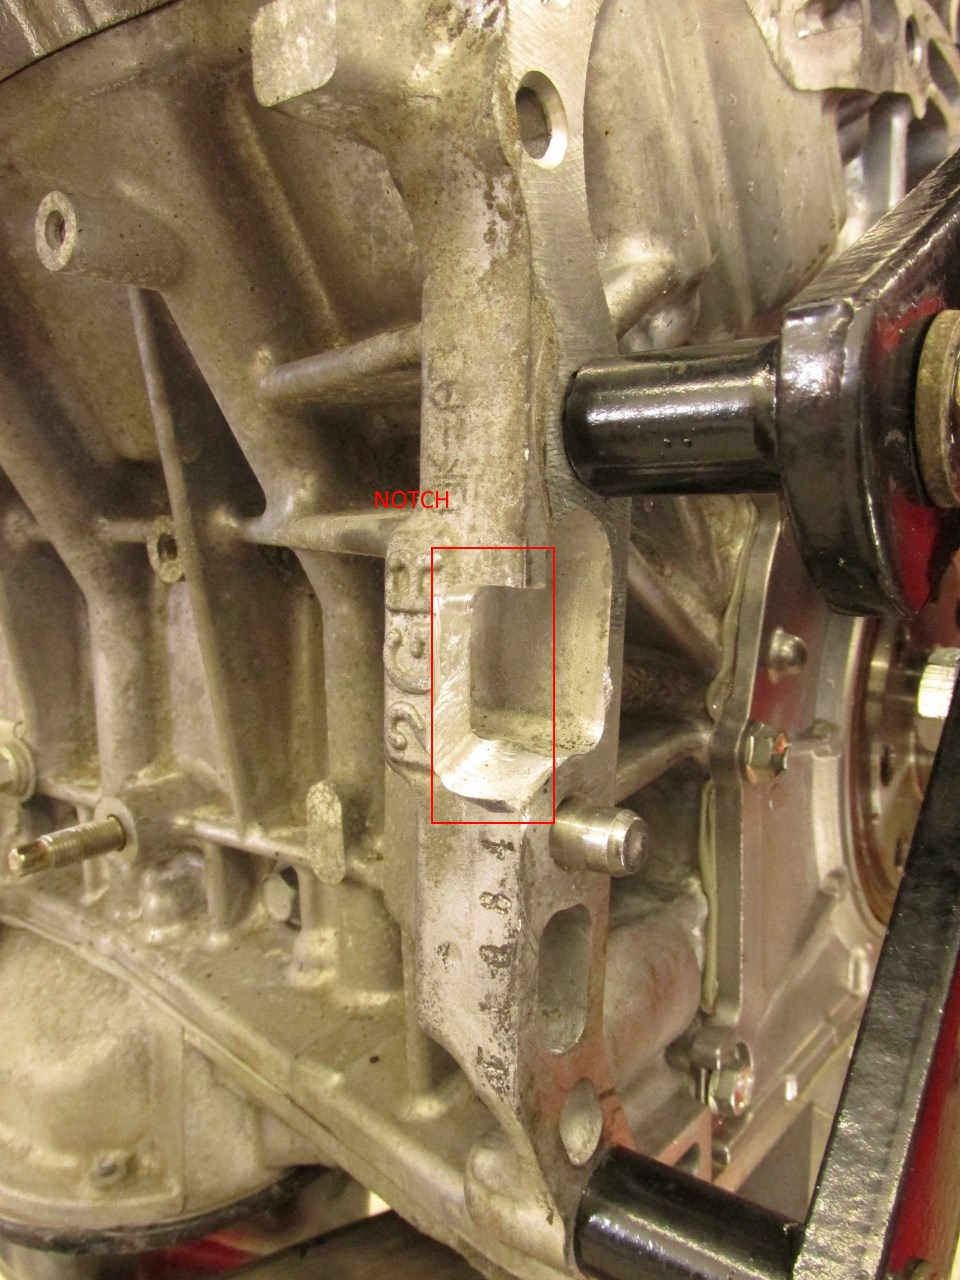
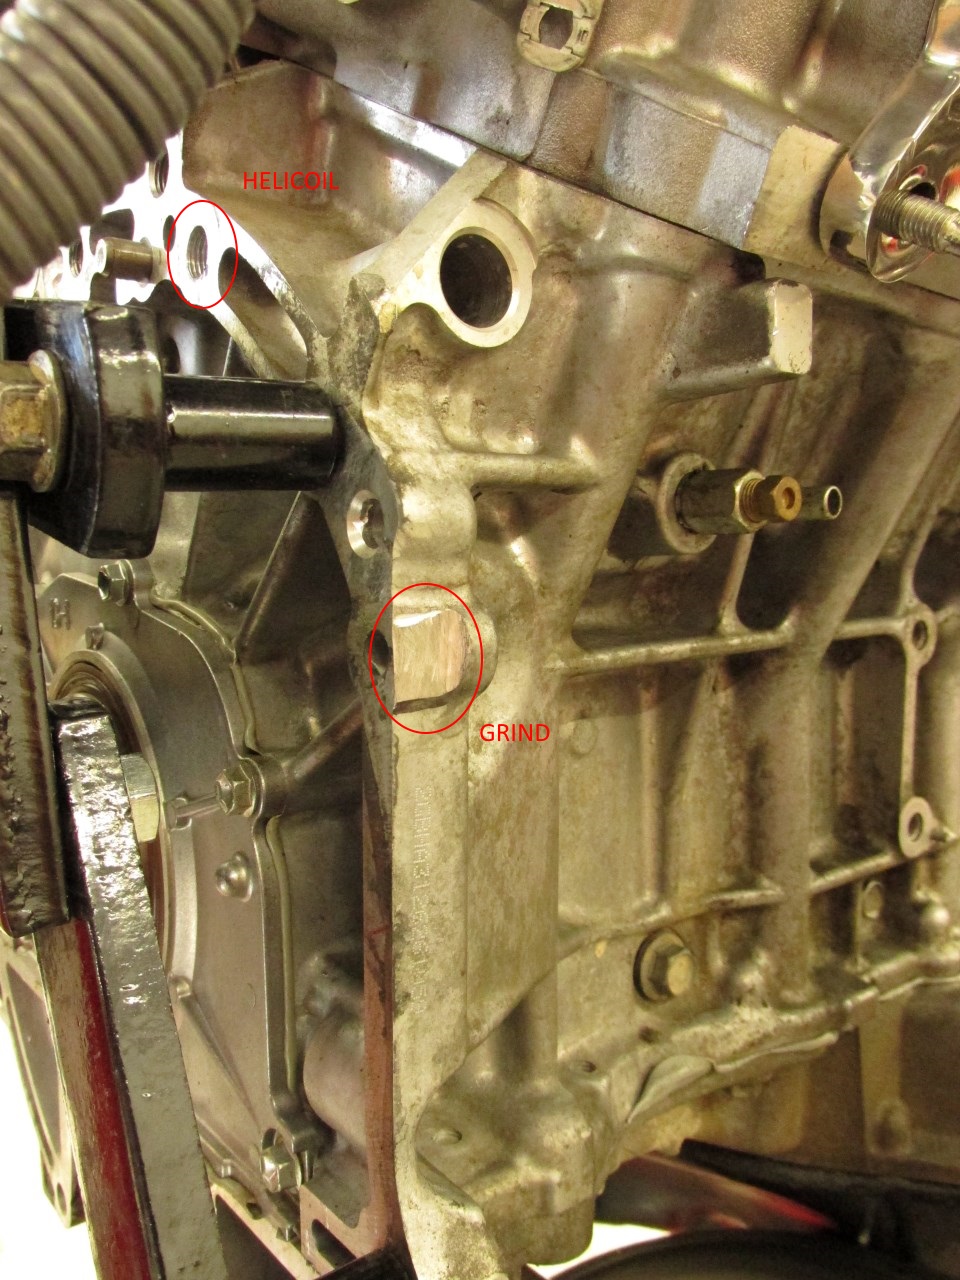
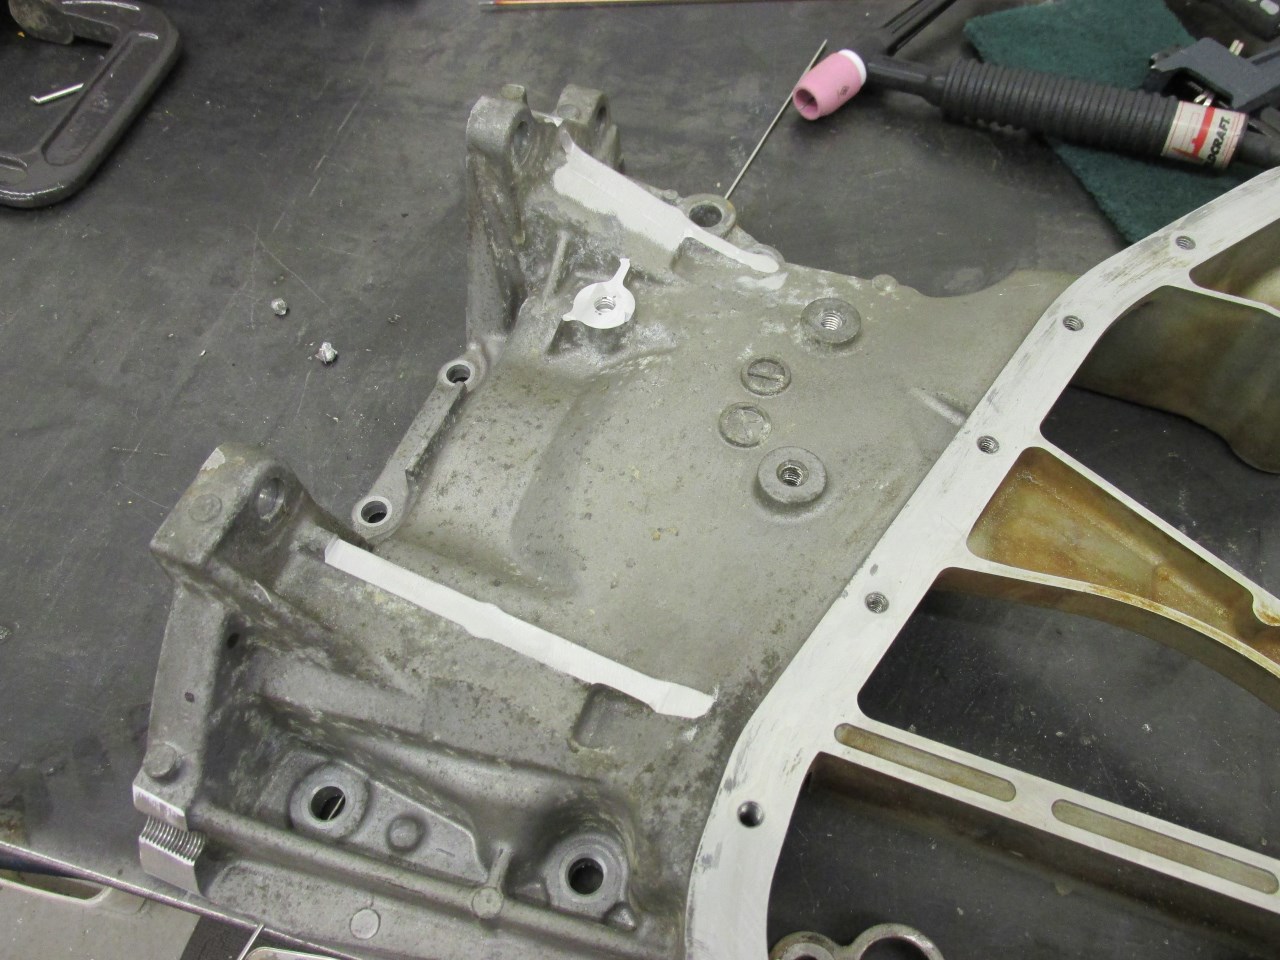
In order to bolt the 2GR to the stock MR2 Turbo transmission (E153), you have to modify the engine block in two locations. The forward side has to be notched to clear the slave cylinder, and the rear has to be ground down to clear part of the transmission. You also have to install one M12X1.25 heilcoil. The hole is already there, just not threaded and a little too large to simply tap. Finally, there is a tab on the upper oil pan that must be cut off to clear the fwd transmission mount. I don't have any pictures of this specifically, but some of the later pictures show the result of this. You will end up cutting through an unused threaded hole in the oil pan.
At this point, you have four bolts between the engine and transmission. The 2GR upper oil pan has an additional two mounting points that, I am told, line up with existing threaded bosses on a 93+ MR2 transmission. I used a 91 MR2 transmission, and those two bosses were not present. Four bolts is probably enough, but I decided that I would be more comfortable with a complete circle of six, so I added my own bosses to the transmission as shown below.
Location of required bosses marked:
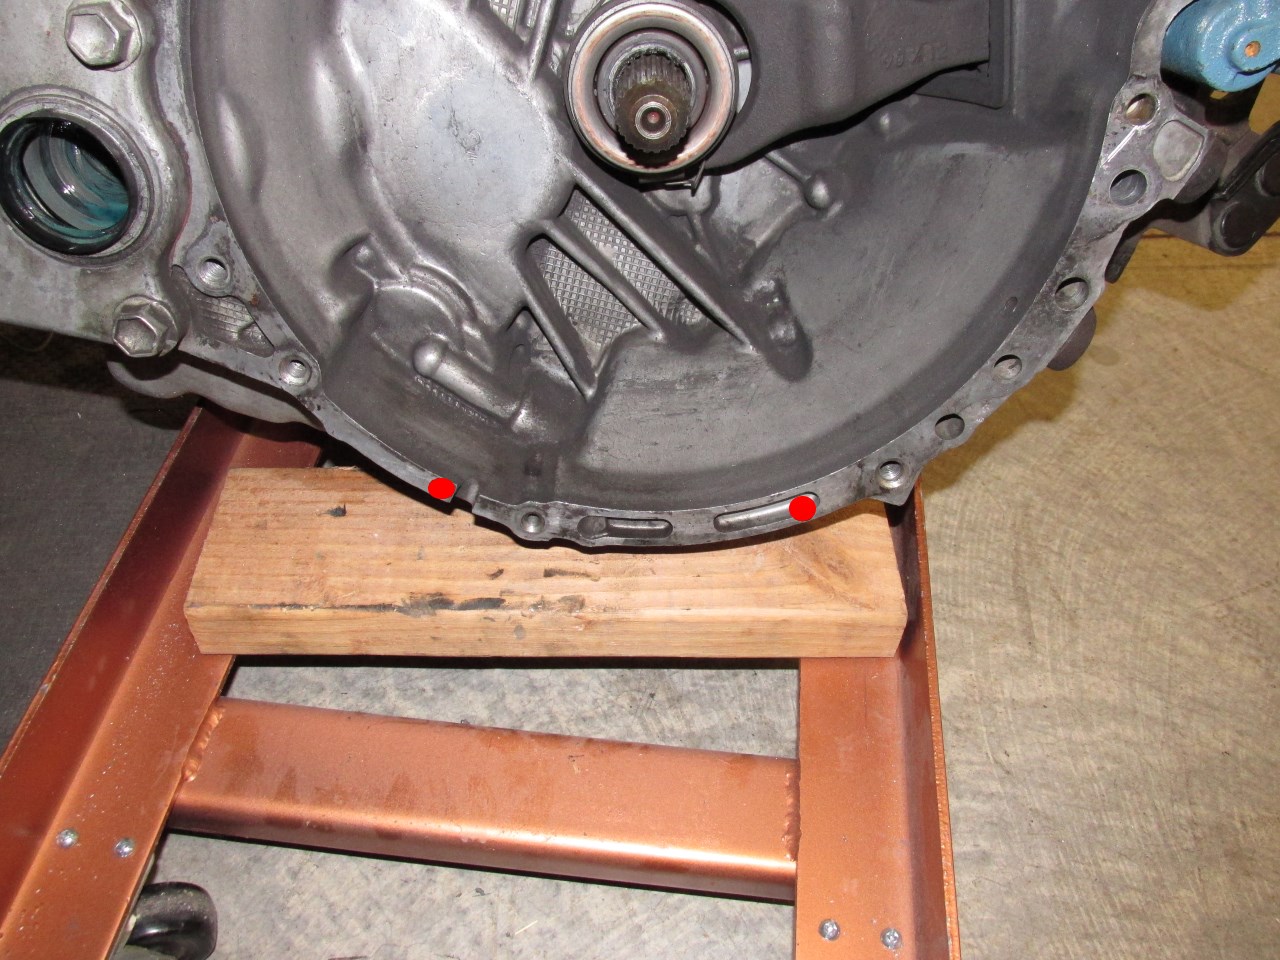
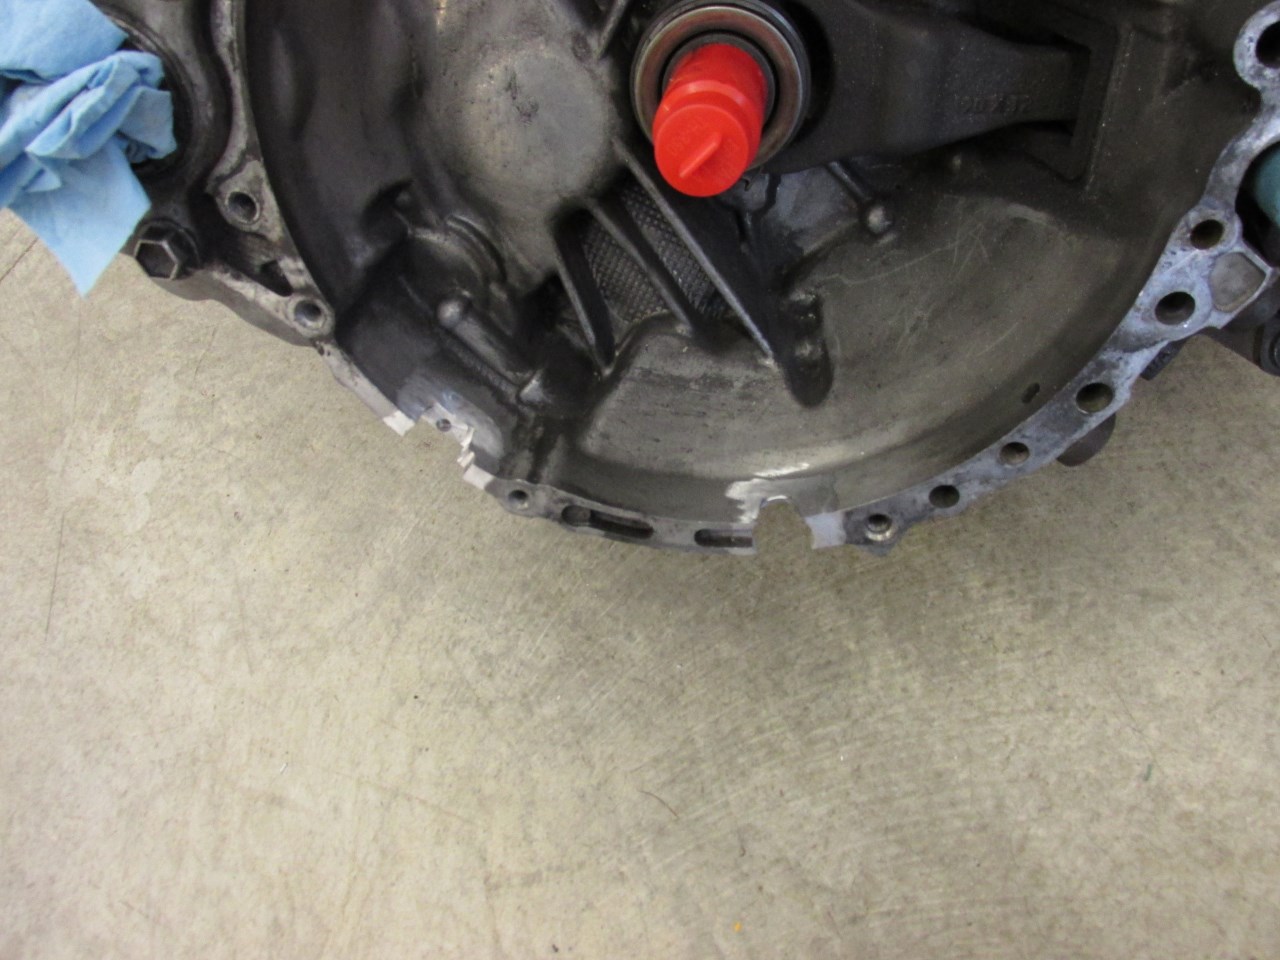
Pictures below show notches cut in bellhousing, and new threaded boss welded in place. To ensure alignment I made bushings that just fit both the bolt, and the holes in the oil pan. This ensured that the bolts would be centered in the holes. I then tack welded the bosses with the engine and transmission bolted together. With the bushings removed from the oil pan I was left with perfectly aligned holes.

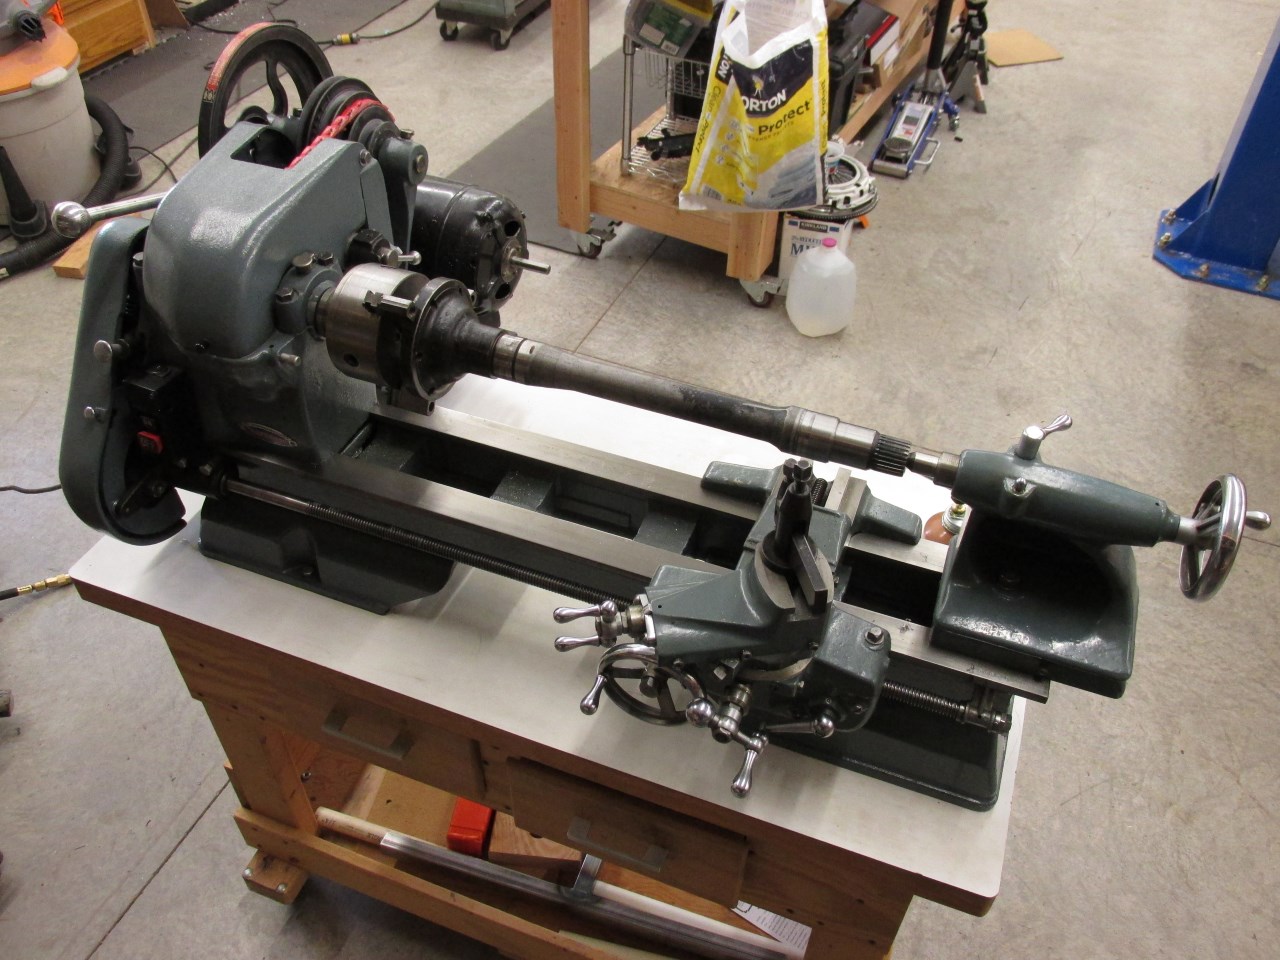
In order to use the E153 transmission with it's two piece RH drive shaft and carrier bearing, you need the bearing support bracket from a 2GR equipped Camry. I purchased Toyota part number 43457-07010 from an eBay seller. There are a couple of other part numbers that also work, this just happens to be the one I used. This bearing carrier bolts directly to the 2GR block and fits the stock MR2 carrier bearing. The only catch is, it positions the bearing about 10mm closer to the transmission than on the stock MR2 motor. To solve this, a new snap ring groove needs to be cut in the axle and a 10mm spacer made to shift the bearing over. I did this myself on my 1930's era Craftsman lathe, but virtually any small machine shop should be able to do it for a reasonable price. This process is covered in much more detail in this thread on the MR2OC forum. Marc from Frankenstein Motorworks now sells a cast aluminum axle carrier that works with the stock MR2 axle without modification.
Finally, you need a clutch and flywheel. The 2GR was never offered by Toyota with a manual transmission, so there is no stock flywheel to use. Luckily, the bolt pattern on the crank shaft is the same as some of Toyota's earlier V6's, such as the 1MZ. I used a Fidanza aluminum flywheel, part number 130881. You will also need Toyota V6 flywheel bolts (90105-10138 is the OEM part number). If you want a stock weight flywheel, I have been told that a stock 1MZ flywheel will work as well. However, the way the 2GR rev's with a lightweight flywheel is a truly wonderful thing, so I would strongly recommend spending the extra couple hundred bucks. I used a Southbend clutch that I had previously used on my 3SGTE, although I had it rebuilt before installing it here.
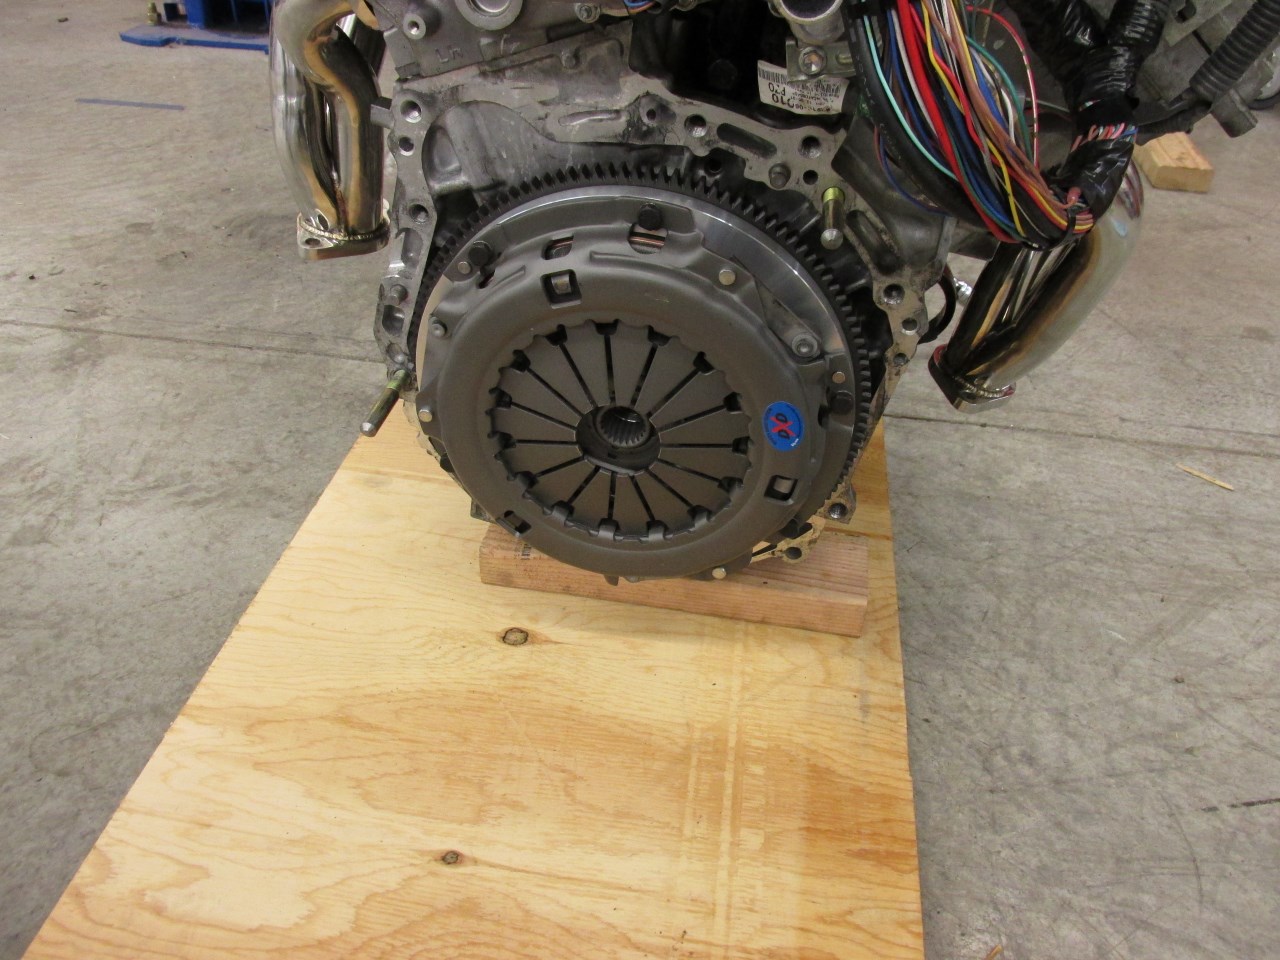
If you look close, you can see my two custom alignment pins installed in preparation for mating the engine and transmission. The pins are simply two M12x1.25 bolts with the heads cut off and the ends chamfered, they make the process of aligning the engine and transmission much easier, not to mention safer for the pressure plate. These are especially useful when doing this with the motor in the car, but helpful on the floor as well.
One minor, not strictly necessary, but definitely nice modification to make while doing the swap is to the dipstick tube. Basically, it is very nearly touching the firewall heat shield in it's stock configuration. I cut approximately 1/2" out of the bracket where the tube bolts to the head and welded it back together, making the dipstick much easier to use. This can easily be done after the swap is complete, as the tube comes off easily with a single bolt. Installed, my modified dipstick tube look like this:

You also may need to purchase a new serpentine belt. For a swap without A/C I used a Gates K060578 belt. It is only a 6 rib, vs the stock 7, but there are few if any 7 rib belts available in that length. Since we are driving only the alternator and water pump the loss of one rib doesn't seem to be an issue. On the subject of A/C, many people (including myself at this point) have gotten A/C working on their swaps. It is fairly well documented in this thread on the forum.
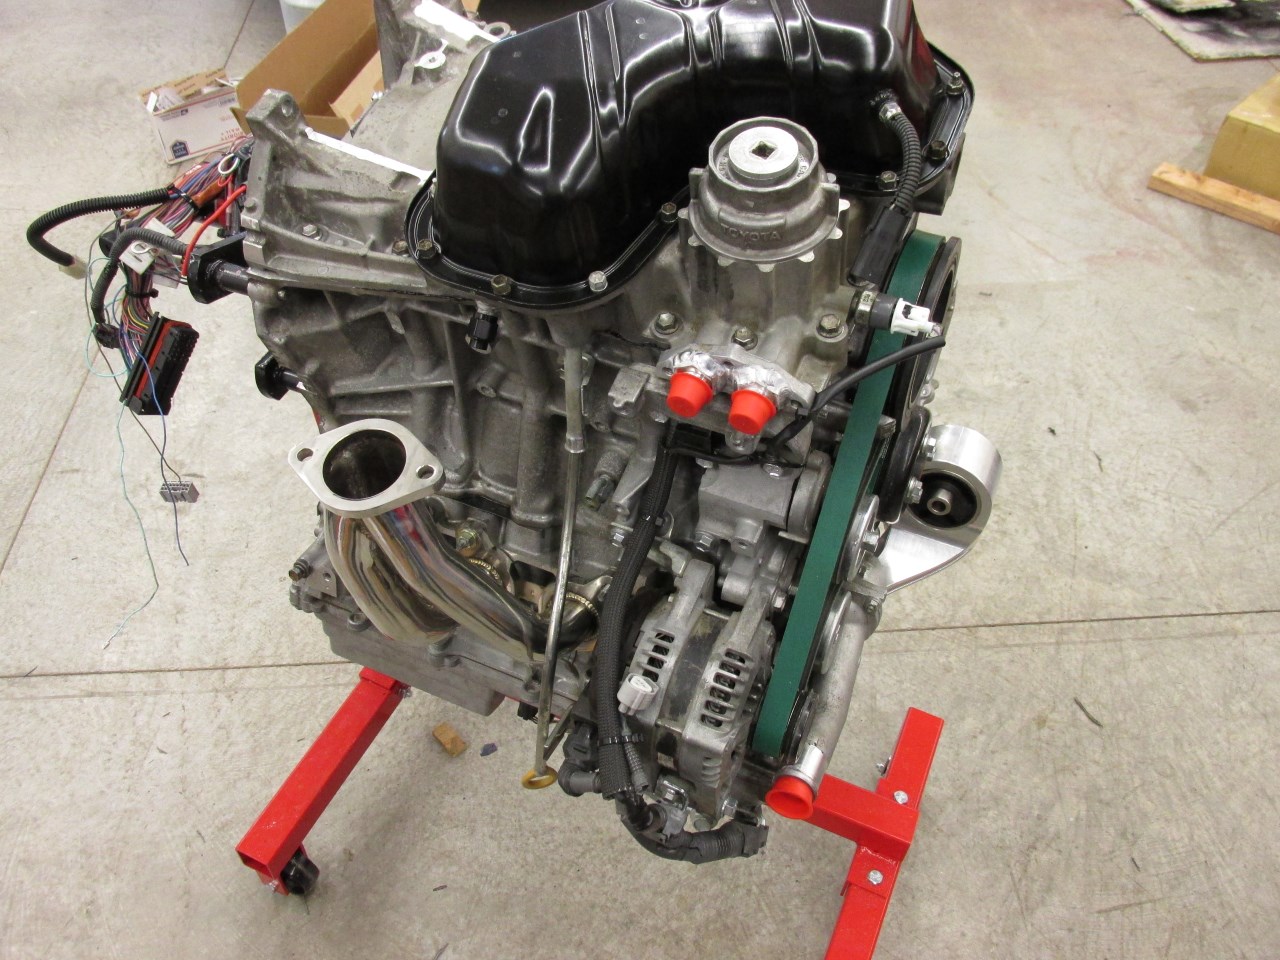
Mechanically, that's pretty much it. The motor is ready to be bolted into the chassis.
There are, however, a few more steps that are required before the final installation.
Exhaust
If you are looking for a bolt-on exhaust solution, there is a very nice Y-pipe available from DD Performance Research that will connect the Frankenstein Motorworks headers to a Berk Technology muffler section. It's a little on the spendy side, but is an option if you don't have the means to build your own. But as you have probably guessed by now, I will be building one...
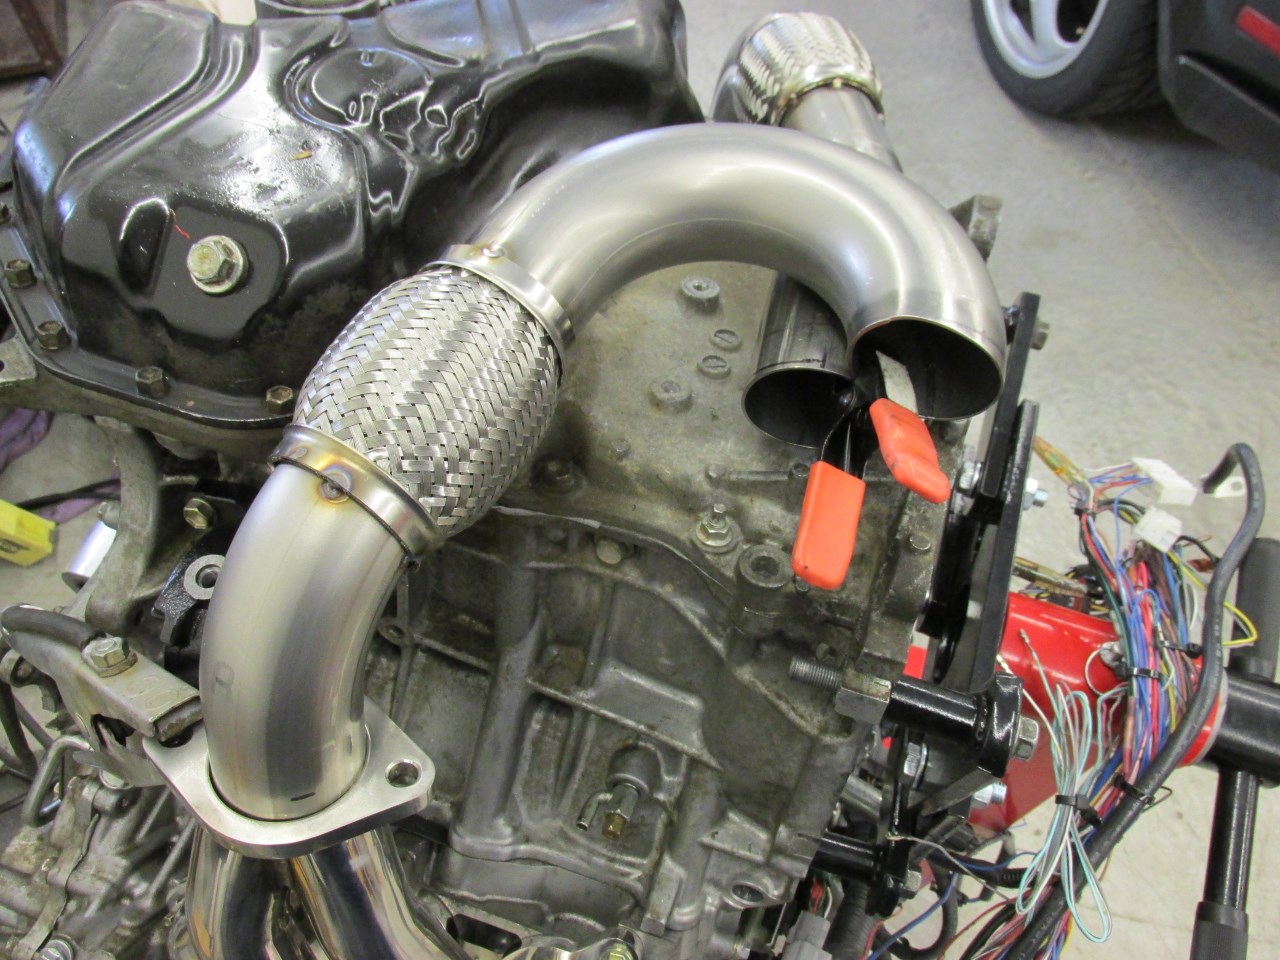
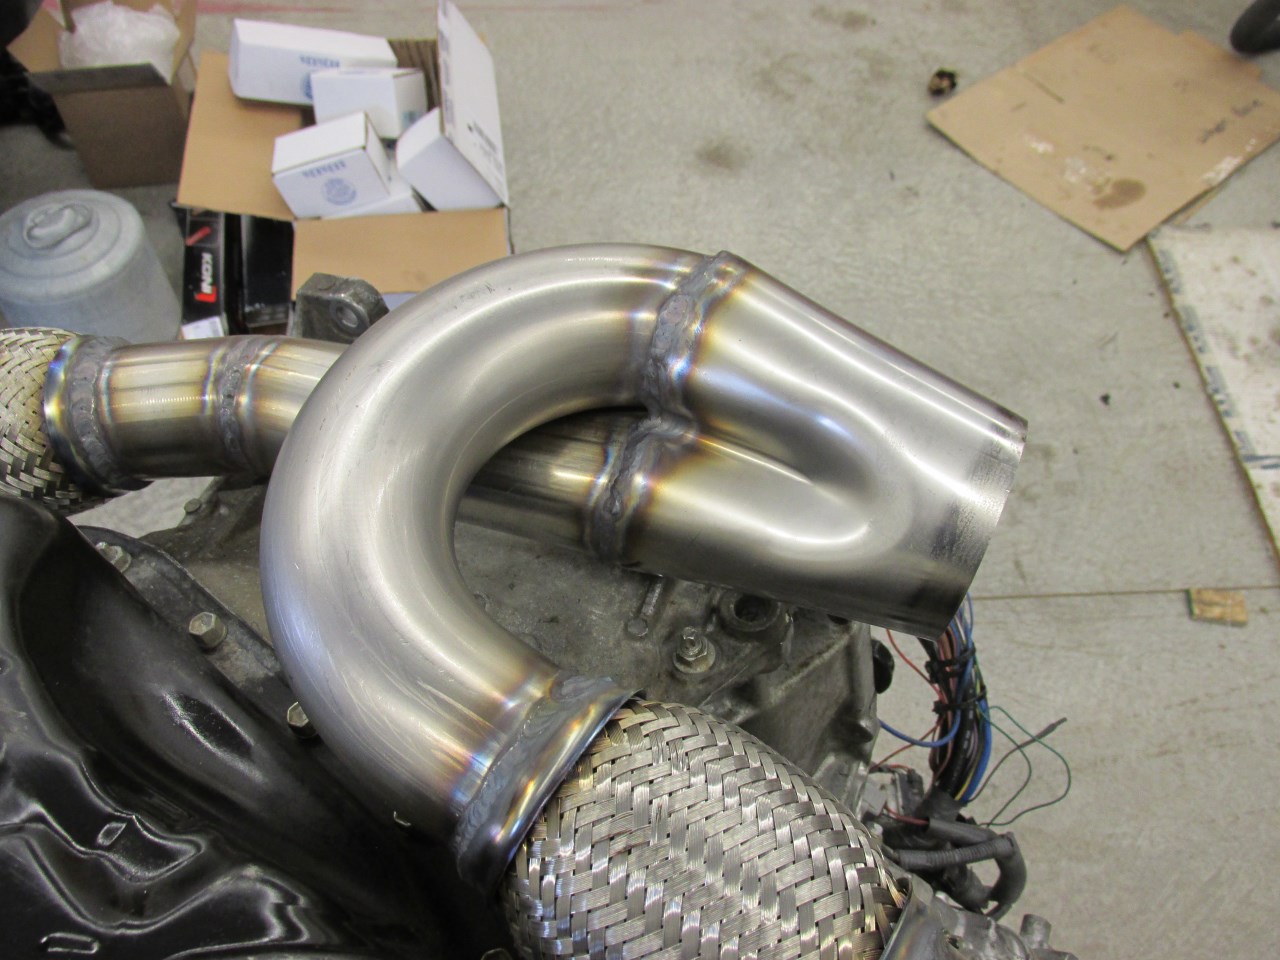
Here is the initial mockup from several angles. Tubing is 2.25" before the merge (to match the outlet of the headers), and in this configuration the secondary tubes end up very nearly equal length. The merge transitions to 3" to match my Berk Technology muffler. The merge collector is from Cone Engineering. By it's design it's a little tricky to use, but it also allows quite a bit of adjustability in angle and is quite compact, an important feature in this case.
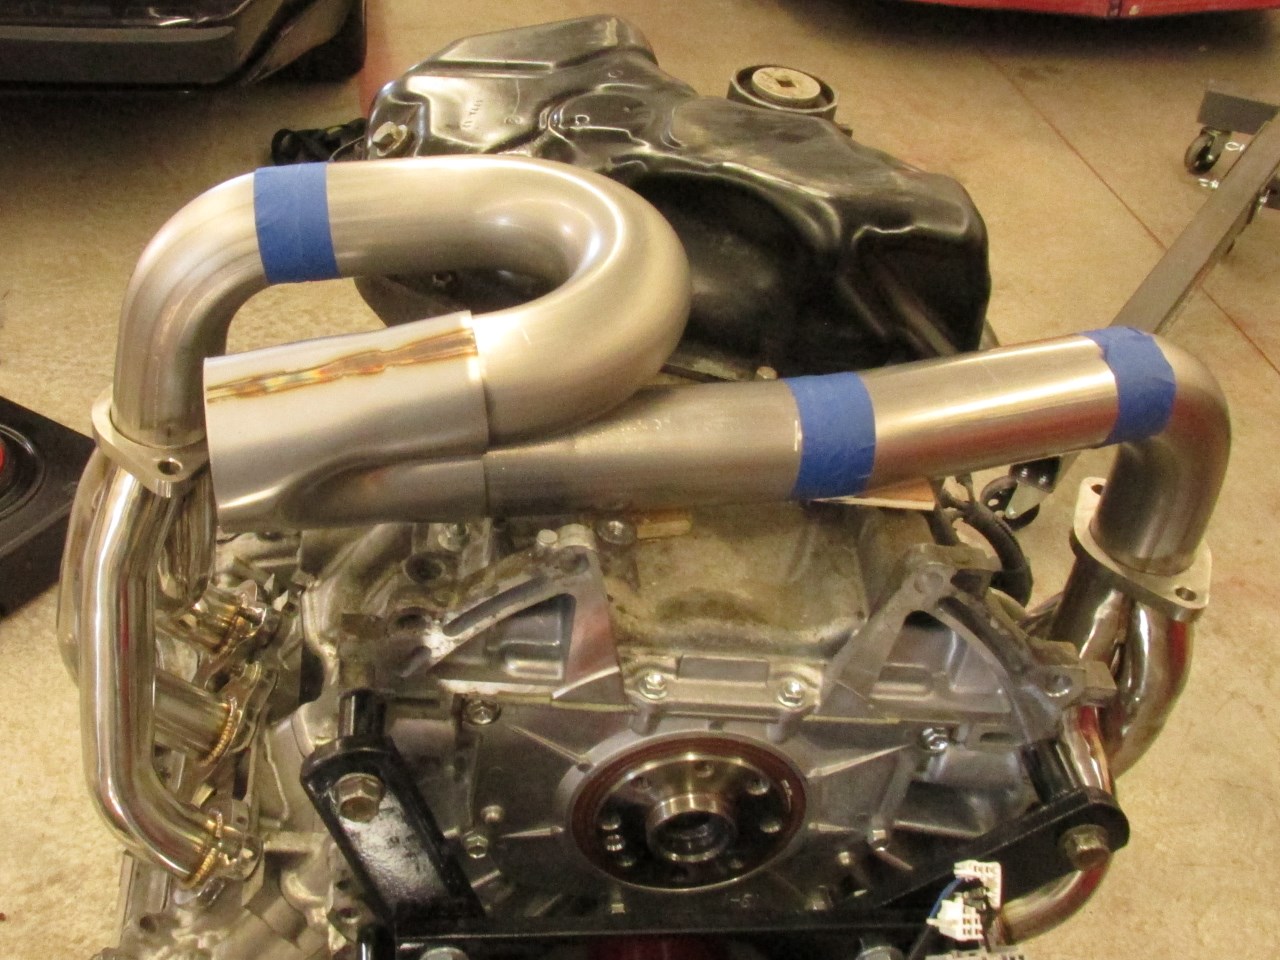
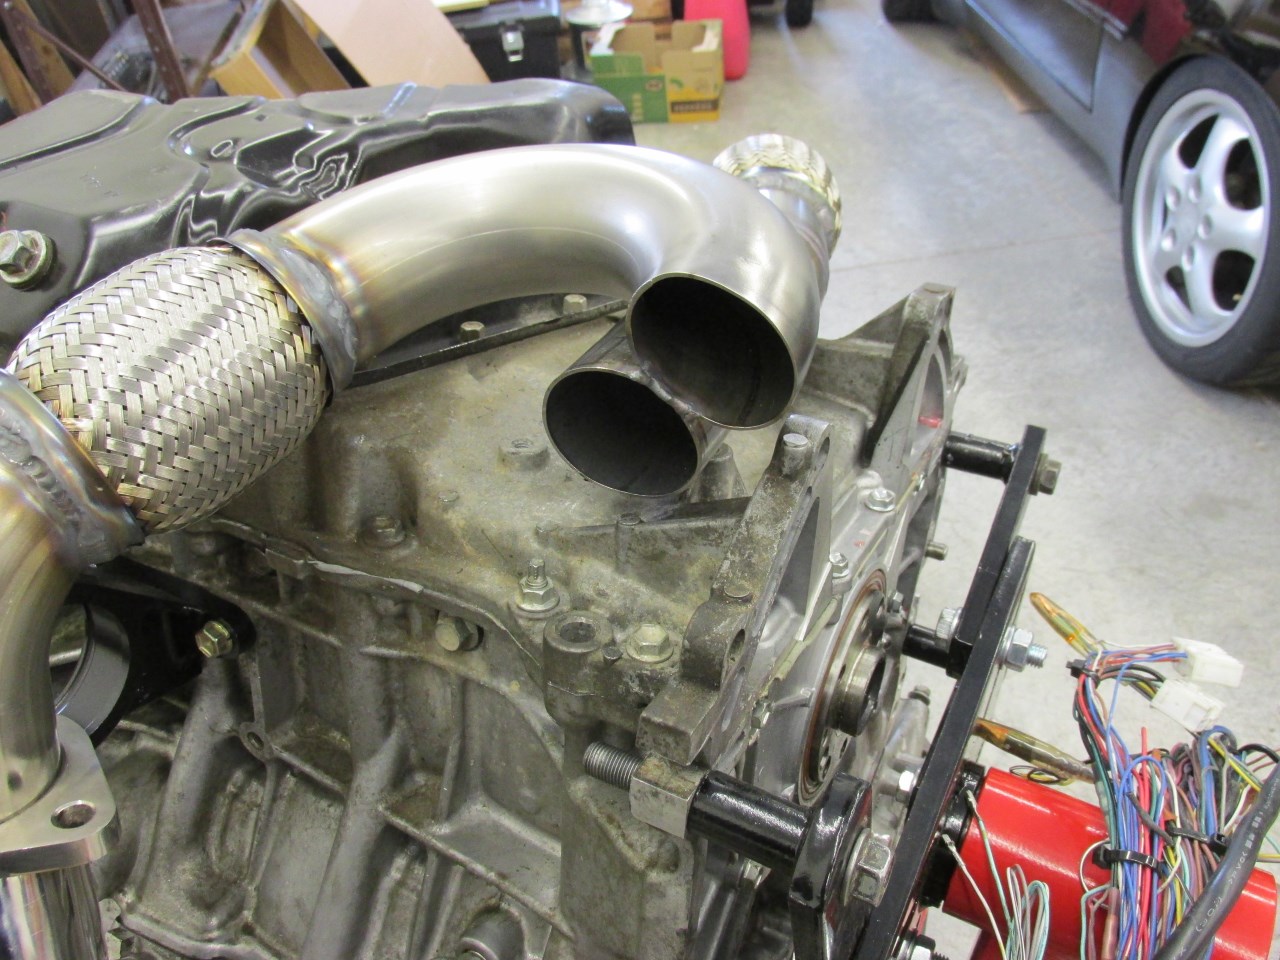
From there, I refined the design a little with the addition to two flex sections, and dimpled the pipes a little where they cross to improve ground clearance. This allowed the merge collector to be angled a little, rather than standing up vertically. Overall, there isn't a whole lot of room under the motor for the exhaust, so keeping everything as tight as possible is critical. I actually built it so that it touched the oil pan in a couple of places, which I will deal with later.
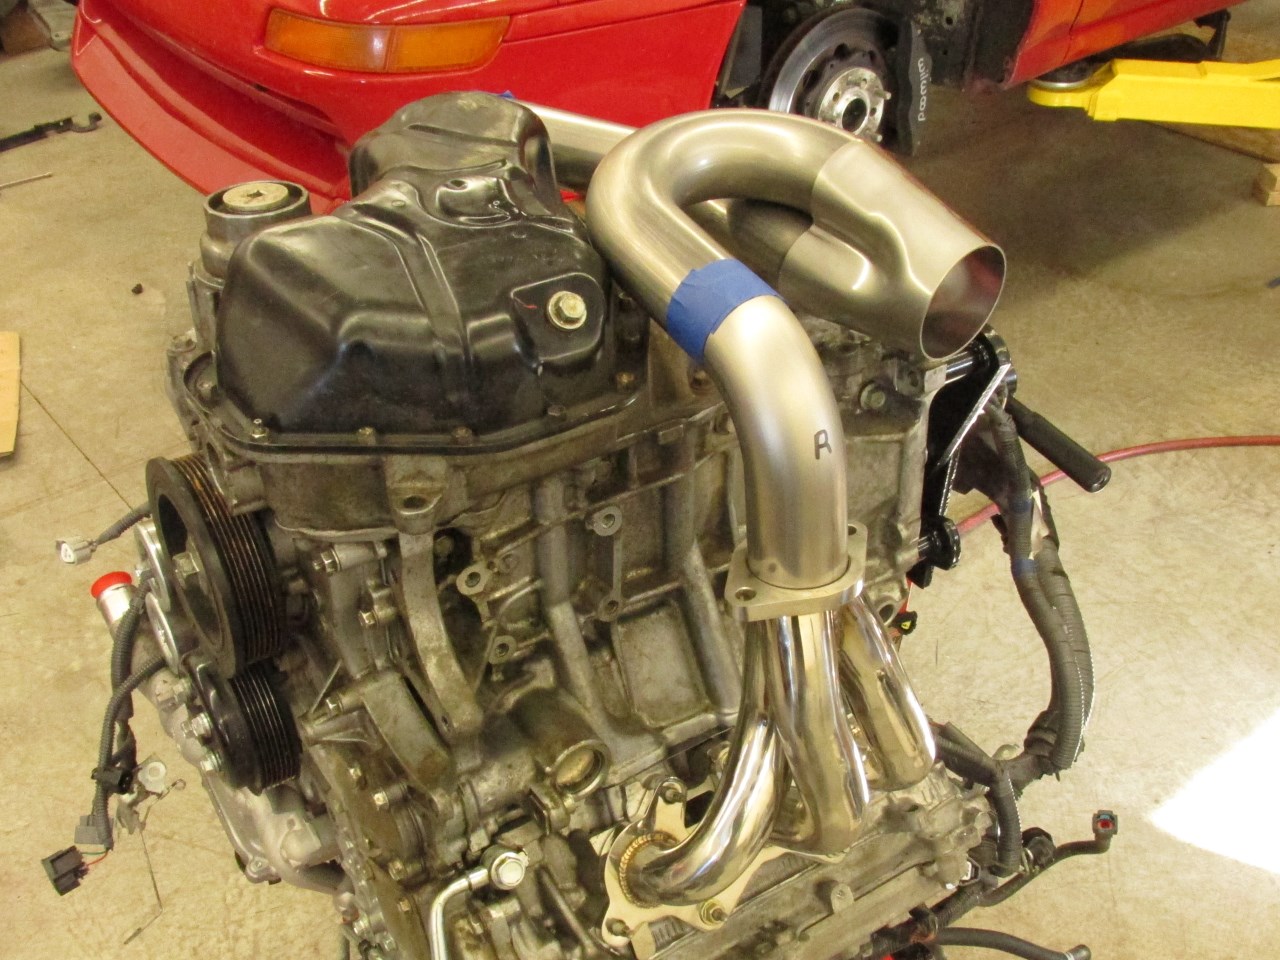
First, with the pipes on the motor I tacked all of the joints together:

Then moved them to the welding bench to finish:
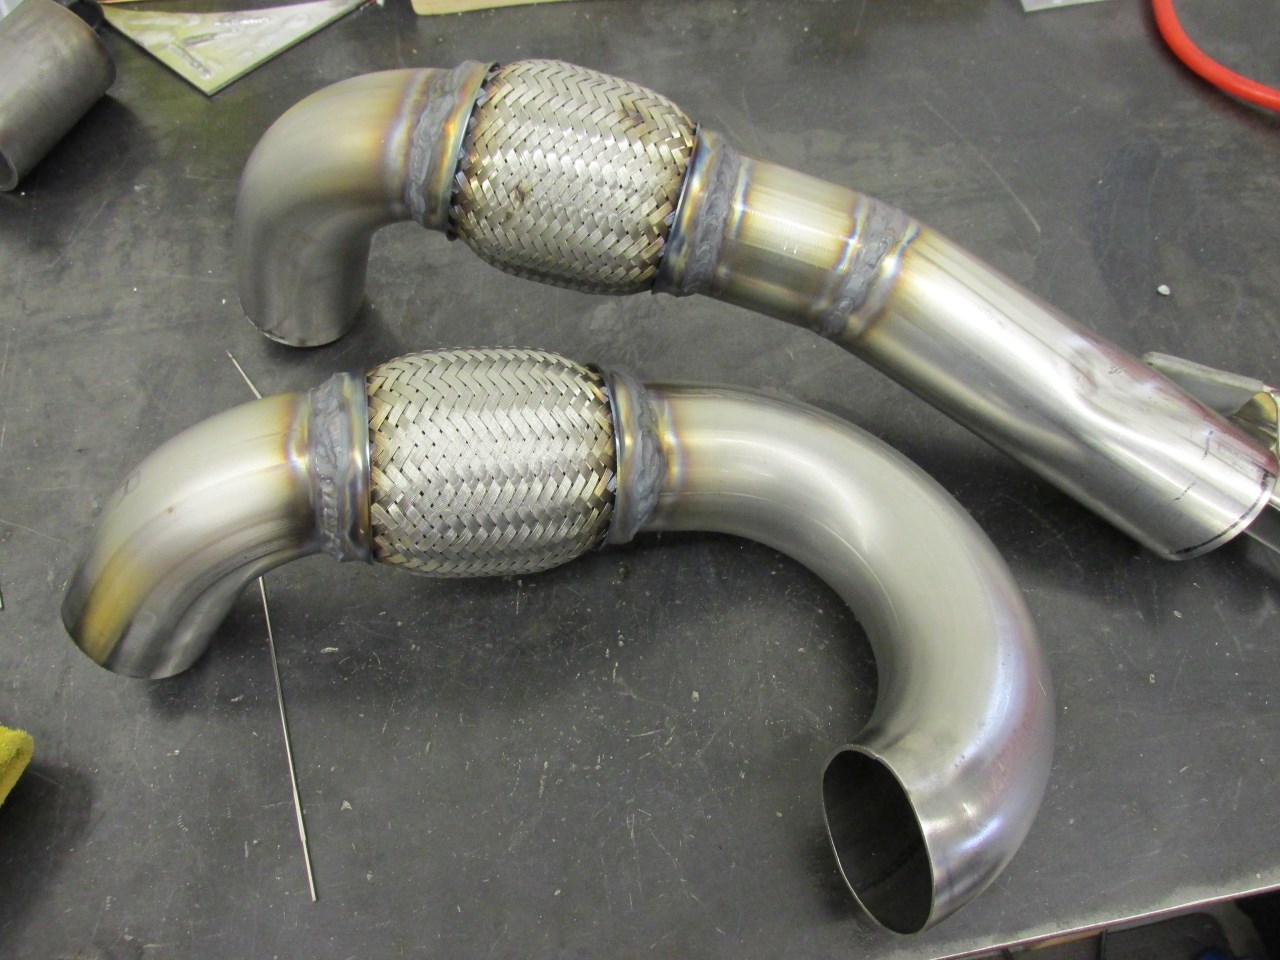
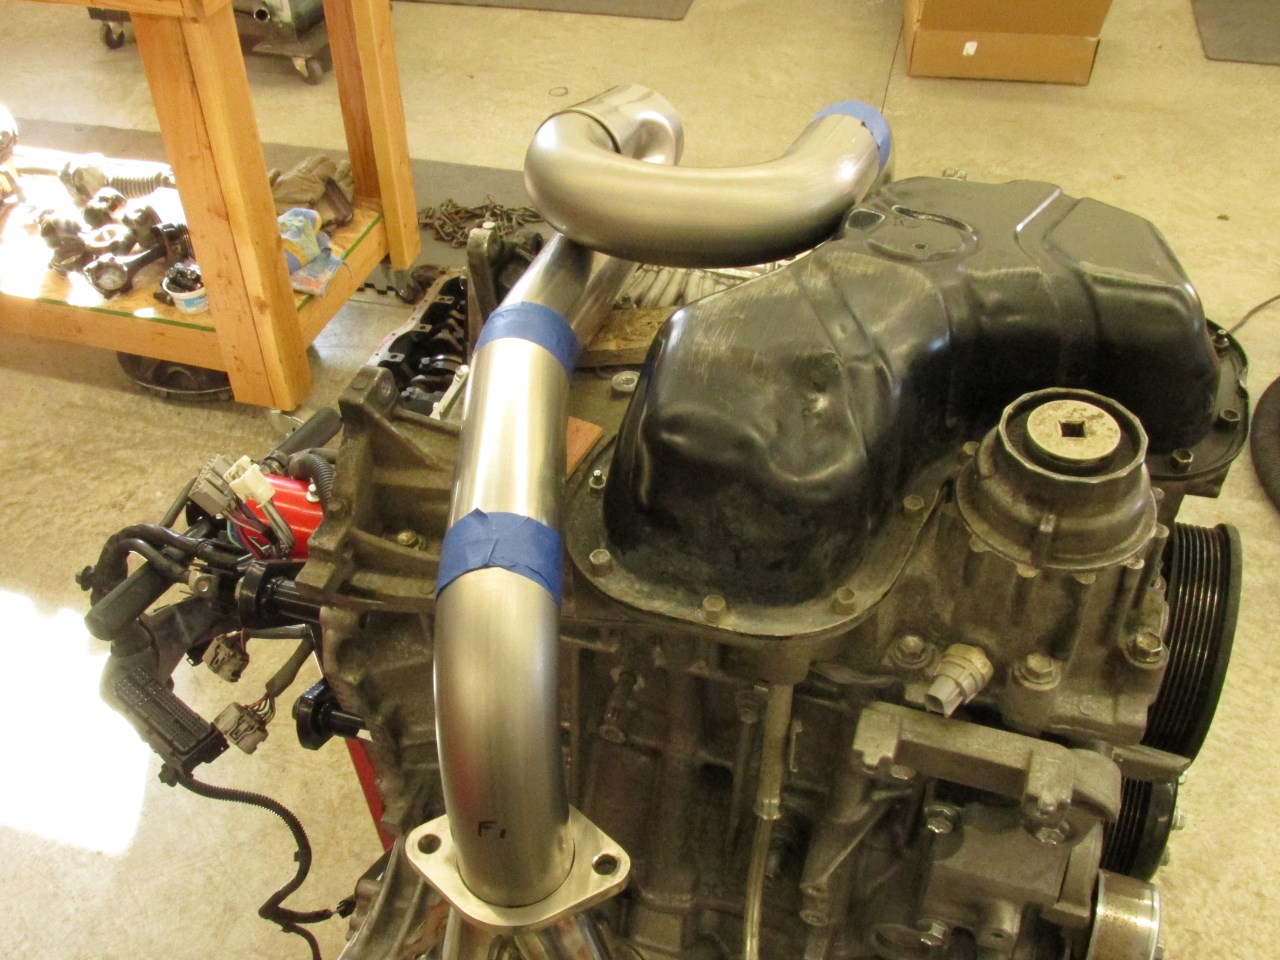
Back on the motor to weld the pipes together at the merge and tack the merge in place:
And then I fully welded the merge collector with it on the welding bench. Here it is back on the motor:
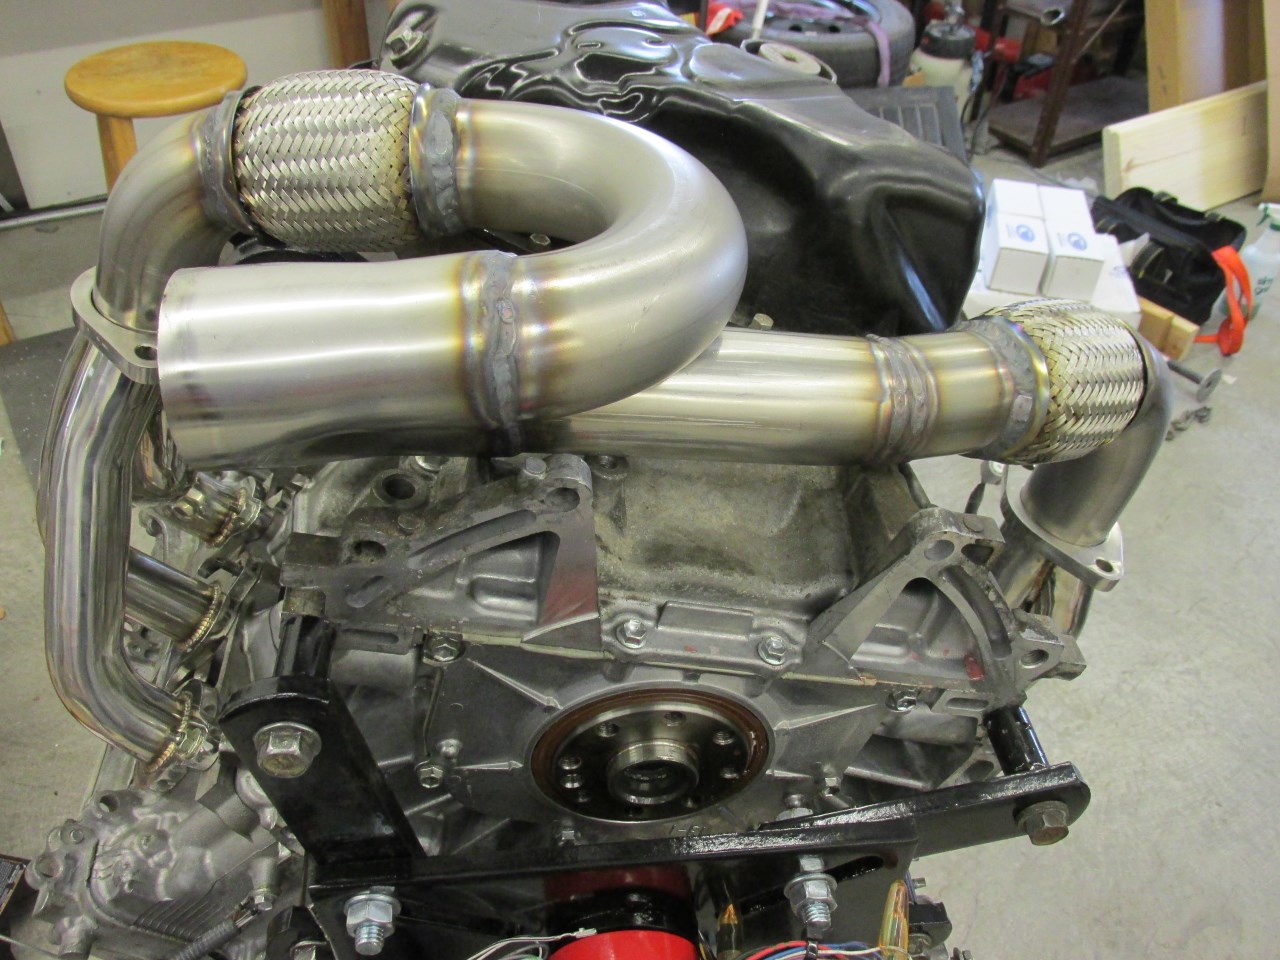
During this process I had temporarily installed the motor into the car at least once to double check clearance and angles on the exhaust. At this point, it needs to go back in to finish connecting the merge collector to the muffler section.
For this purpose, I cannibalized the mid-pipe from my Berk exhaust, rather than buying a bunch of new 3" pipe. I also added bungs for the AFR sensors at this point. Make sure you actually have room for the sensor in the location you chose, or you will end up with an extra hole in your pipe that you have to weld shut (oops, you can see my mistake in the picture below). I didn't take any pictures of the process, but the end result is below.

Finally, the last step on my exhaust was sending the headers and Y-pipe off to be ceramic coated. I used Performance Coatings in Washington. The end result looks great, and the price was, I thought, very reasonable. The color I chose is called "satin titanium".
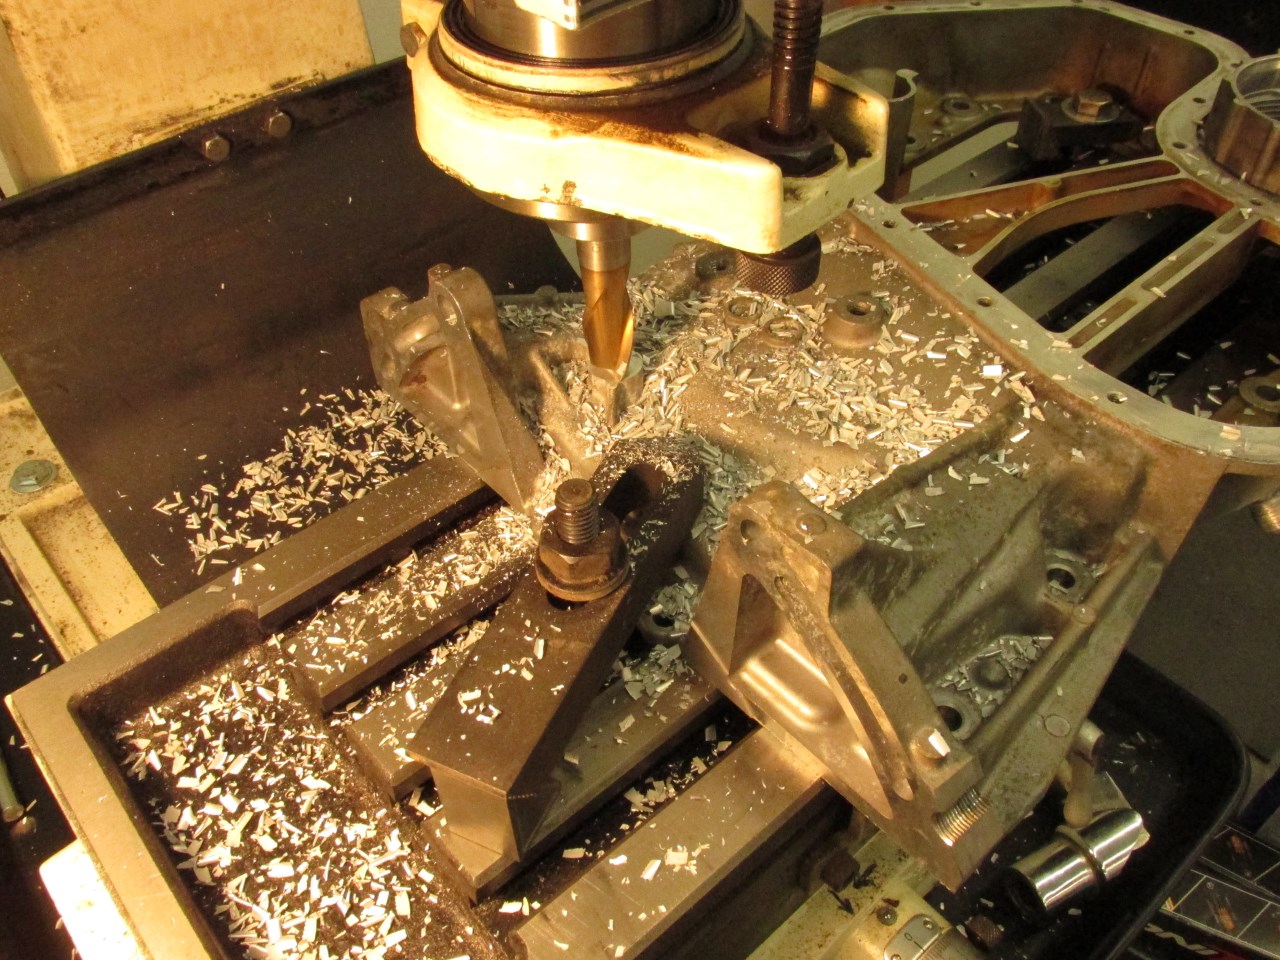
Remember I said the exhaust was touching the oil pan? Well, I had a new oil pan I had been working on for my oil cooler setup (more on that later), and while it was off the motor I clamped it down in my mill and took some material off of the ribs and one threaded boss to make more room. Had I not been swapping oil pans, I would have done this on the motor with a grinder, or maybe just designed the exhaust to sit a little lower (my production Y-pipe does NOT require this step!)
Wiring and ECU
For many, this is the most intimidating part of the whole swap. If you are in this category, there are several of companies out there that offer custom swap harnesses. I have no experience with any of them and cannot comment on their quality. If you chose to go this route, please do your research on the company you choose! If doing your own wiring, do yourself a favor and buy a selection of good quality automotive wire in various wire colors on eBay or somewhere. There are a few areas where you need to extend wires or add new ones, and being able to at least closely match the stock wire colors makes this all much cleaner. Get some good quality heat-shrink butt splice connectors as well. Bought in bulk they are pretty cheap, but they can be quite expensive at your local hardware store, so plan ahead!
The ECU in particular used to be a very tricky thing, since most 2GR equipped vehicles come with immobilizers. Finding an ECU that isn't paired to an immobilizer was expensive and or very difficult, and wiring in the immobilizer and smart-key system increased the swap complexity quite a bit. All three of those parts also had to come from the same vehicle. Fortunately, Marc at Frankenstein Motorworks has figured out how to hack the factory ECU from at least some vehicles to remove the immobilizer. He also removes all of the check engine light codes associated with the automatic transmission and emissions equipment, raises the rev limit to 7200RPM, and applies a few other small tweaks as well. Unfortunately for me, he hasn't yet hacked the Rav4 ECUs newer than 2010. Since my motor was from a 2012, that meant I had to re-pin 59 wires in the ECU connectors to match the older ECU. If you are starting with a wiring harness that matches the ECU, the wiring gets much less involved.
As I mentioned previously, I wish for this guide to be helpful, but I don't expect it to be a 100% step by step walk through. You will need to be intimately familiar with both the 2GR and the MR2 wiring diagrams in order to pull this off!
Speaking of wiring harnesses, remember how I said the Rav4 harness was the one to get? That is because the harness leaves the motor over the transmission, just like the stock MR2 harness. It also has plenty of length to reach both the stock fuse box location, as well as the stock ECU location in the trunk. To the best of my knowledge, all of the other harness options exit the motor on the other side and require wire extensions. Depending on how you wire it you may also need a new hole in the trunk for the wires. If anyone knows of another harness option that is similar to the Rav4 harness let me know.
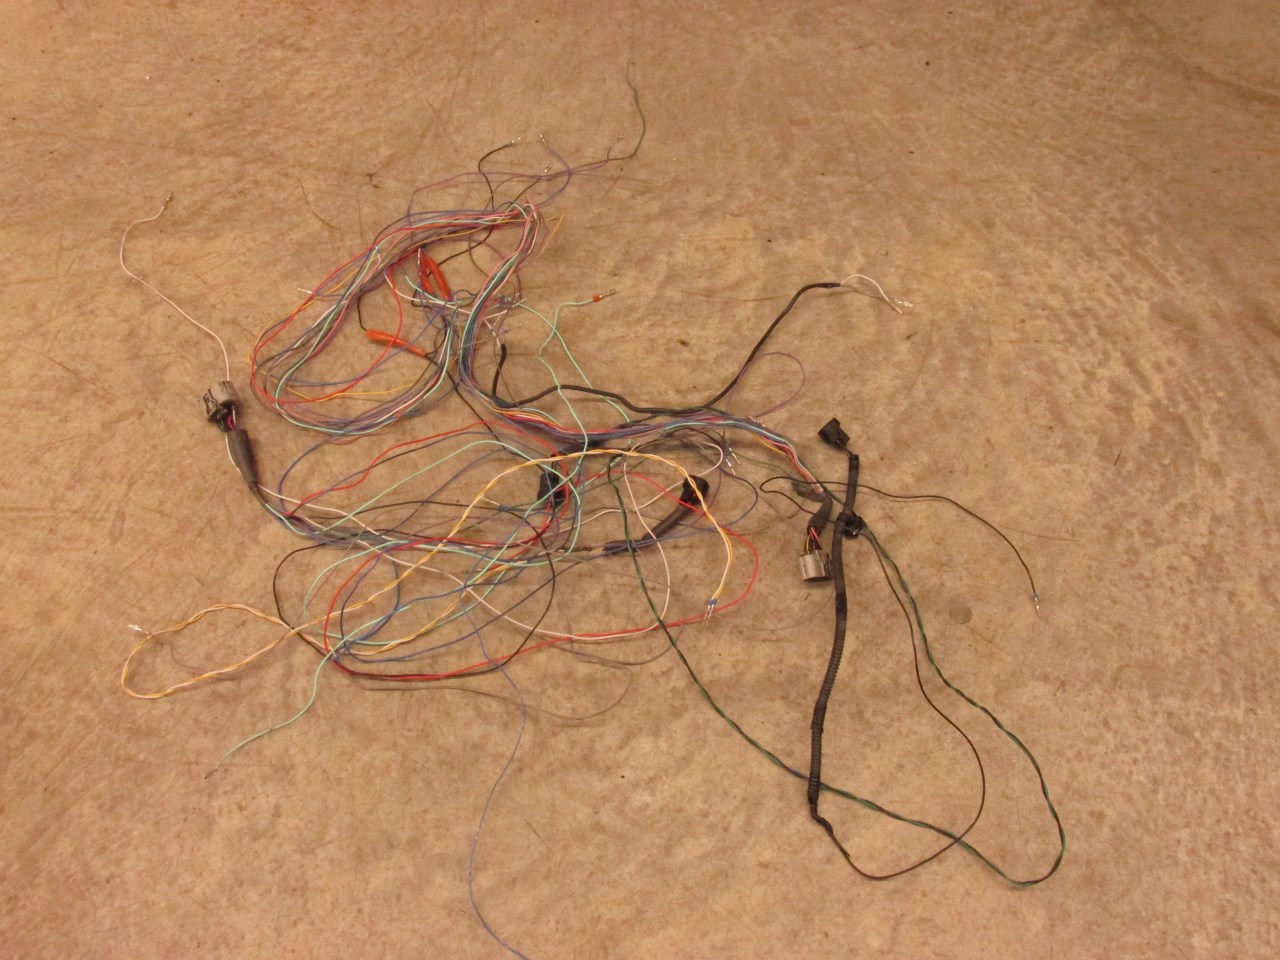
First step on the wiring is to strip the harness sheathing back to the edge of the motor and start removing wires that won't be used. This includes all of the wires associated with the automatic transmission, the secondary O2 sensors, etc. I used zip ties to keep the wires bundled in their approximate shape.
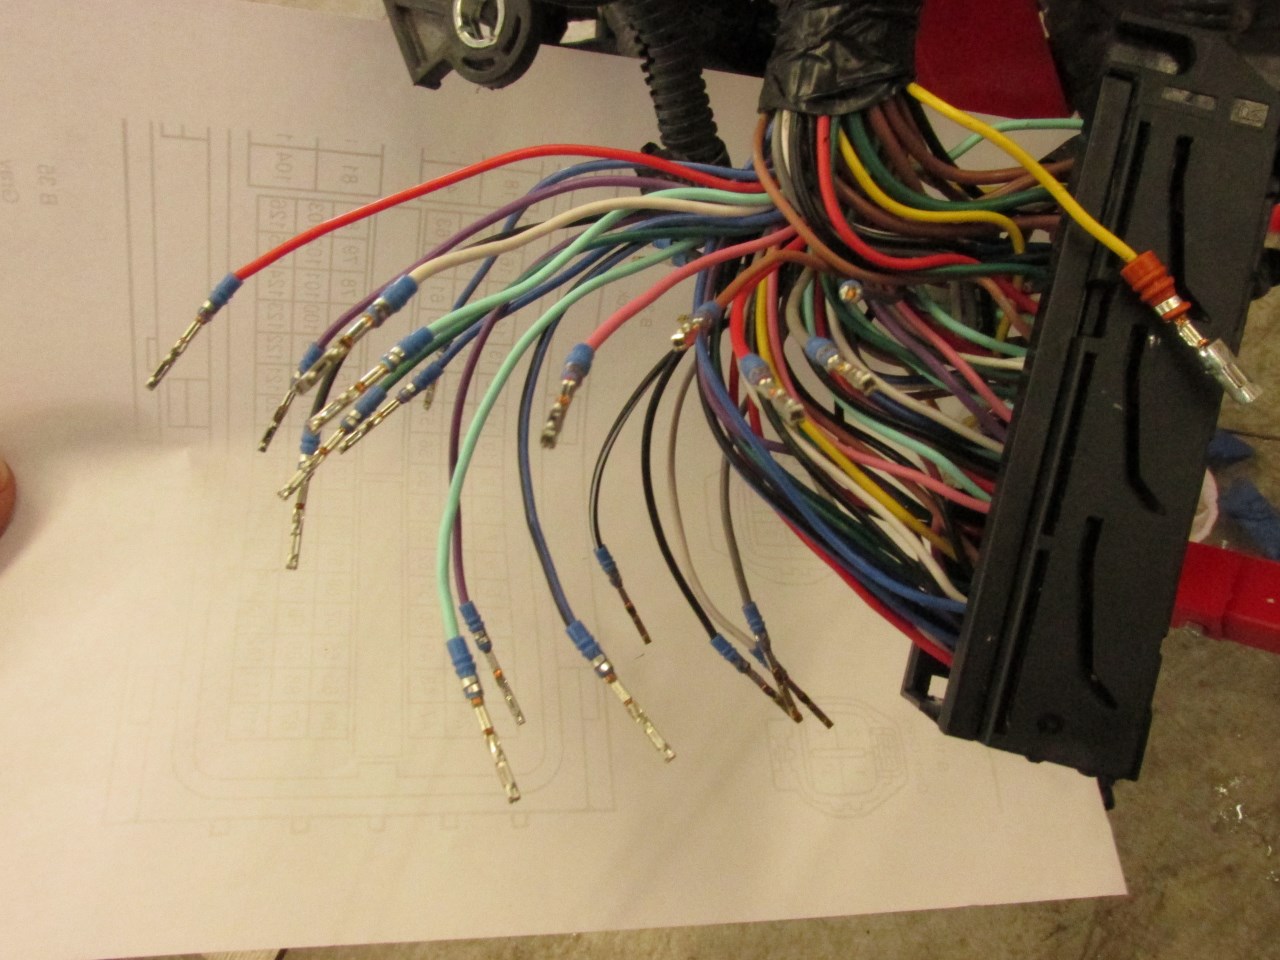
When that process was complete, the pile of removed wires looked like this:
To facilitate the wiring process and to help with re-pinning from a 2012 harness to a 2007 ECU, I created this pin-out guide for the Rav4 engine harness. If you are not having to re-pin, the "ECU Pinout" tab will be mostly just for reference, and for determining which wires to remove. The "Chassis Interface" tab is where the bulk of the swap information is found. Also please note that the answer to the question of if a particular wire is needed may be different for your swap, depending on if you plan to install air conditioning, stock 2GR emissions equipment, secondary O2 sensors, etc.
The Rav4 has three connectors where the engine harness connects to the fuse box, labeled on the wiring diagram as BA1, BA3, and BA4. The MR2 has two, EB1 and EA3. Conveniently, while the connector shells are different, the pins are the same. This means you can simply de-pin the Rav4 fusebox connectors and insert the pin into the appropriate spot in the connector shell salvaged from an MR2 engine harness. The Rav4 harness has roughly 8" of extra wire length on these wires, which can be bundled away in the harness to avoid excessive cutting and splicing.
In addition to wires that need to be re-pinned into the MR2 fuse box connectors, there are four wires that are not present in the Rav4 harness that need to be added to these connectors. These wires are for the reverse switch (2 wires), coolant temp gauge, and starter relay. Those excess wires we removed will come in handy here! Also, a wire needs to be run from the starter to the starter relay in the trunk to power the relay, same as on the stock MR2 harness. If you intend to reuse your MR2 starter then a suitable spade terminal will need to be added to the starter end of this wire (or salvage this wire from an MR2 harness). Alternately, the starter from a 2GR equipped vehicle is a direct bolt-on to the E153 transmission, and is both more compact and about 4lb lighter than the MR2 starter. If you go this route, reuse the starter solenoid wire from the 2GR wiring harness with it's connector on the starter end. You will also need a rubber boot to cover the end of main power cable.
One note: the air fuel ratio (AFR) sensors on the 2GR draw a lot of power. On the Rav4 they are powered by their own 20amp fuse and relay. On the MR2 the stock intercooler fan wiring circuit provides a perfect substitute for this. Simply splice the two AFR sensor power wires together and connect them to the appropriate pin in the fuse box. Inside the fuse box the trigger for the fan relay needs to be rewired to the main relay so that it turns the AFR sensors on when the engine is running.
Lastly, the main power wire from the alternator needs to be shortened and a new ring terminal crimped onto the end. You will definitely want to have the motor in the car at this point to make sure you get the length right.
On to the connection in the trunk between the body harness and the ECU / engine harness. On the MR2, this consists of the EA1 plug between the body harness and the engine harness, and the plug on the ECU where the body harness connects. On the 2GR, all of these wires connect to the ECU. I chose to take the body harness apart in this area, cut the plugs off, and splice on my small ECU plug pigtail. One note here: if your car has power steering you will need to provide it with a signal that the engine is running, otherwise it will run all the time. I spliced mine into the fuel pump circuit, since the ECU only energizes that when the engine is on. The end result looks like this:
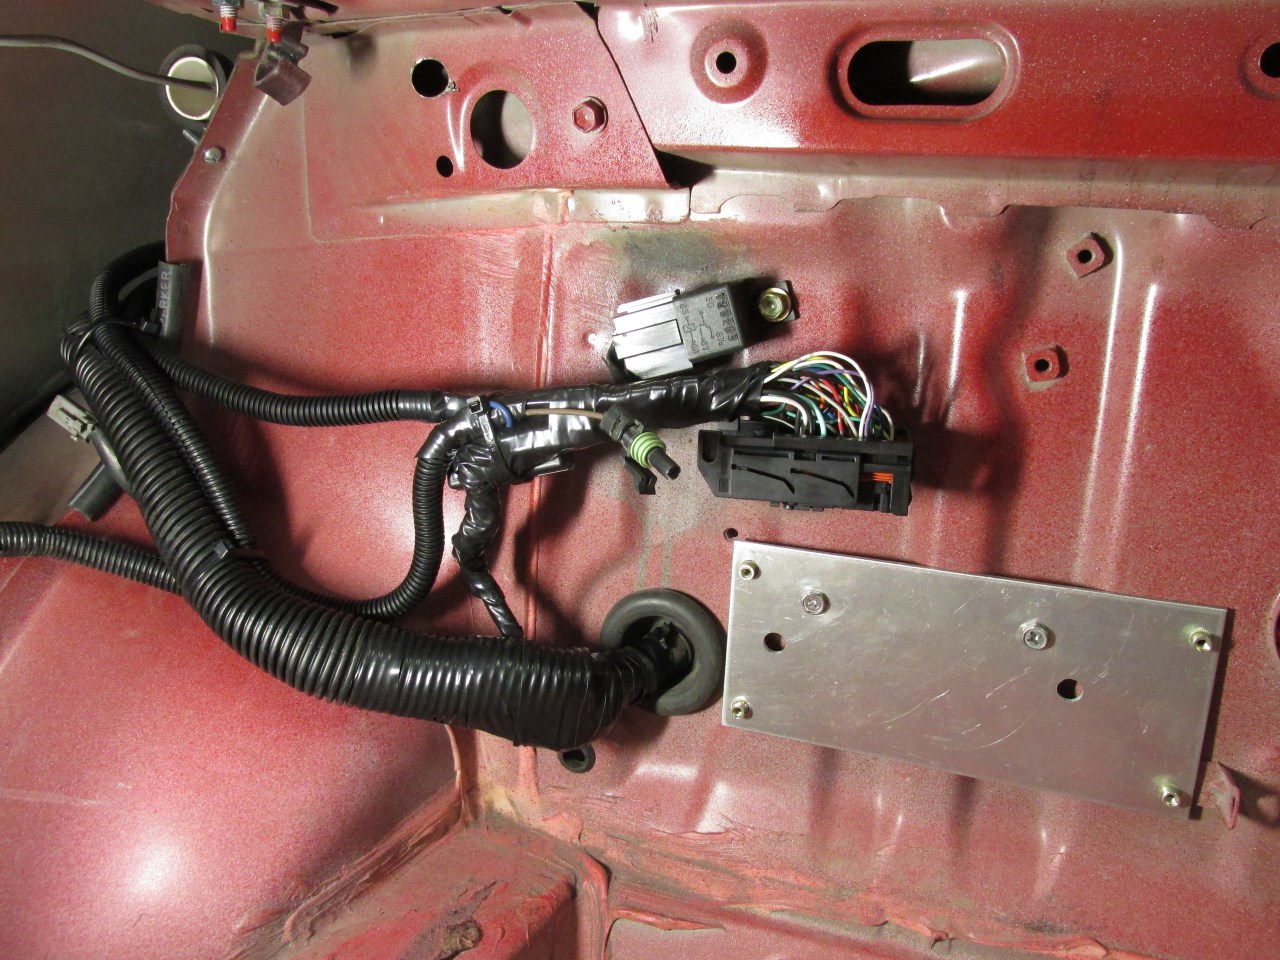
The ECU mounting bracket that I made is simply a piece of aluminum with four rivnuts installed backwards. This allows them to act as a spacer as well as a thread. Unconventional, but effective. The brown wire with the weatherpack connector is a ground for the OBD2 connector, and is supposed to ground directly to the engine. I do not know If this is completely necessary for basic OBD2 functionality. The extra relay is for the brake circuit. The 2GR ECU expects a signal on one pin when the brakes are applied, and a signal on a different pin when they are not applied. Since the stock MR2 circuitry supplies only the former, a relay was added to supply the later. This is not necessary for basic swap operation, but I have been told is required for the cruise control to work. I have not tried without it.
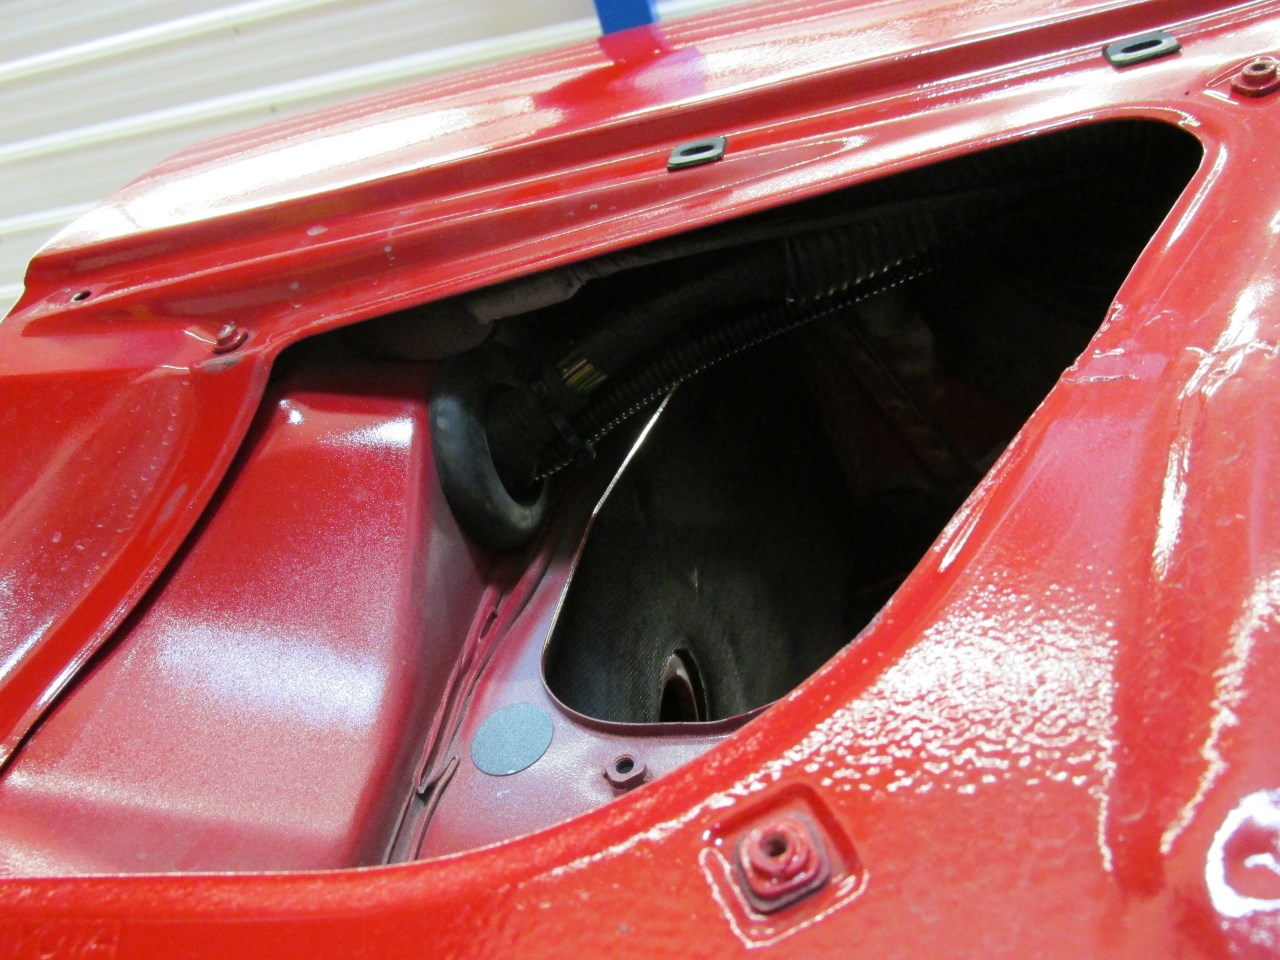
Note that my body harness has been run through the fender instead of through the engine bay. Sort of a "mini" wire tuck, since the fuse box is still in the engine bay. This also requires a hole be drilled in the firewall above and forward of the side vent to run the wire through. The harness there looks like this:
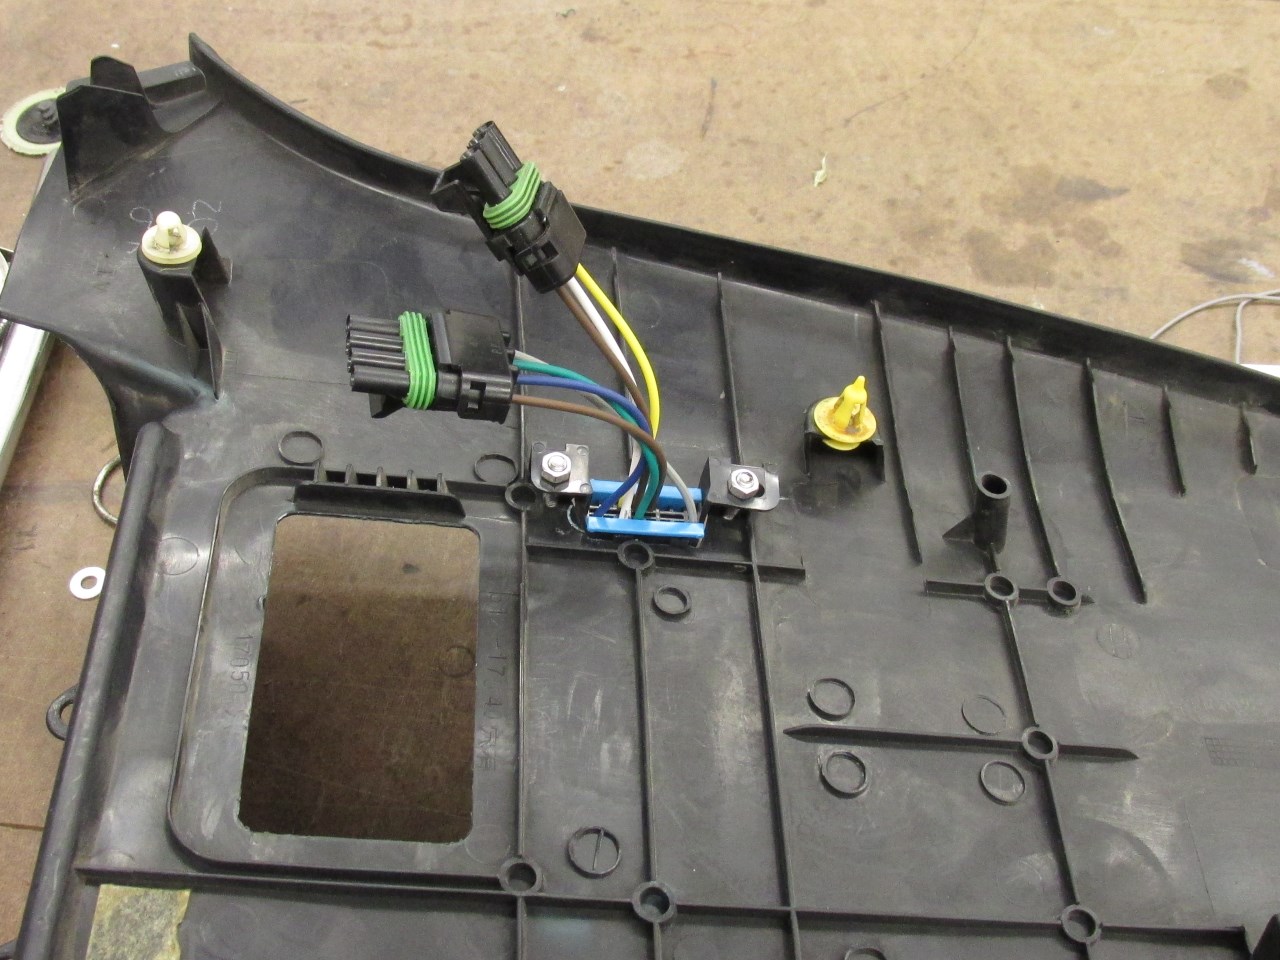
The last two steps in the 2GR wiring process are the electronic throttle pedal and the OBD2 port. The throttle pedal requires six wires be run from the ECU into the cabin. While you are at it, run a wire for cruise control. Thanks to the drive by wire throttle body on the 2GR, adding cruise control is nothing more than one wire and a switch with some resistors. You can either modify the stock cruise control switch, or install a secondary switch and push button as I did. More details on the cruise control setup can be found here on the MR2OC forum. Mounting the throttle pedal is made simple by another Frankenstein Motorworks product. However, it only works with certain pedals, and not the Rav4 pedal that came with my motor. I purchased a Camry pedal (Toyota p/n 78110-07011) off eBay for $38 complete with wiring pigtail. I sold my Rav4 pedal on eBay for $60, so that was a win!
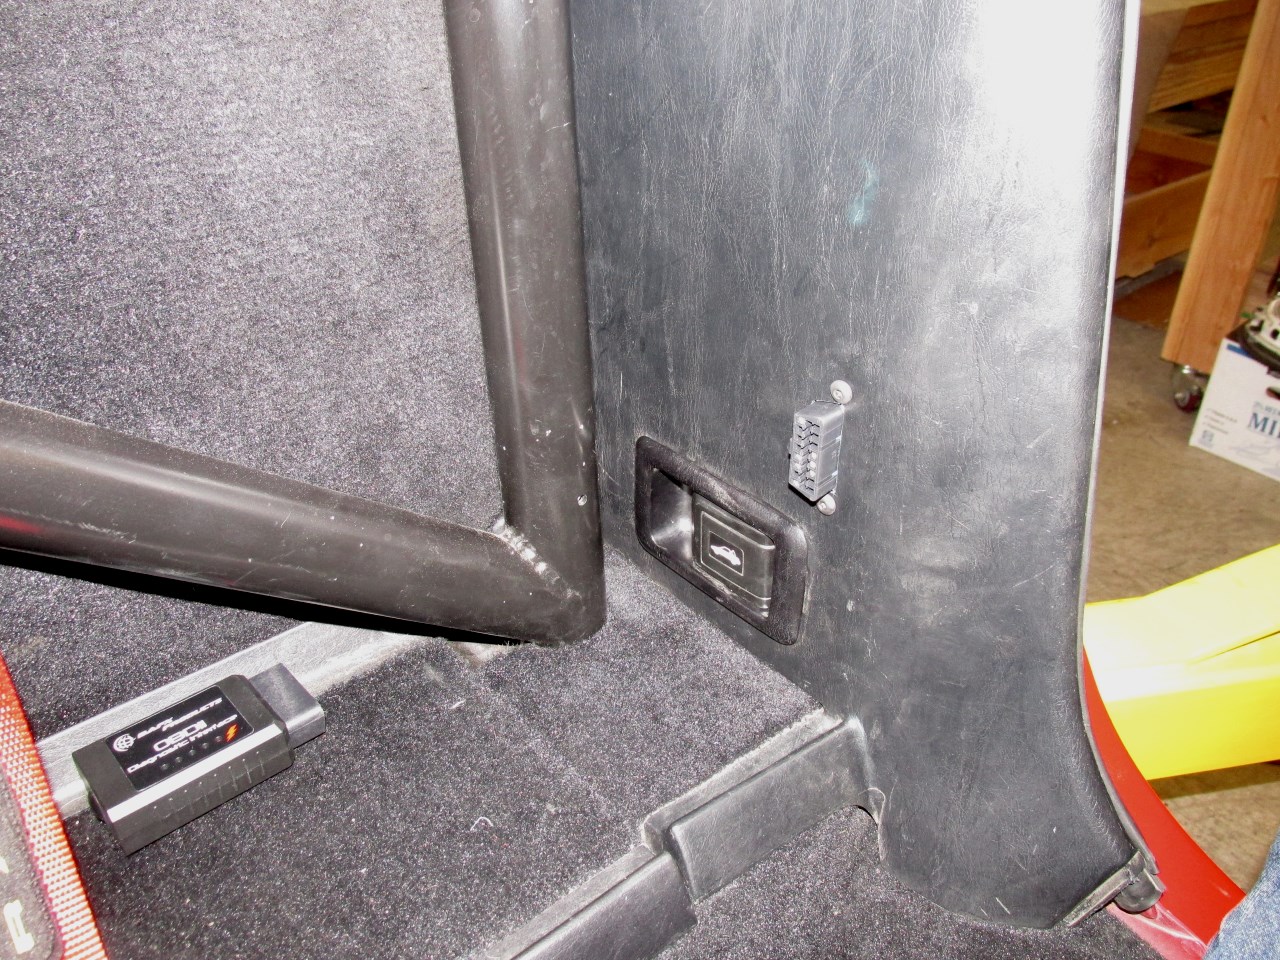
I installed my OBD2 port in the panel behind the drivers seat, next to the engine lid release. Convenient, yet out of the way. I ran all of the wires associated with the OBD2 port, although for basic OBD2 functionality only the CAN buss wires and ground wires are required. The CAN buss wires are supposed to have a 120ohm resistor between them. Some OBD2 scanners won't work without it, others seem to be OK.
Two other items that fall into the wiring category AFR sensors and the MAF sensor. If your motor came with them, great! If not you will of course need them. There are a wide variety of AFR sensors that are used by the 2GR in various applications. They range in price from ~$50 each to ~$120 each, and as far as I can tell the only difference is the application they are specified for, and the length of the wire. Functionally they are identical. I used Denso #2349008, which is one of the cheap ones. The only downside is the wires are a little too short to reach the Y-pipe. There are extension cables on the market that will solve this problem (#109206 from Caster Electronics is one I have heard of people using). I chose to just splice longer wires onto the sensors. For the MAF sensor, there are many part numbers and as far as I can tell they all seem to function the same. I initially bought a cheap ($22, though advertised as Denso / OEM) MAF off of ebay, and later spent more on a Denso from Rock Auto. Both provided the same readings, so I say get the cheap one.
Cooling System
This portion is relatively straight forward. Frankenstein Motorworks (again!) offers a modified coolant outlet neck with a provision for the filler port and temp sensor for the stock MR2 gauge. It also allows the stock coolant hose to be used to connect to the firewall.
I, on the other hand, chose to make my own, and went through a couple of iterations in the process. I started with a stock style setup, adding a port to connect to the firewall filler.

I welded shut both the heater core port and the throttle body coolant port. My car is primarily a summer car, and my heater is plumbed into the main coolant pipes at the front of the car. It takes a while to warm up that way, but works well enough for my purposes. I also removed the water bypass pipe from the middle of the V, and welded those ports shut. The installed result is shown below. This step is certainly not needed, and in fact not recommended for most street cars.

I had previously modified my firewall coolant pipe as shown below. You can also see my fuel filter mounted stock regulator, my first fuel system iteration. More on that later.
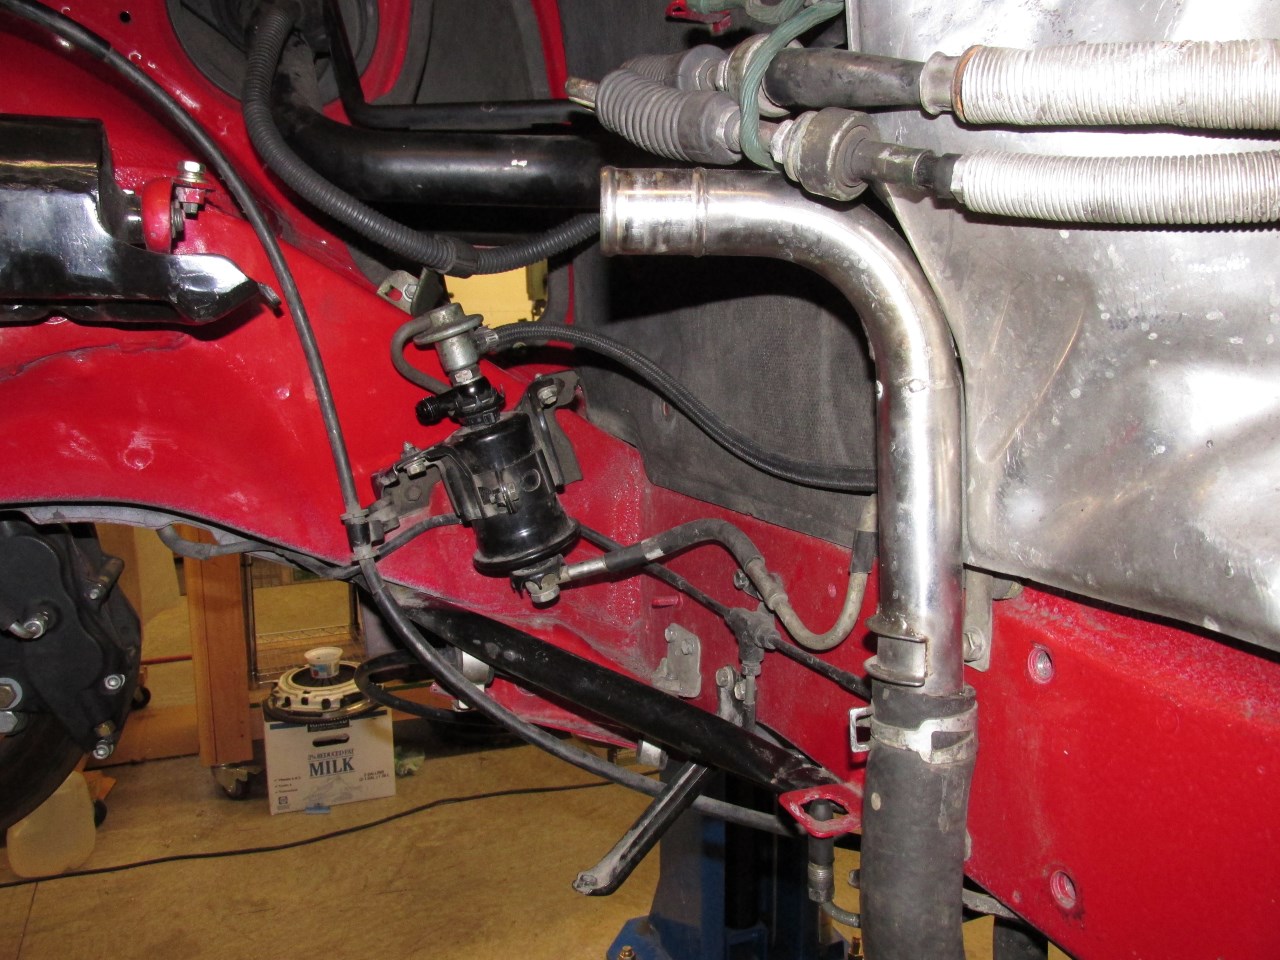
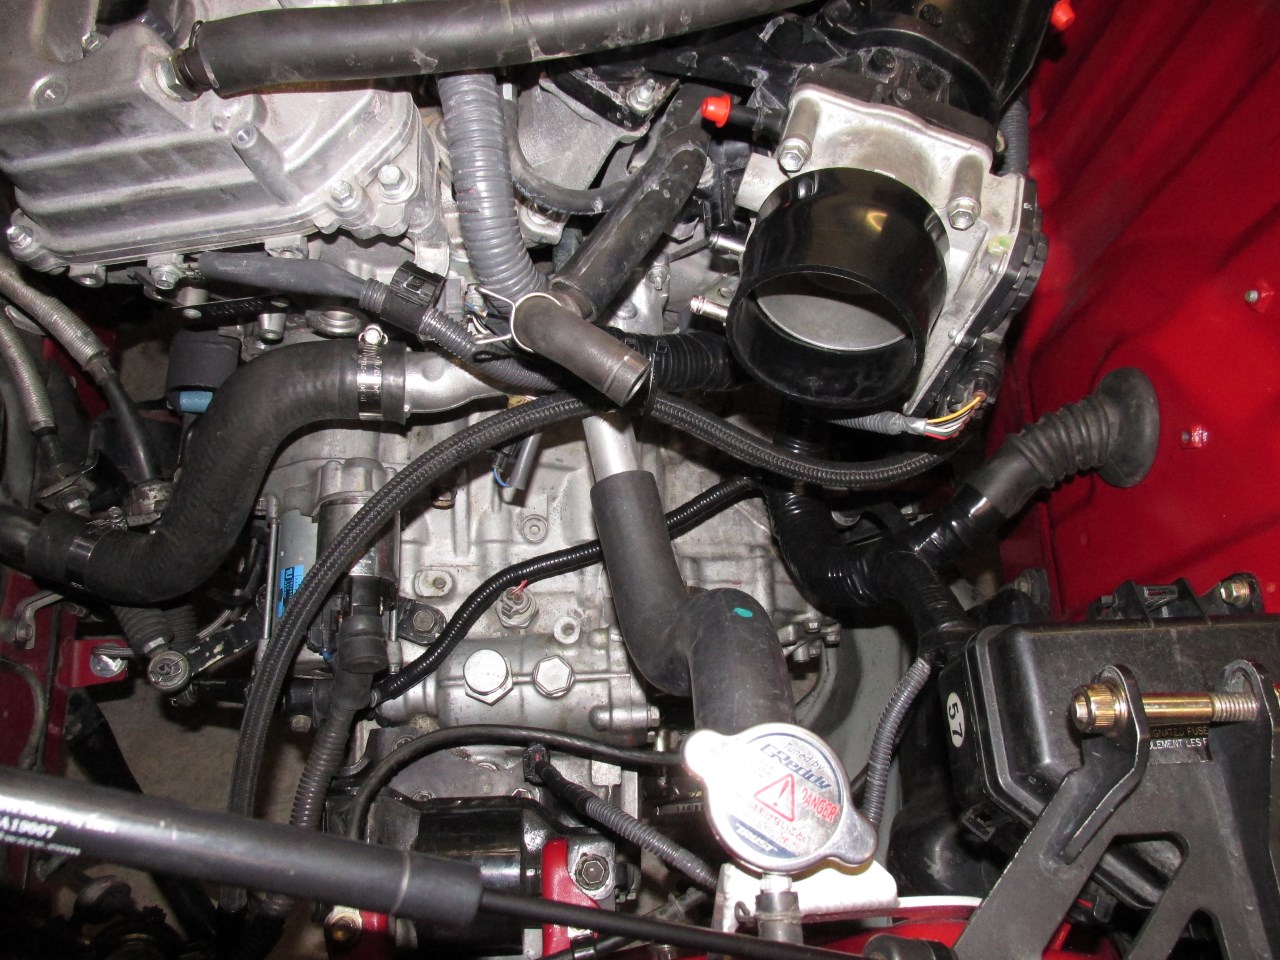
This setup works even better with the 2GR swap than it did on my old 3S setup. Combined with an S-bend coolant hose (Gates #21186), it makes for a very clean installation.
On the right hand side of the car, a Gates #21701 hose, trimmed to fit, works perfectly to connect to the stock water pipe on the firewall.
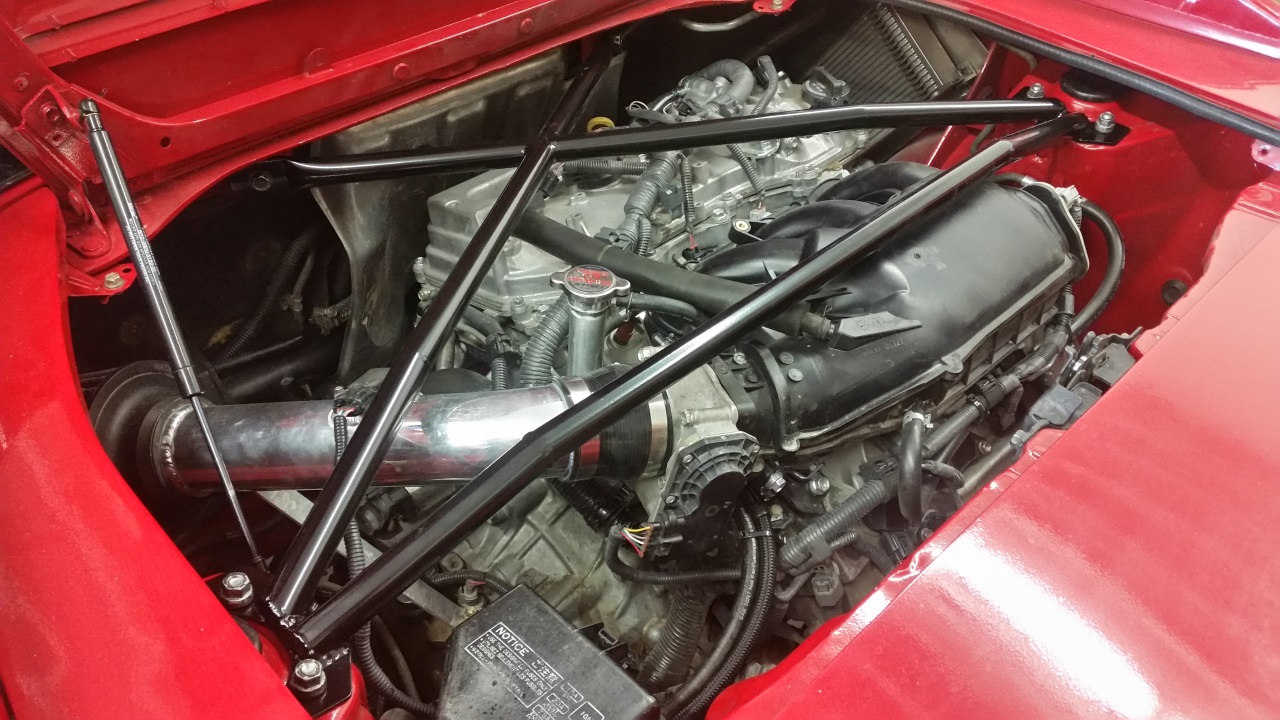
Not long after getting the swap running I decided I wanted to make a new strut tower brace, and to make that process easier I decided to move the coolant filler port so that it mounted directly on the water neck. The result of that little project is below:
Fuel System
The 2GR requires a "returnless" fuel system. For us, all that means is we need to supply the motor with a fixed fuel pressure, with the return from the fuel pressure regulator before the fuel rail, rather than after. I went through several iterations here before finding a setup I was truly satisfied with.
The first was using a stock 3SGTE regulator as mentioned previously, modified to mount on the fuel filter. This was a holdover from my 3S, where I had run that setup for a couple of years. However, once I got the swap running I ended up with some lean error codes that I initially attributed to the 3S regulator outputting a lower pressure than the 2GR was expecting. In hind site this may not have been the real cause, but it led me to setup number two:
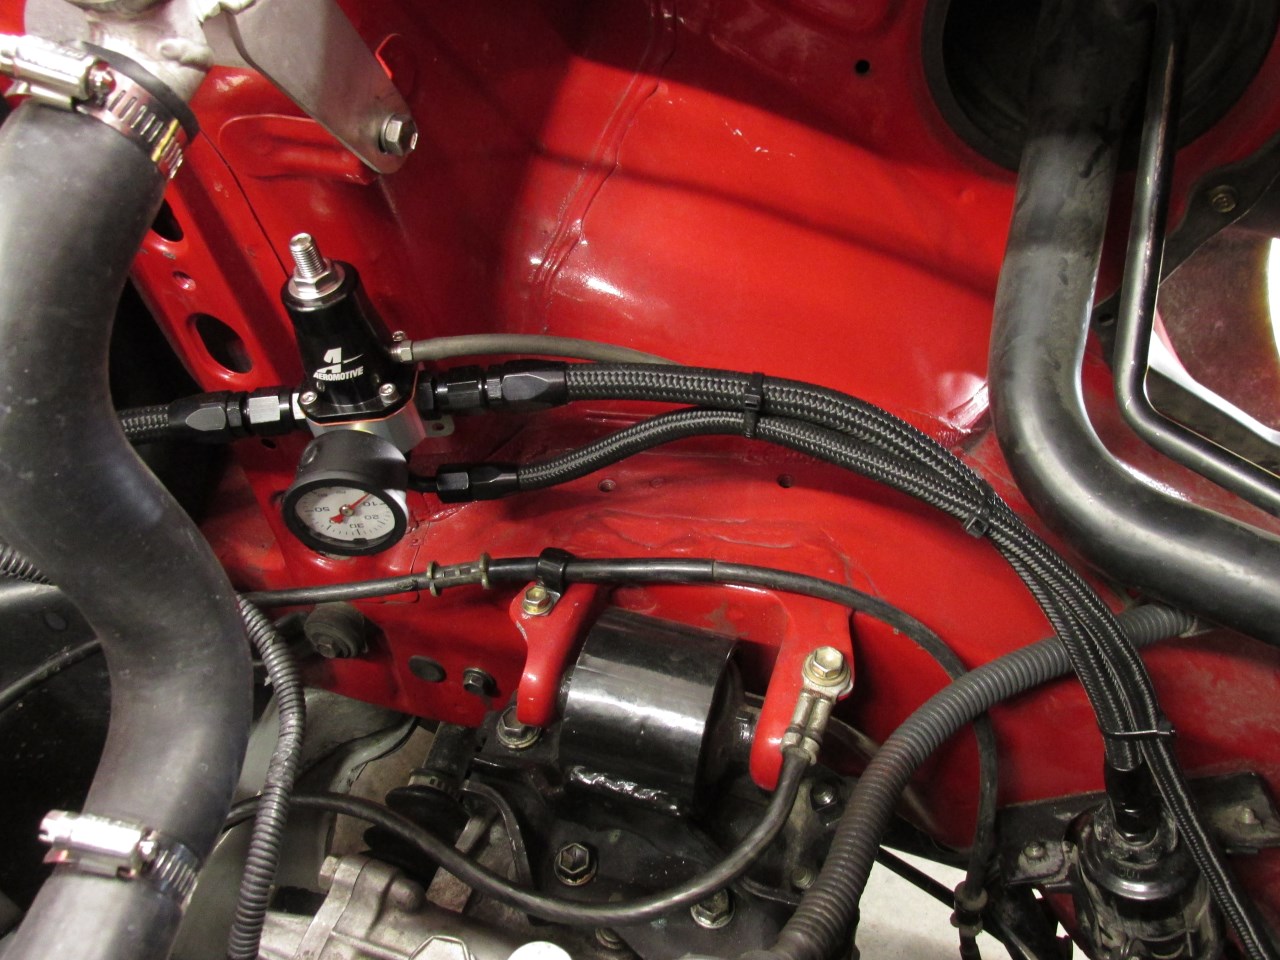
This setup worked OK, except that I wasn't happy with how the Aeromotive regulator immediately bled off pressure when the fuel pump shut off. This was causing excessive cranking on hot starts, leading me to search for a regulator that would prevent this pressure drop. It also cluttered up the engine bay a little bit.
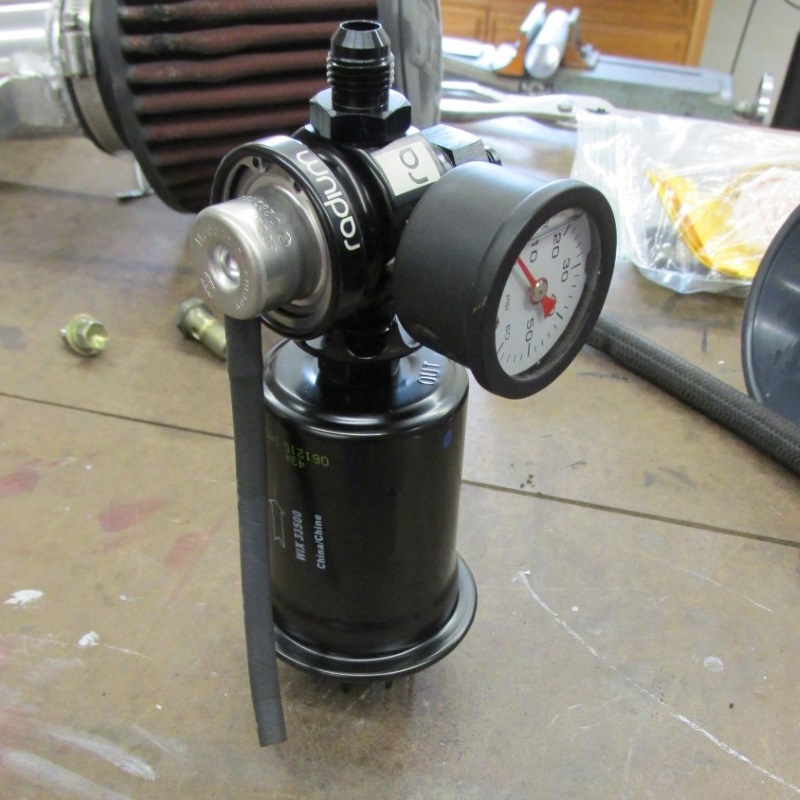
Finally I found the Radium Engineering fuel pressure regulator, which consists of an OEM Bosch regulator inside a custom housing. To mount it, I modified an M12x1.25 to -6AN adapter into an M12x1.25 to -6an o-ring adapter, a fitting that as far as I can tell wasn't commercially available until now. This allowed me to mount the regulator directly on the stock fuel filter for a much cleaner and simpler installation. This seems to have solved the hot-start issue, and overall I like the setup better than any of my previous versions.
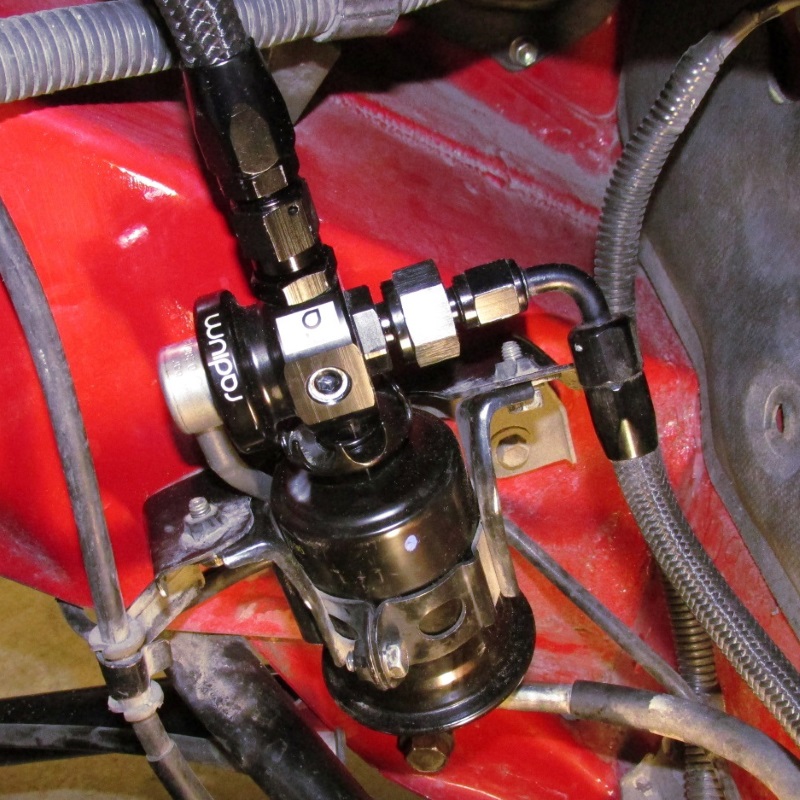
Between the filter and the engine, a P-clamp secures the fuel line to the strut tower. On the engine end, I salvaged the quick disconnect fitting from the stock 2GR fuel line, and installed it in the end of my nylon braided fuel line with a hose clamp. The stock fuel line snapped into a plastic clip just behind the throttle body for support. I removed the plastic clip and installed an M6 rivnut in it's place. This allowed me to P-clamp the fuel line near the fuel rail to keep it from flopping around and over time stressing and potentially breaking the plastic fuel rail. I have since then switched this to an AN quick disconnect fitting and a 90 degree hose end on the fuel line. I now offer a complete bolt on fuel system for your swap.
Intake
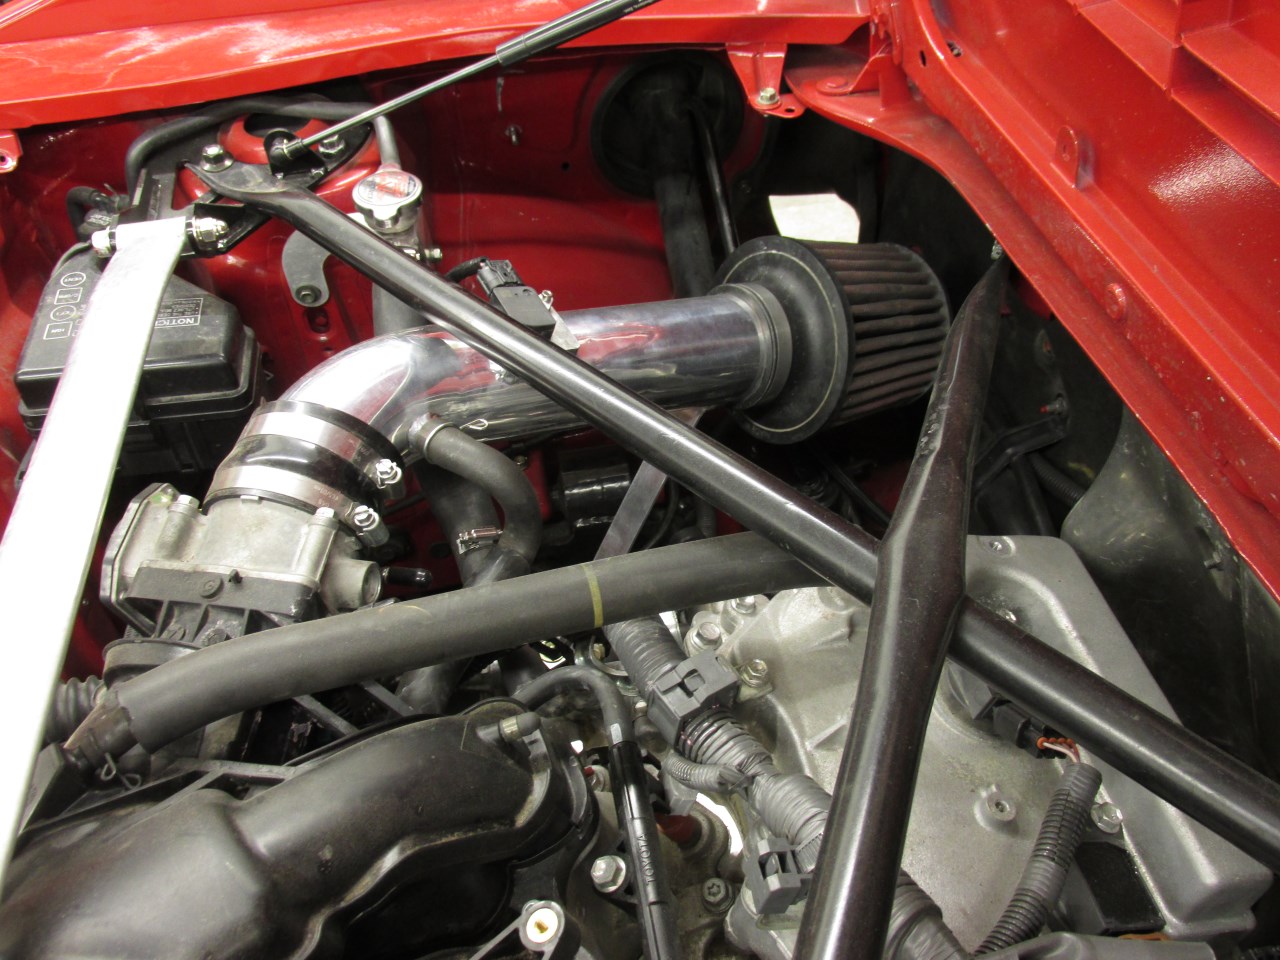
The intake has been a source of a surprising amount of headache on the swap. Initially I purchased and modified an intake off of eBay, sold for a 2GR equipped Camry. This came with a 3" pipe, and produced substantially high positive fuel trims, as well as persistent system lean and MAF sensor error codes (P0171, P0174, and P0101). The addition of a honeycomb flow straightener to the pipe helped significantly, though the fuel trims were still higher than I would like. Ultimately I ended up building my own intake using 2.75" pipe instead, and this has produced fuel trim values much closer to 0. But there are some who are running 3" intakes without issue. This topic is covered in much more detail on the forums, both in my own swap thread and also in this thread dedicated to the subject.
To keep the intake nice and secure I built a brace from 1"x1/8" aluminum bar that attaches to an unused bolt hole on top of the transmission. It is finished off with an AEM Dryflow filter. I strongly recommend NOT using a K&N for two reasons. One, the oil can cause issues with a MAF sensor. Two, they just don't filter very well.
The intake "problem" has now been solved my Marc @ Frankenstein Motorworks with his custom MAF pipe and matching ECU tune. It's also worth a few extra horsepower. See this article for more details.
Oil Cooler
This step is above and beyond the basic swap. If you purchased a motor with the factory oil cooler that should be more than sufficient for any street use, and even for some moderate track use. Even a motor without the oil cooler should be fine for a street car. However, if you do want to add an external oil cooler, this is how I went about it.
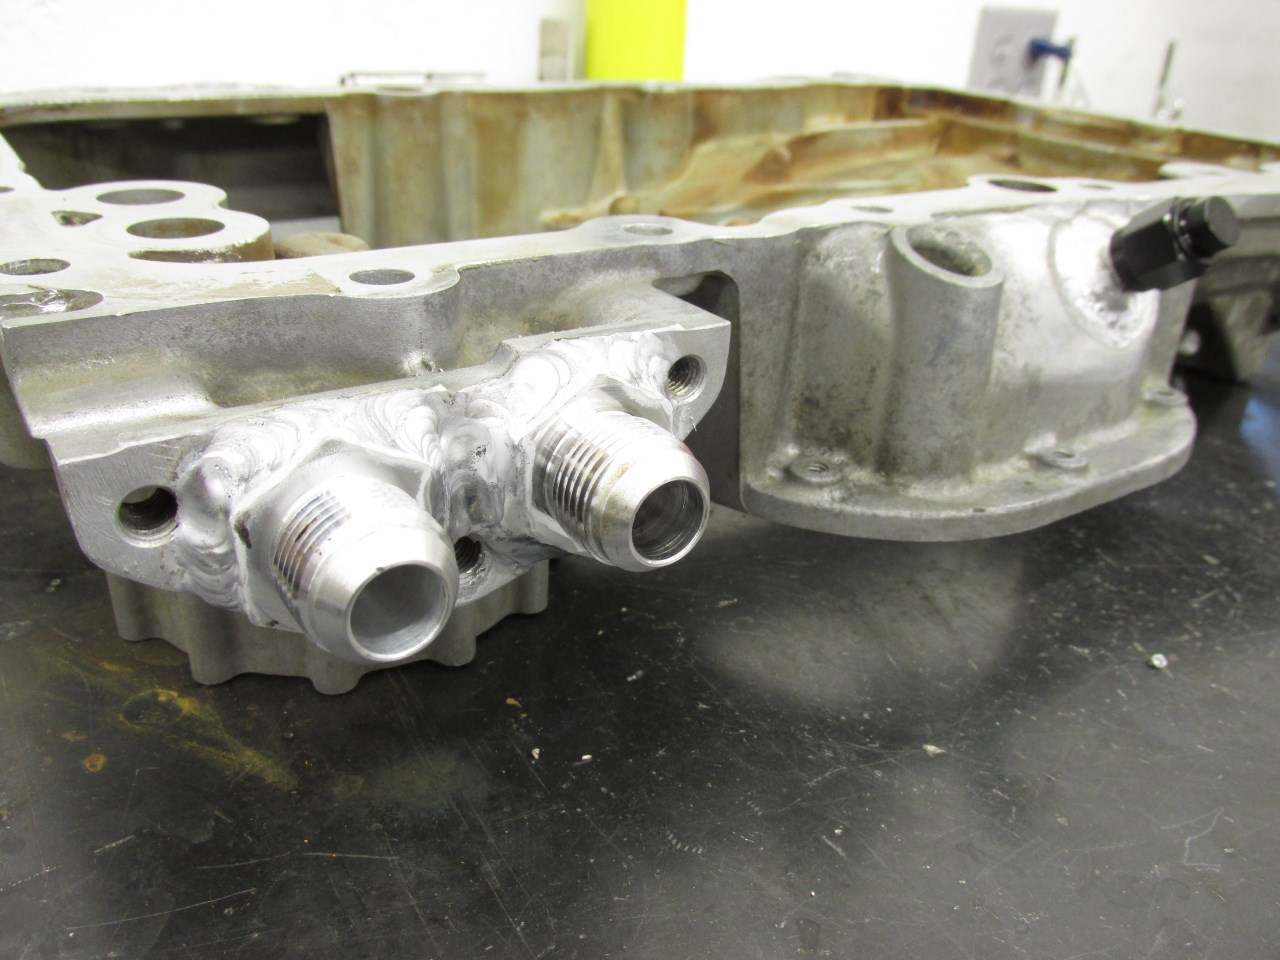
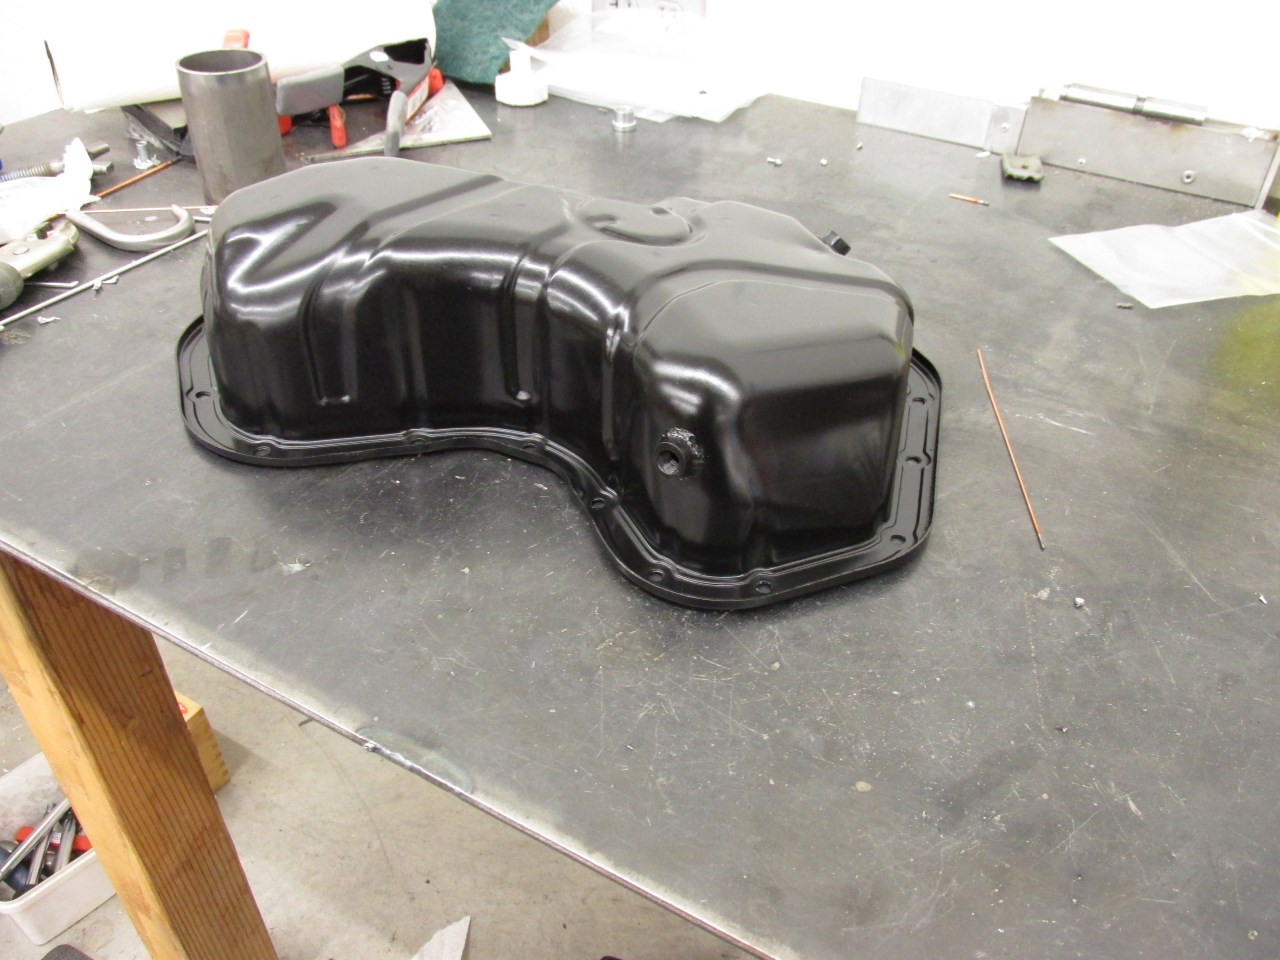
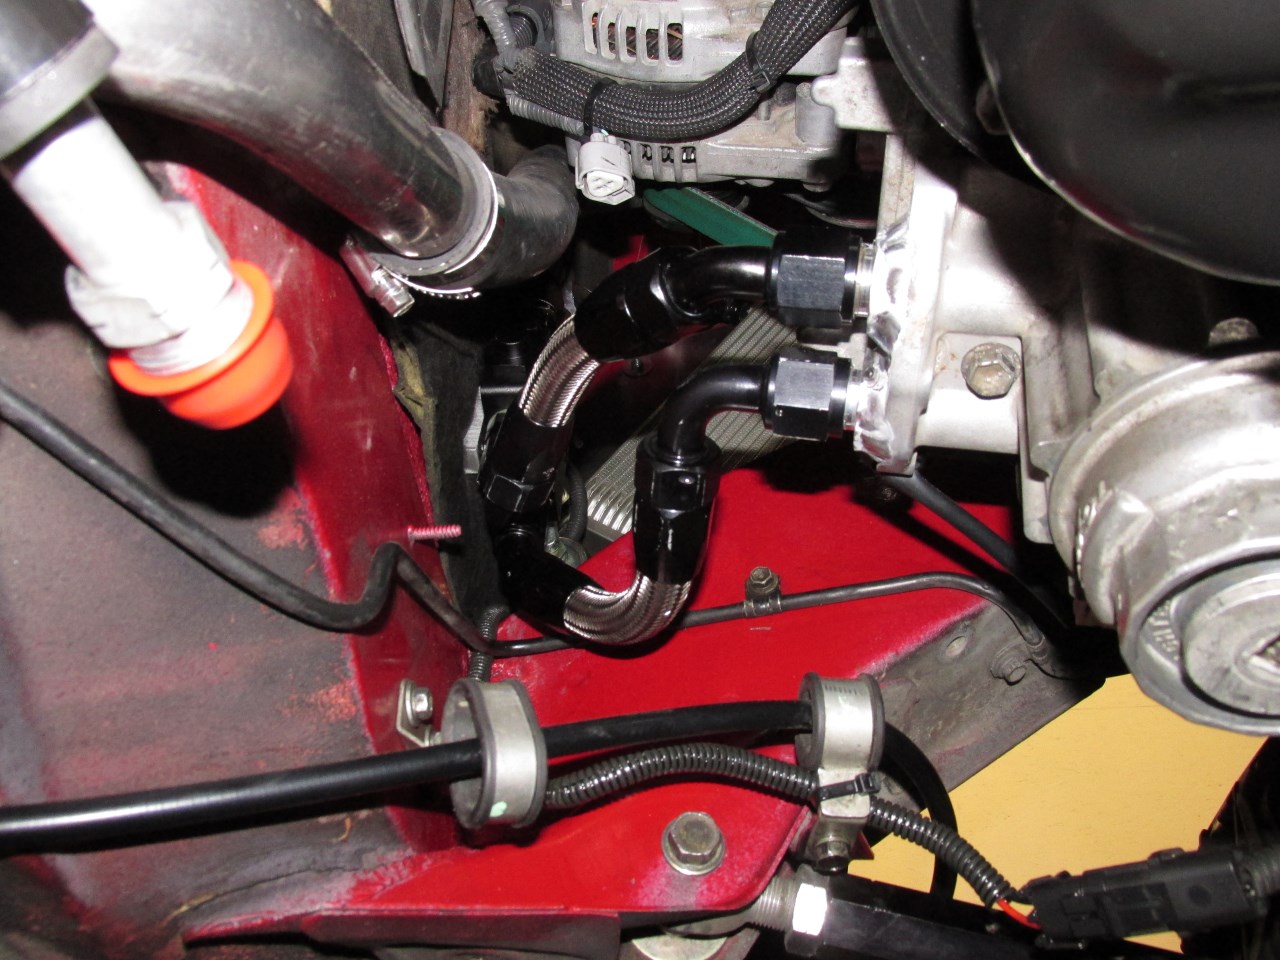
To start with, I purchased an upper oil pan from an oil cooler equipped motor off of eBay. There may be other ways, but in my opinion this is by far the best way to get oil cooler ports on the 2GR motor. To the upper pan, I welded two -10AN fittings to adapt to my oil cooler lines. I now sell a bolt on adapter to add these 10AN ports to the factory pan. I also added a -6AN port, in case I wanted to add a catch can with a drain line in the future. My lower oil pan was a little beat up from the junk yard, so I purchased a replacement on eBay. To it I added a 1/8NPT port for an oil temperature sensor.
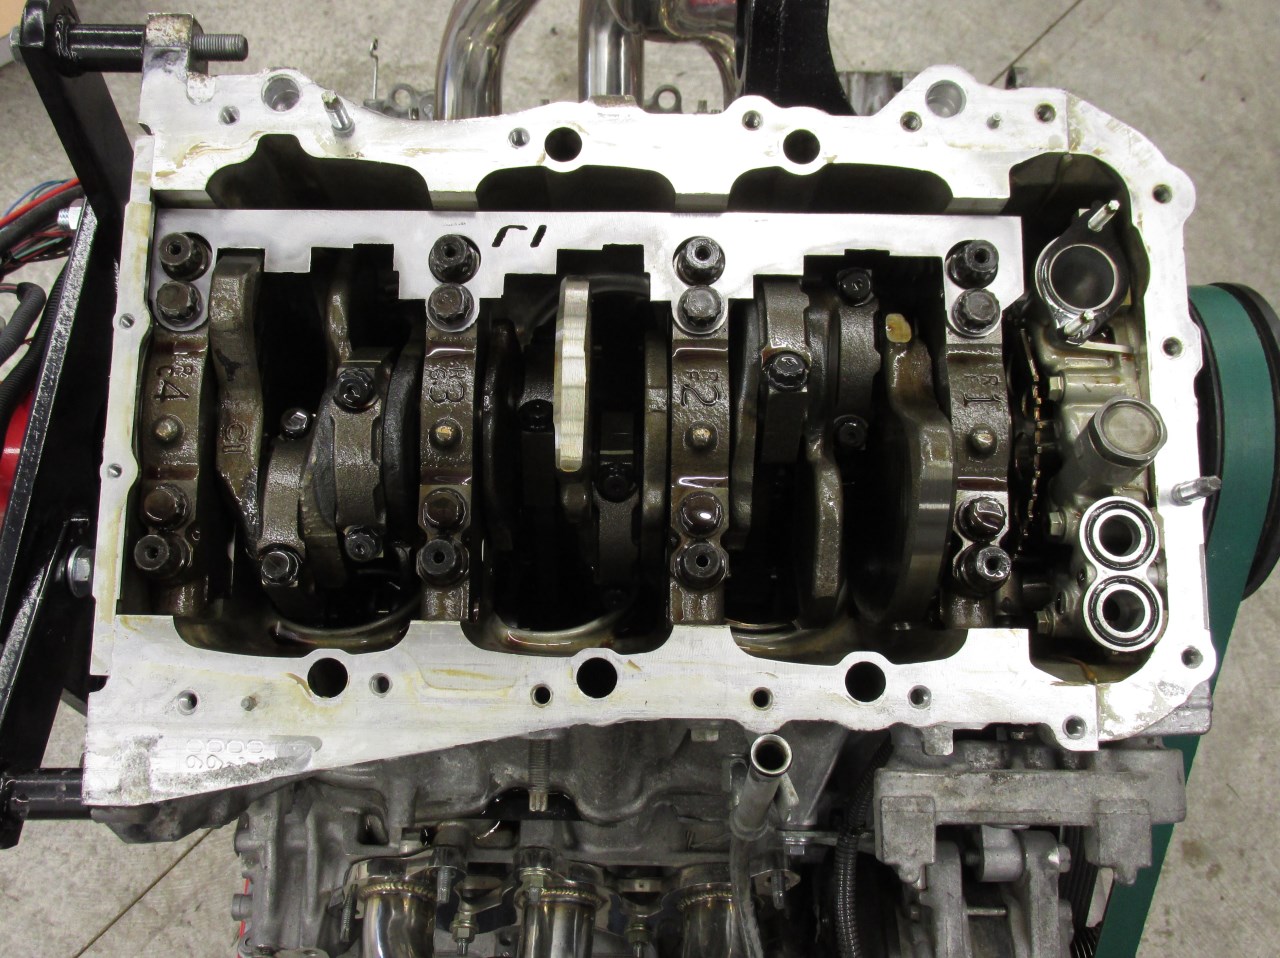
While I had the oil pans off, I took the opportunity to install a crank scraper from crank-scrapers.com. The fit on this part was fair at best. It took quite a bit of adjustment and test fitting to make it work, but in the end it did. I sent them an updated pattern based on my final shape, so hopefully if anyone purchases it in the future it fits a little better out of the box. Hard to say how much effect it really has, but maybe it's the reason my motor doesn't burn much oil on the track, even without a catch can. Just a theory.
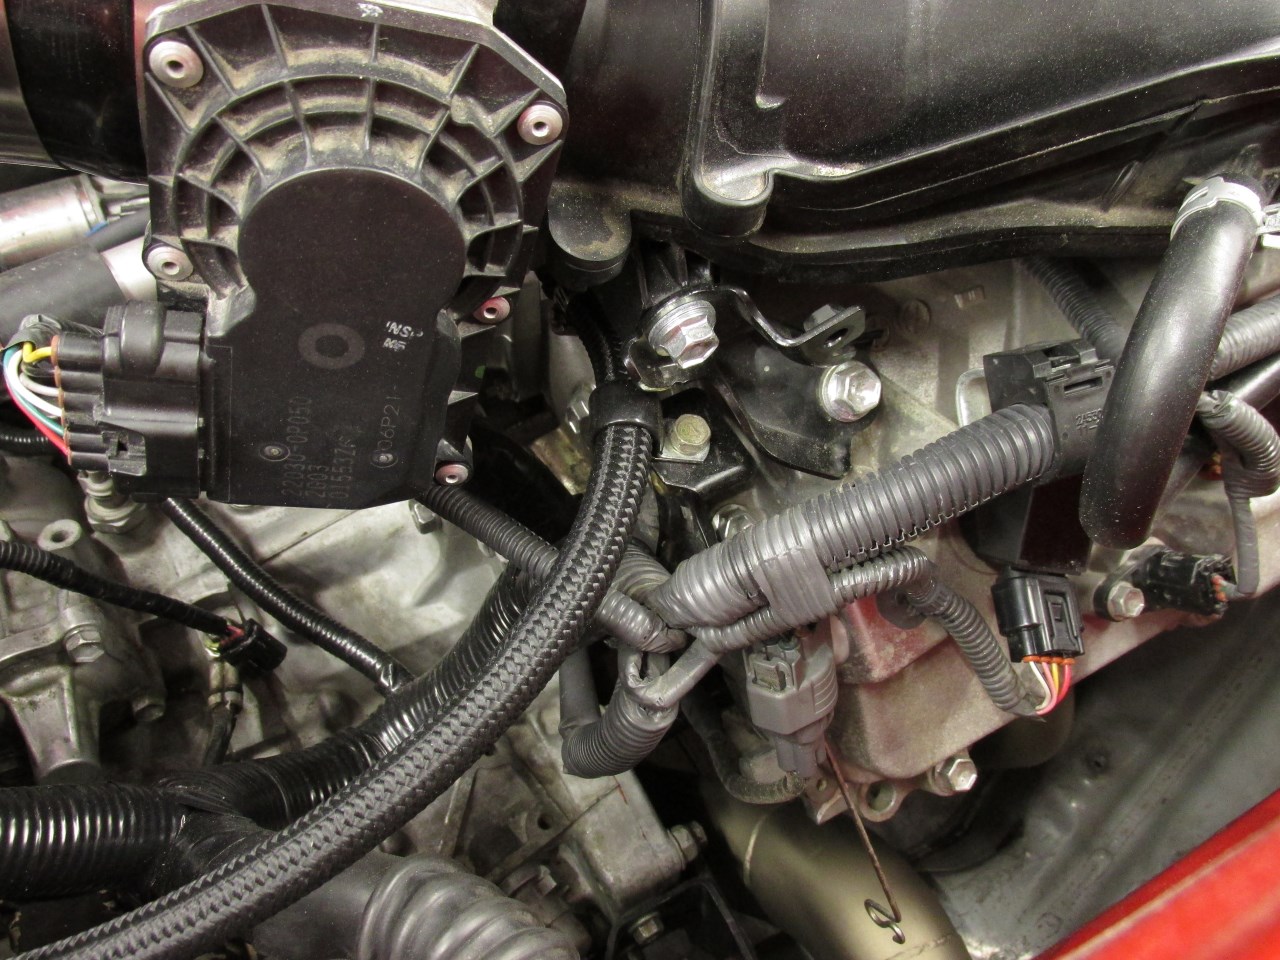
Finally, here are the modified oil pans installed. The wire to the stock oil pressure switch needed to be extended to reach the new location, and you can also see the insulating sleeve that I added to protect that and the crank sensor wires where they pass near the header.
On the chassis side, a Mishimoto oil thermostat was mounted on the firewall, modified to have a 1/8NPT port for oil pressure sensors. One sensor for my gauge, the other for my data logger. The oil cooler is a 19 row Earls core, a holdover from my 3S-GTE. One little custom feature worth noting here are the two aluminum blocks cut to fit between the adapter fittings and screwed down with the screws that attach the thermostat to it's bracket. These ensure that there is absolutely no way the adapter fittings can loosen in the future.
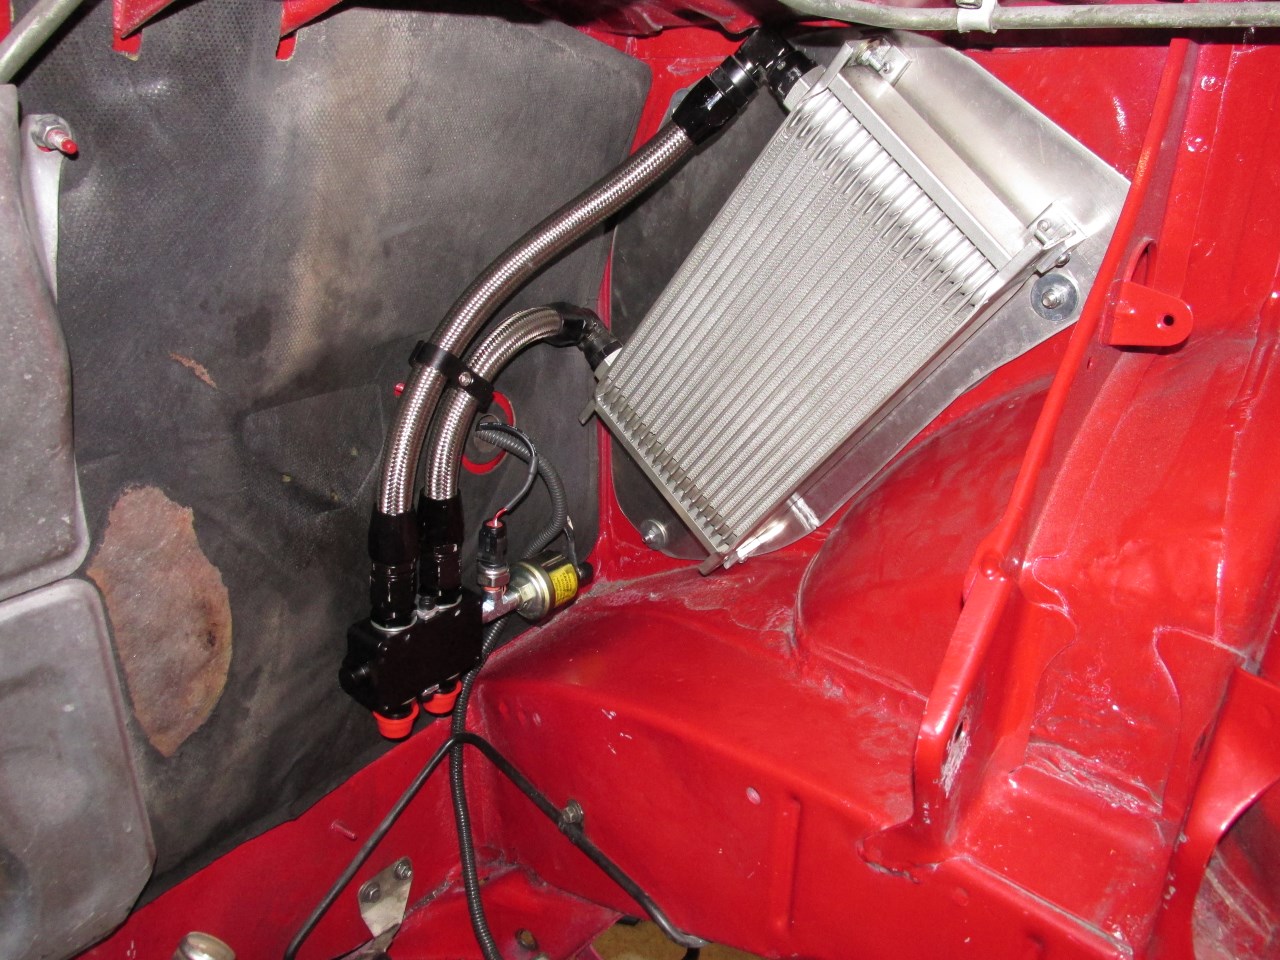

Finally, the lines to connect the oil pan to the thermostat. This ended up a little tighter than I would have liked. In hind site, the thermostat would have been better a few inches higher on the firewall (I moved it a couple of years later and re-did the two lower lines). A few years after that, I discovered that the Mishimoto thermostat was causing significant pressure drop in the oil system and I replaced it with a similar thermostat from Improved Racing.
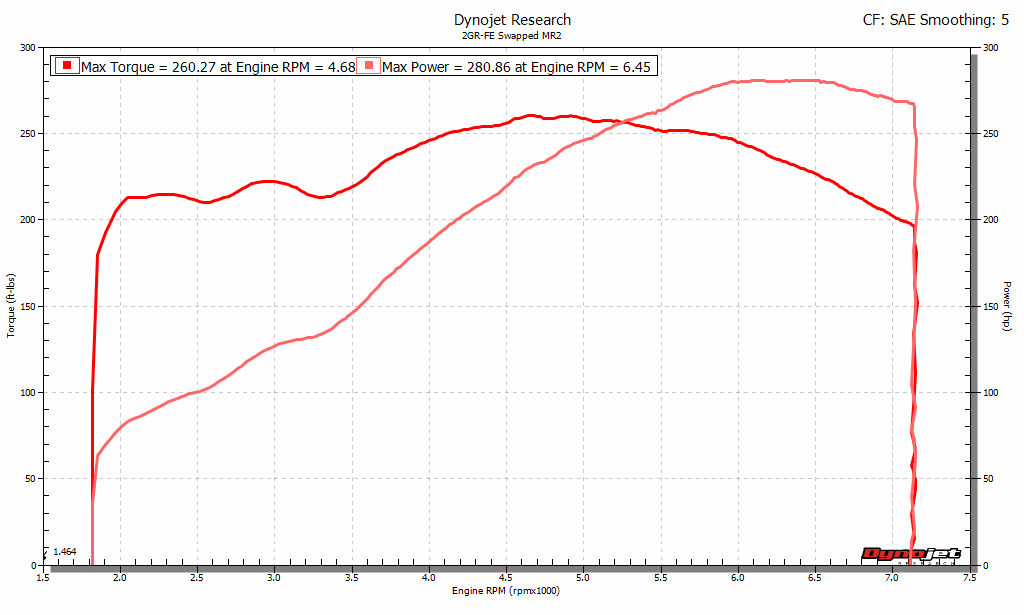
Dyno
The dyno below was shortly after finishing the swap with my original intake setup. There is a video of this dyno pull on Facebook.
For further power improvements, see this post: 2GR-FE Power Gains
So, Was It Worth It?
In my opinion, the answer is a resounding YES. As I have told everyone who asks, for how I use the car I like it better in every way. It just it starts, idles, runs, and drives like a modern car. It is a huge improvement over my old motor with it's standalone ECU and aftermarket cams, which was always a little temperamental, especially in cooler weather. The responsiveness and instant torque has quite simply transformed how the car drives (check out my YouTube Channel for track and autocross videos before and after the swap). It may be "only" 280whp 299whp, but it is an absolute blast to drive. Personally, I love the way it sounds, and the way it free-revs with a lightweight flywheel is amazing. Hard to believe it is a stock motor out of a Camry, or a mini van, or small SUV.