The basis of many of my products is a thorough analysis of the MKII MR2's suspension. This analysis was done using SusProg3D with data collected through careful measurement of the chassis and suspension components of my own car.
If you wish to read my original analysis, links to those threads on the forum can be found here.
Stock Geometry
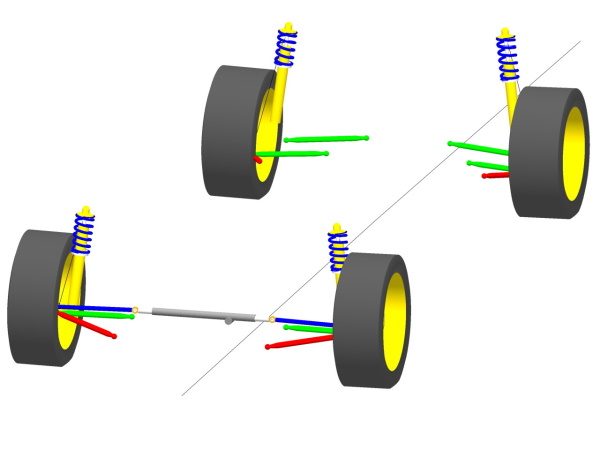
We have to start somewhere, and the geometry of a stock MR2 seems like the best place. The model in SusProg looks like this, viewed from the rear.
Front
Rear
This is stock Rev1 (91/92 for US readers) ride height, tire diameter, and alignment. The later cars were lowered slightly from this, and had larger wheels, although the tire diameters were very similar.
Points to note about the stock geometry:
| Roll Center Height | Front | Rear |
| Stock | 1.9" | 3.3" |
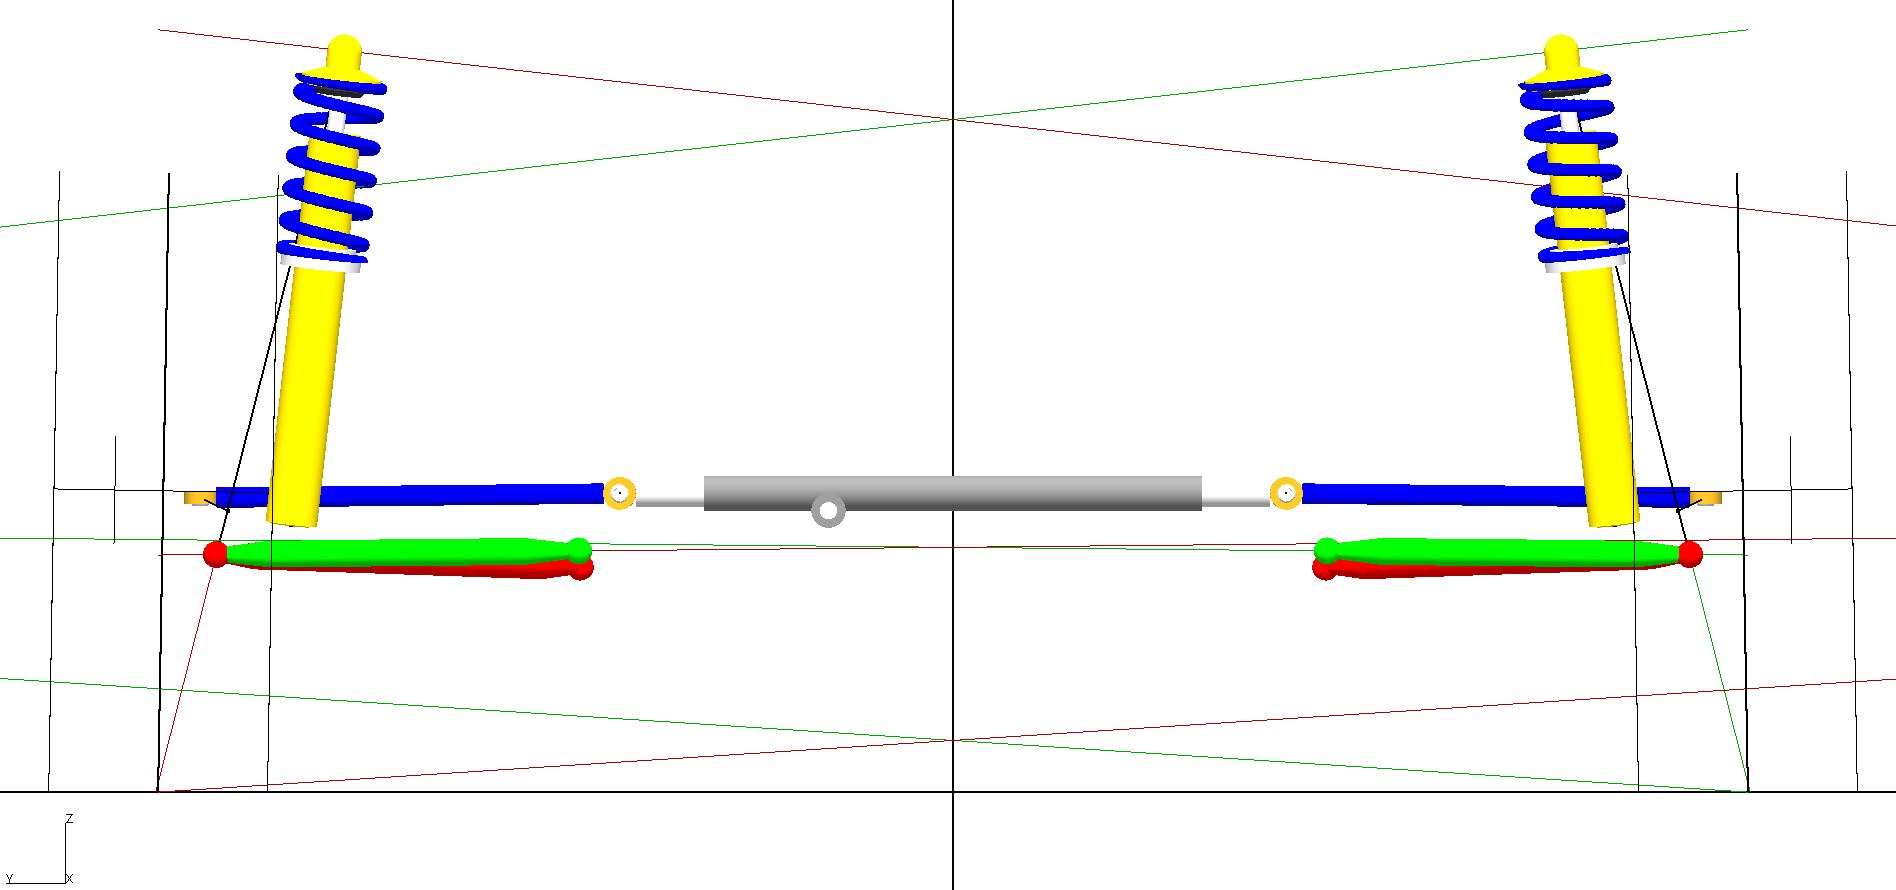
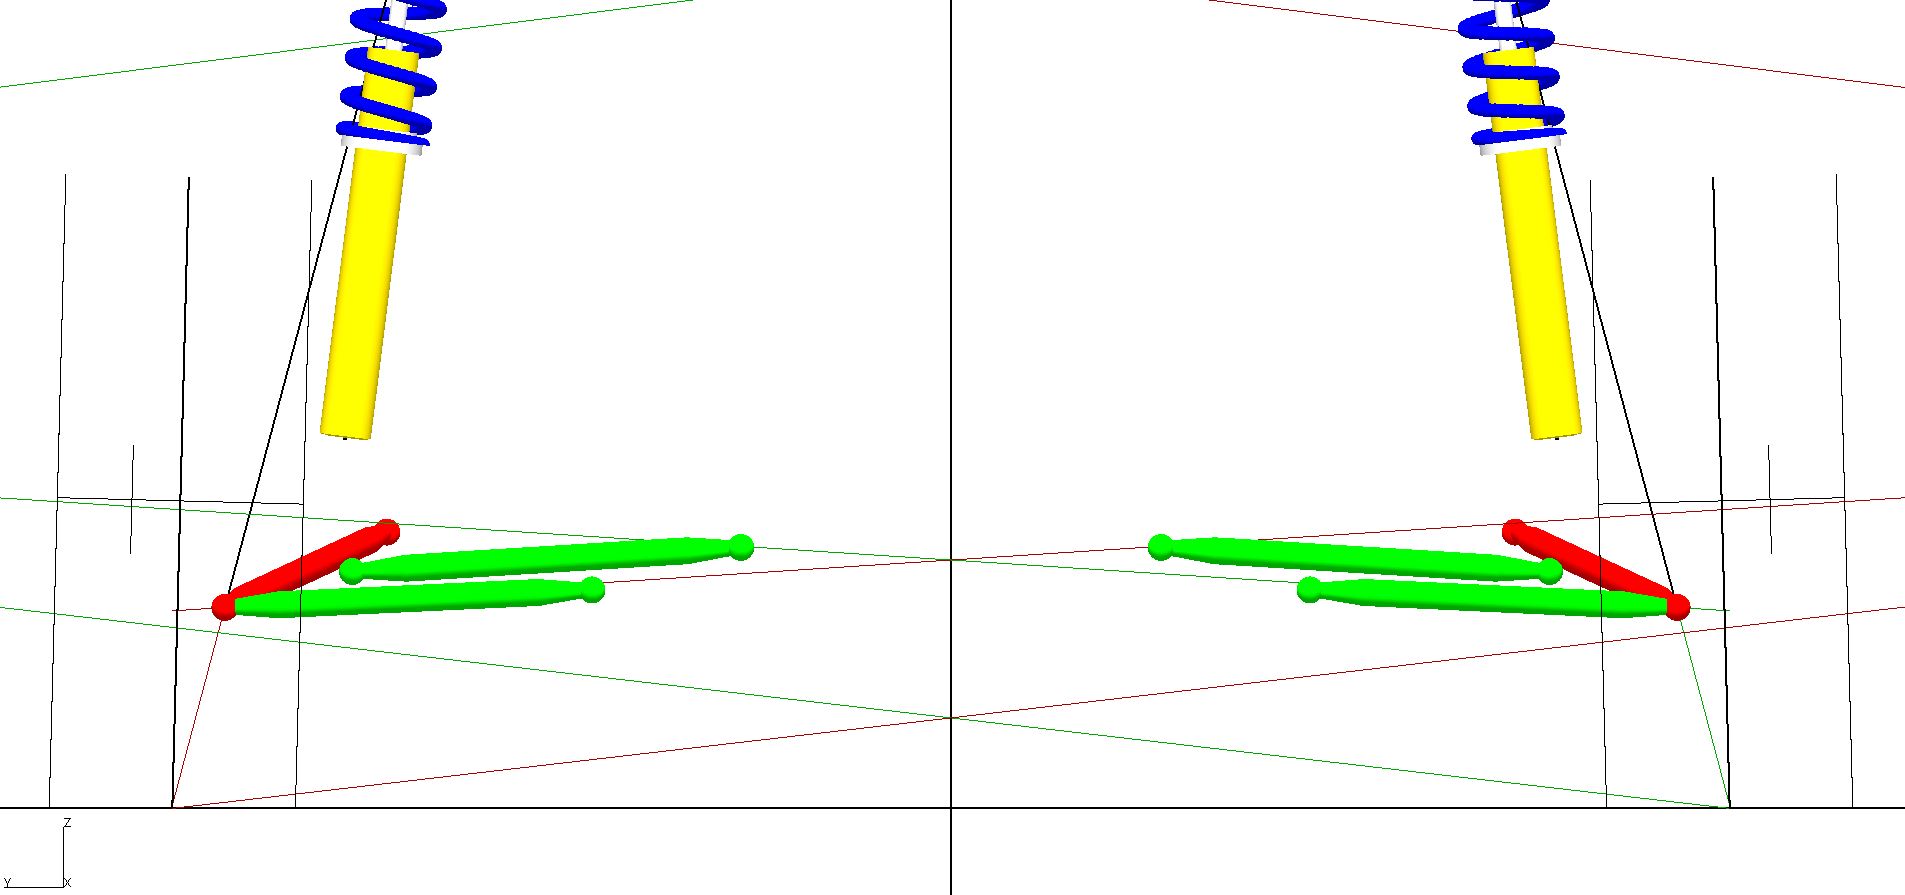
-The front control arms are already nearly horizontal, and the front roll center (indicated by the intersection of the lowest pair of red and green lines) is quite low (1.9" above ground).
-The rear control arms have some downward angle, and the rear roll center is a little higher (3.3" above ground).
-The struts are standing up nearly vertically.
-With stock wheel offset and tire size, the scrub radius is effectively zero both front and rear (indicated by the line from the strut top through the ball joint intersecting the ground at the exact center of the tires contact patch.)
-At stock ride height the Rev2+ front suspension has 24% anti-dive. The Rev1 front strut rod brackets position the pivot point of the front strut rod ~0.5" higher, resulting in 9% anti-dive. For the remainder of this analysis anti-dive numbers assume the Rev2+ front tie rod brackets.
The majority of this analysis will be presented as graphs of toe vs bump / droop and camber vs body roll. I will also mention roll center heights, anti-squat and anti-dive percentages, and front scrub radius. Keep in mind that some of these numbers are specific to the ride height, wheel offset, and tire diameters that I am using in my analysis.
Toe
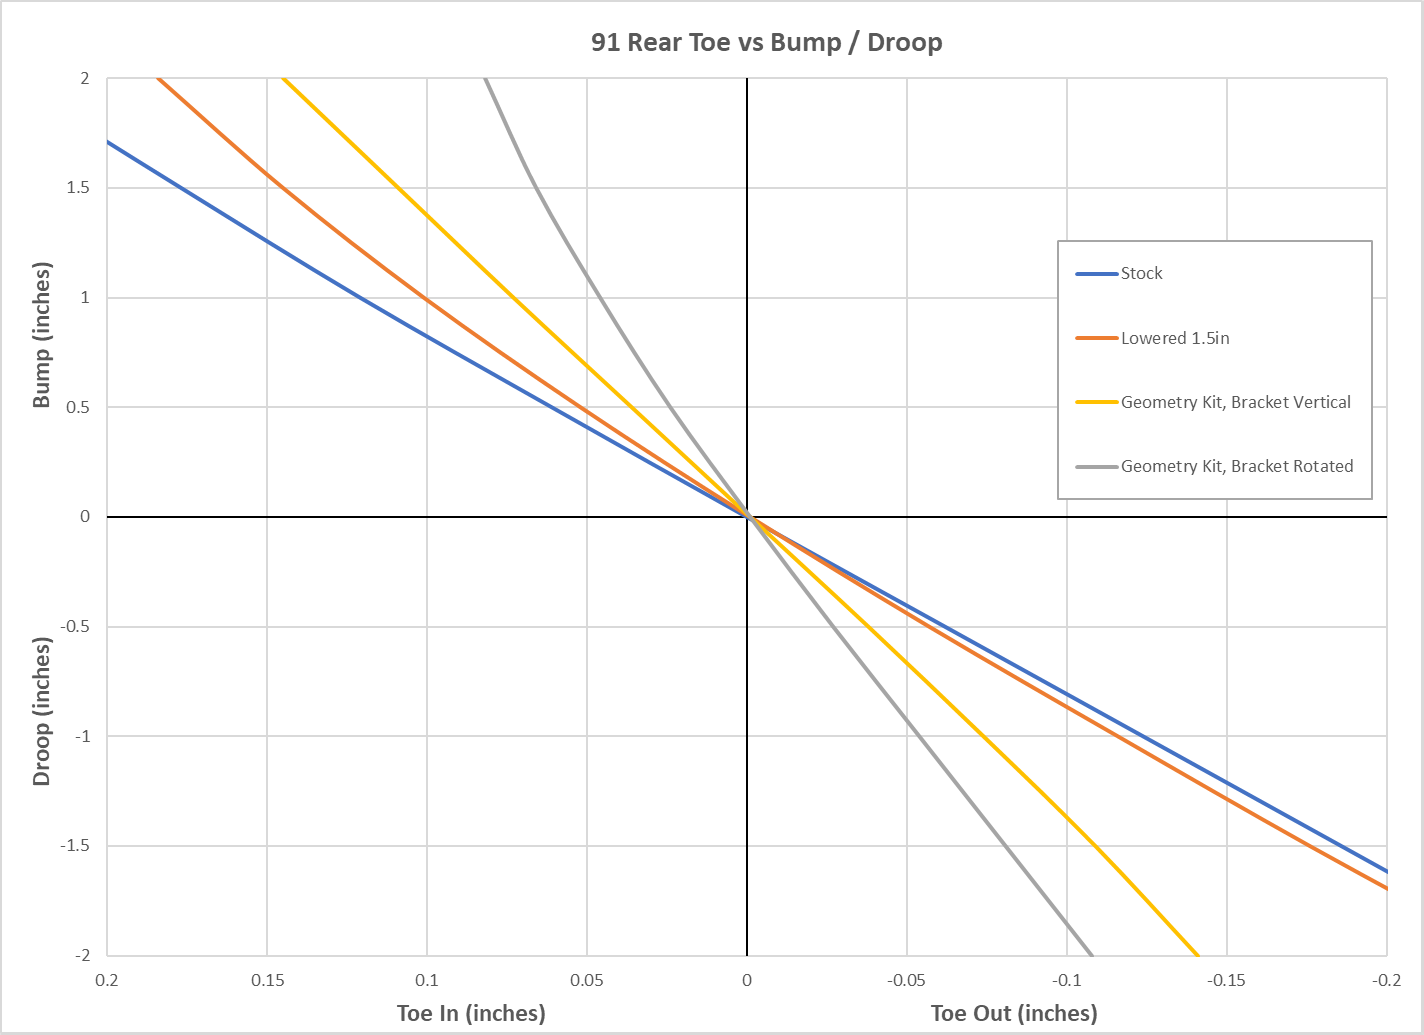
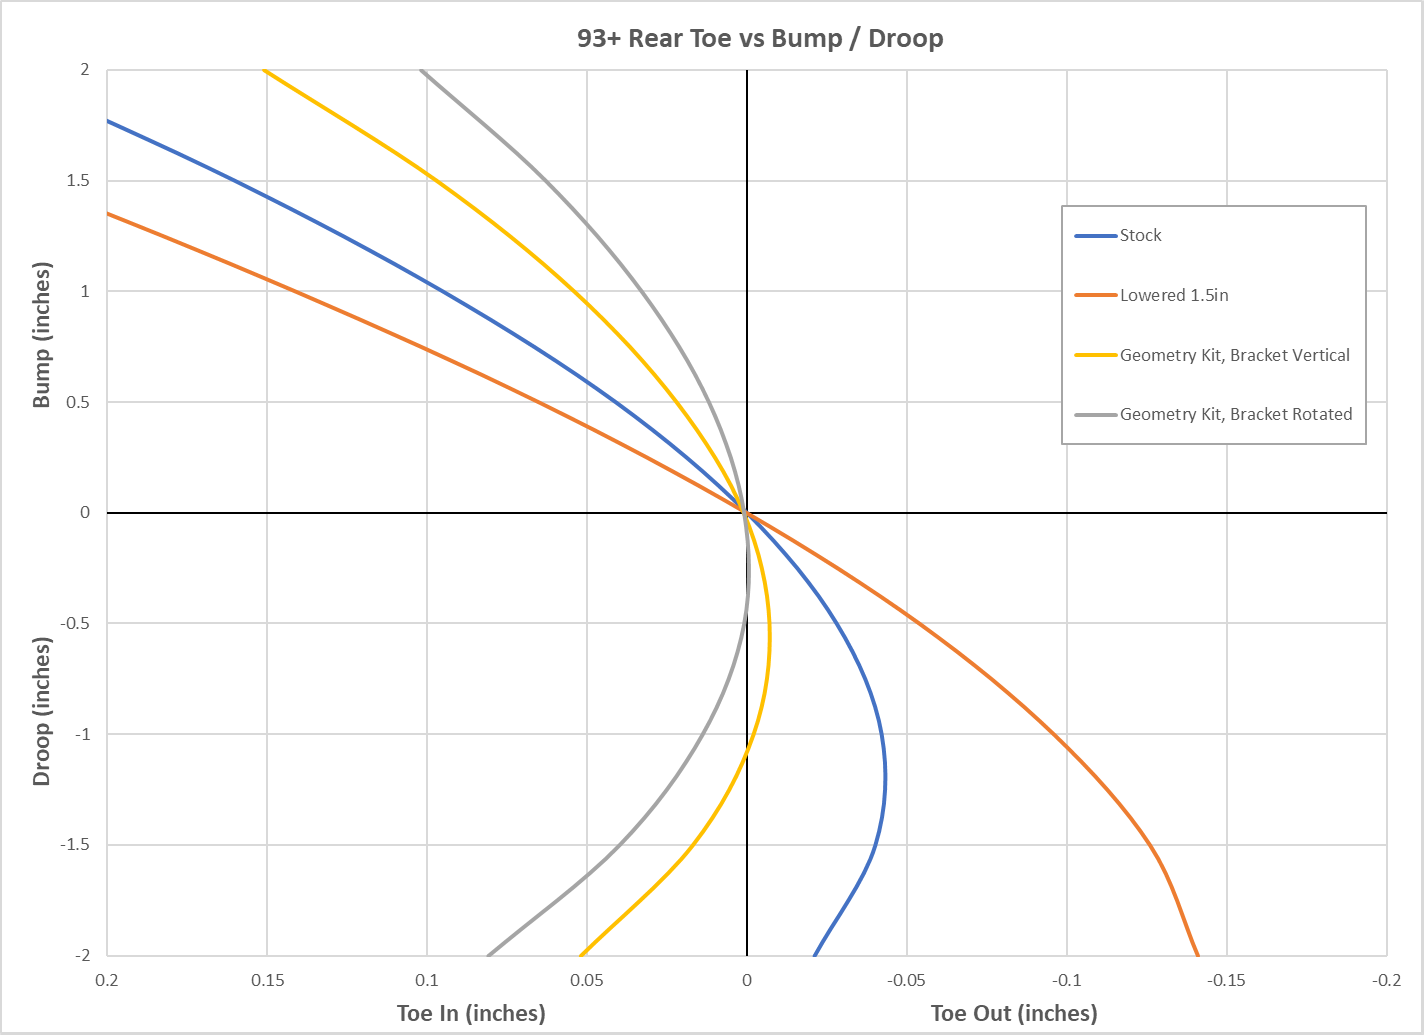
I will begin with the thing everyone wants to know about the suspension on these cars, the rear toe curve and how the Rev 1 (91/92 in the US) and the later Rev 2+ cars (93+ in the US) differ in this respect.
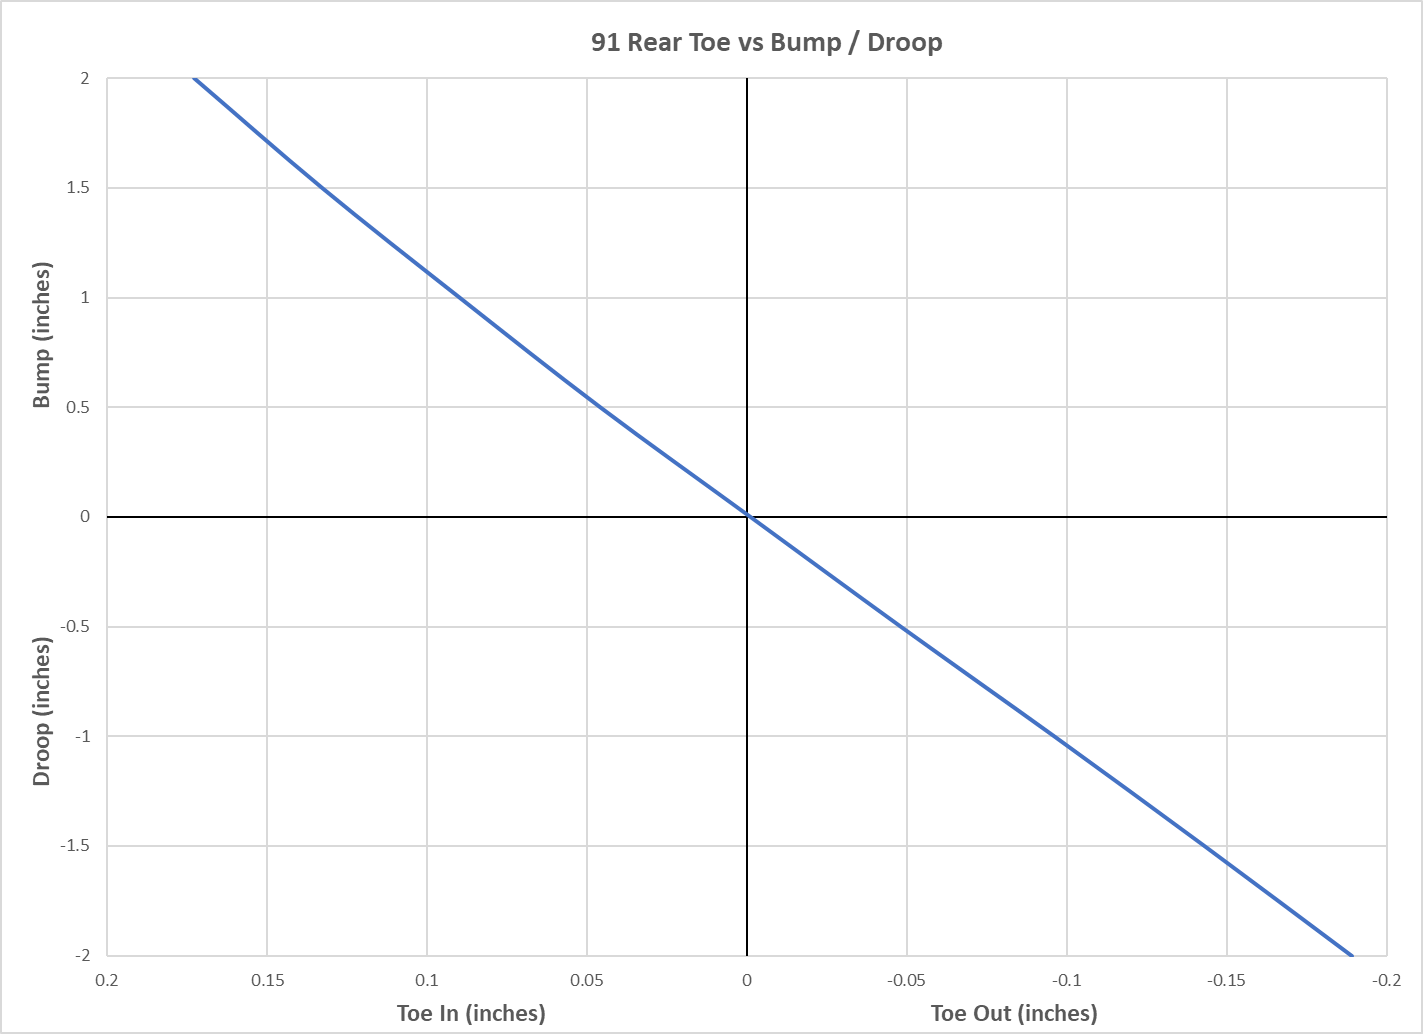
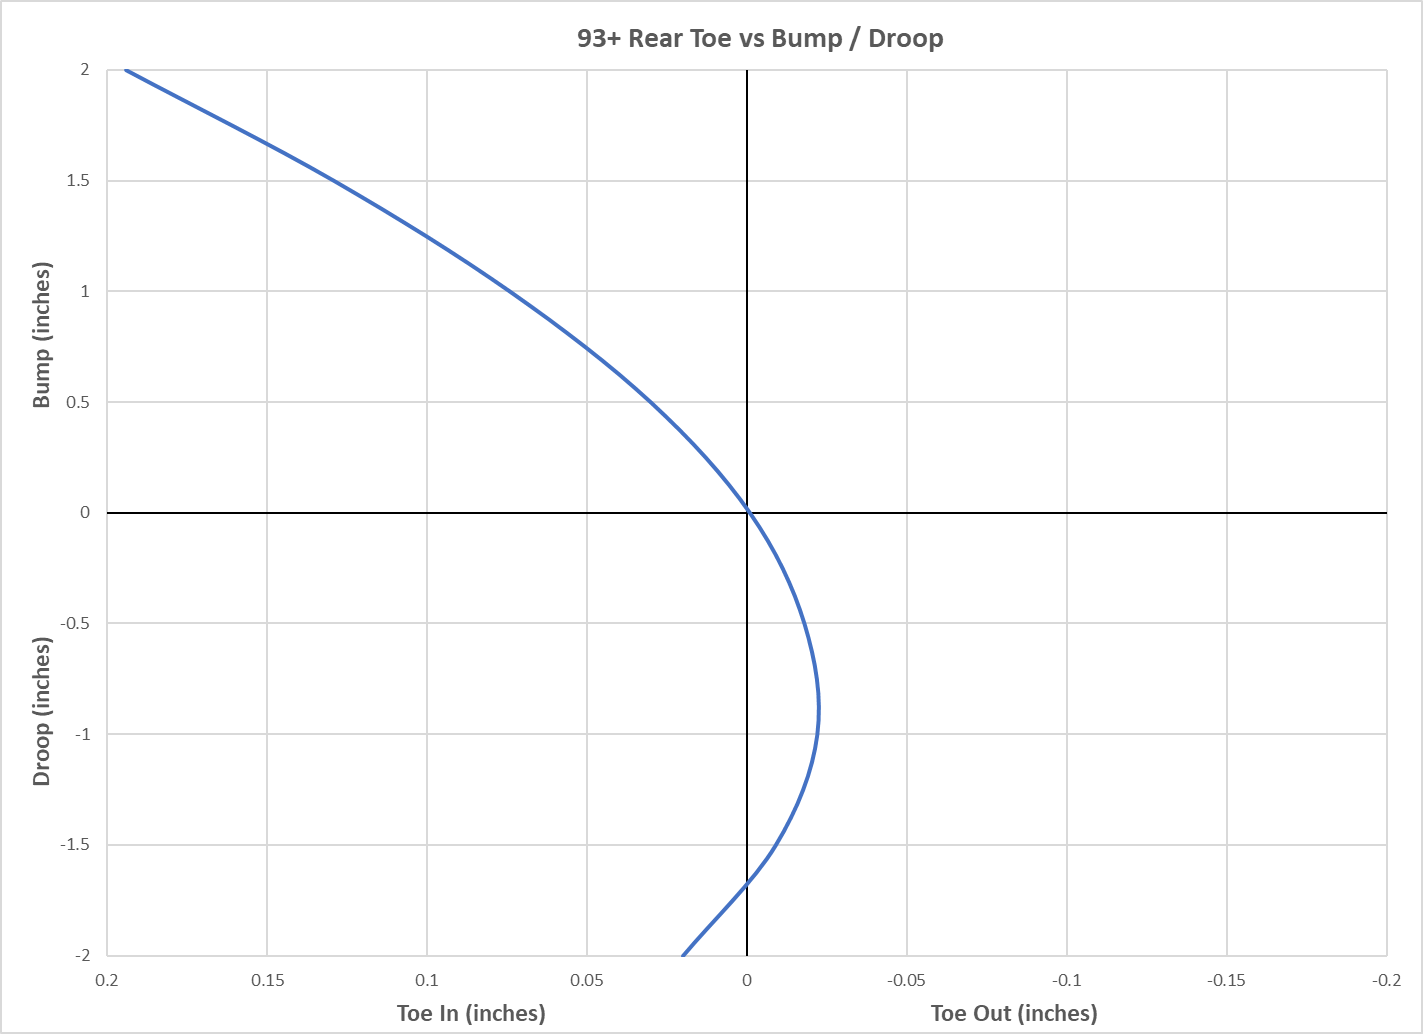
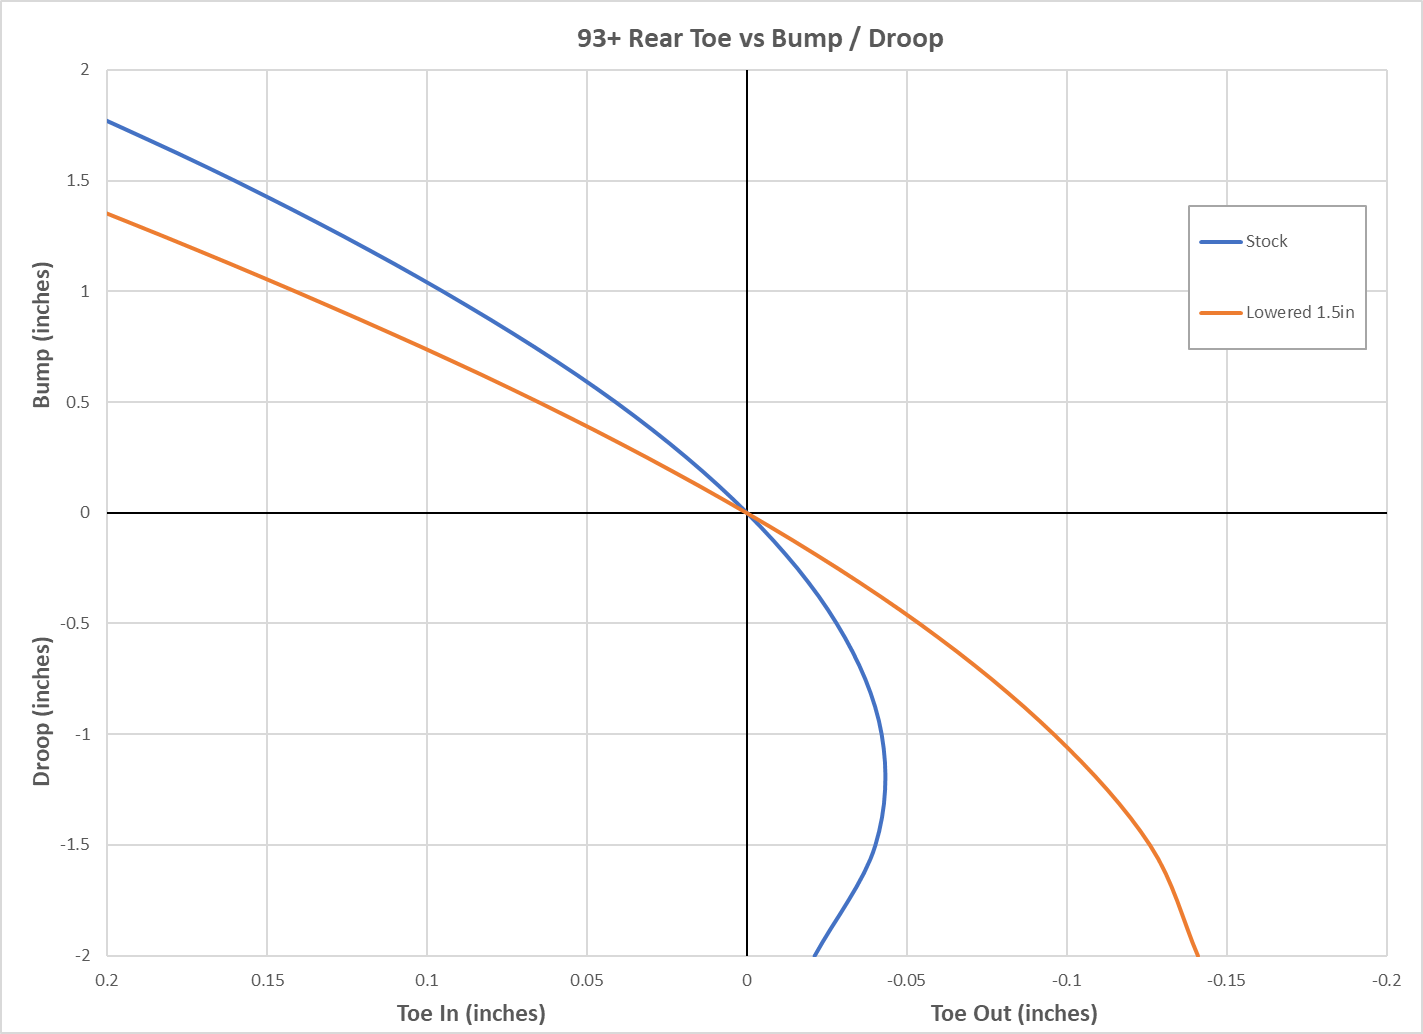
As you can see, the early rear suspension has a nearly linear toe curve, toe in on bump and toe out on droop. This creates a roll understeer condition where in a corner the outside wheel toes in and the inside wheel toes out, steering the rear of the car towards the inside of the corner. The later suspension has a very non-linear toe curve, with toe in on both bump and droop. Since the outside tire is doing the bulk of the work in a corner this still creates roll understeer, however to a lesser degree since the inside tire is also toeing in. Toyota made the change after finding that the average driver didn't have the skills to handle the car with excessive amount of toe out on rebound, especially when combined with the rear weight bias. Particularly under braking this has a large destabilizing effect, and is in my experience the single greatest reason for the MR2's "snap oversteer" reputation. It is a source of endless debate whether the early or later suspension is better for performance purposes, but in my experience a car that is easier to drive and more confidence inspiring will be faster for almost anyone. I have certainly found this to be the case for me.
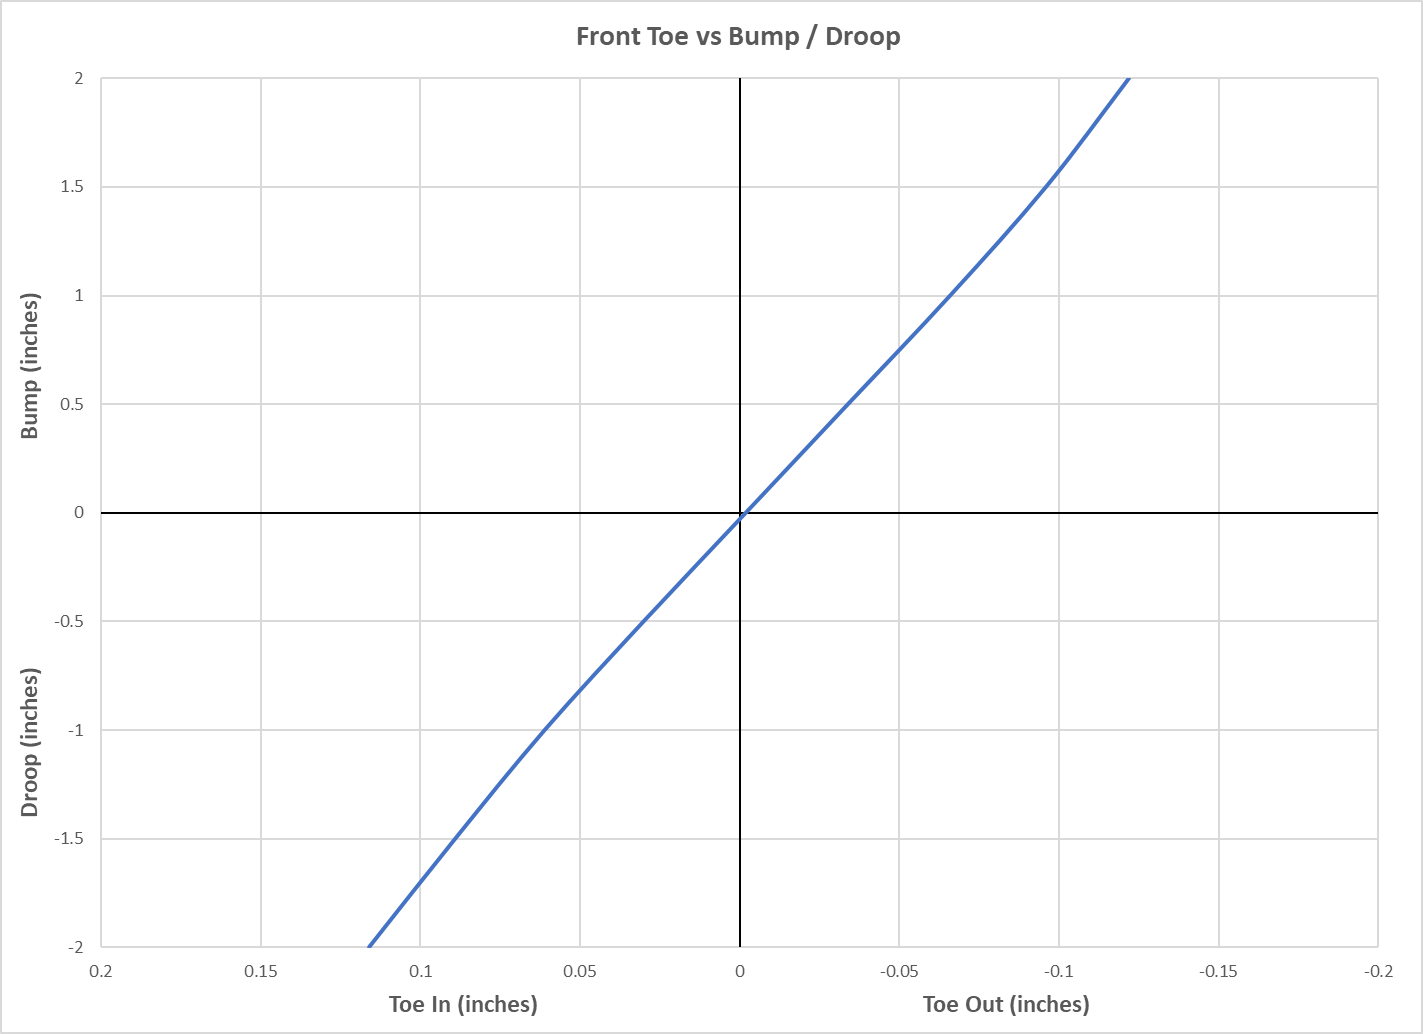
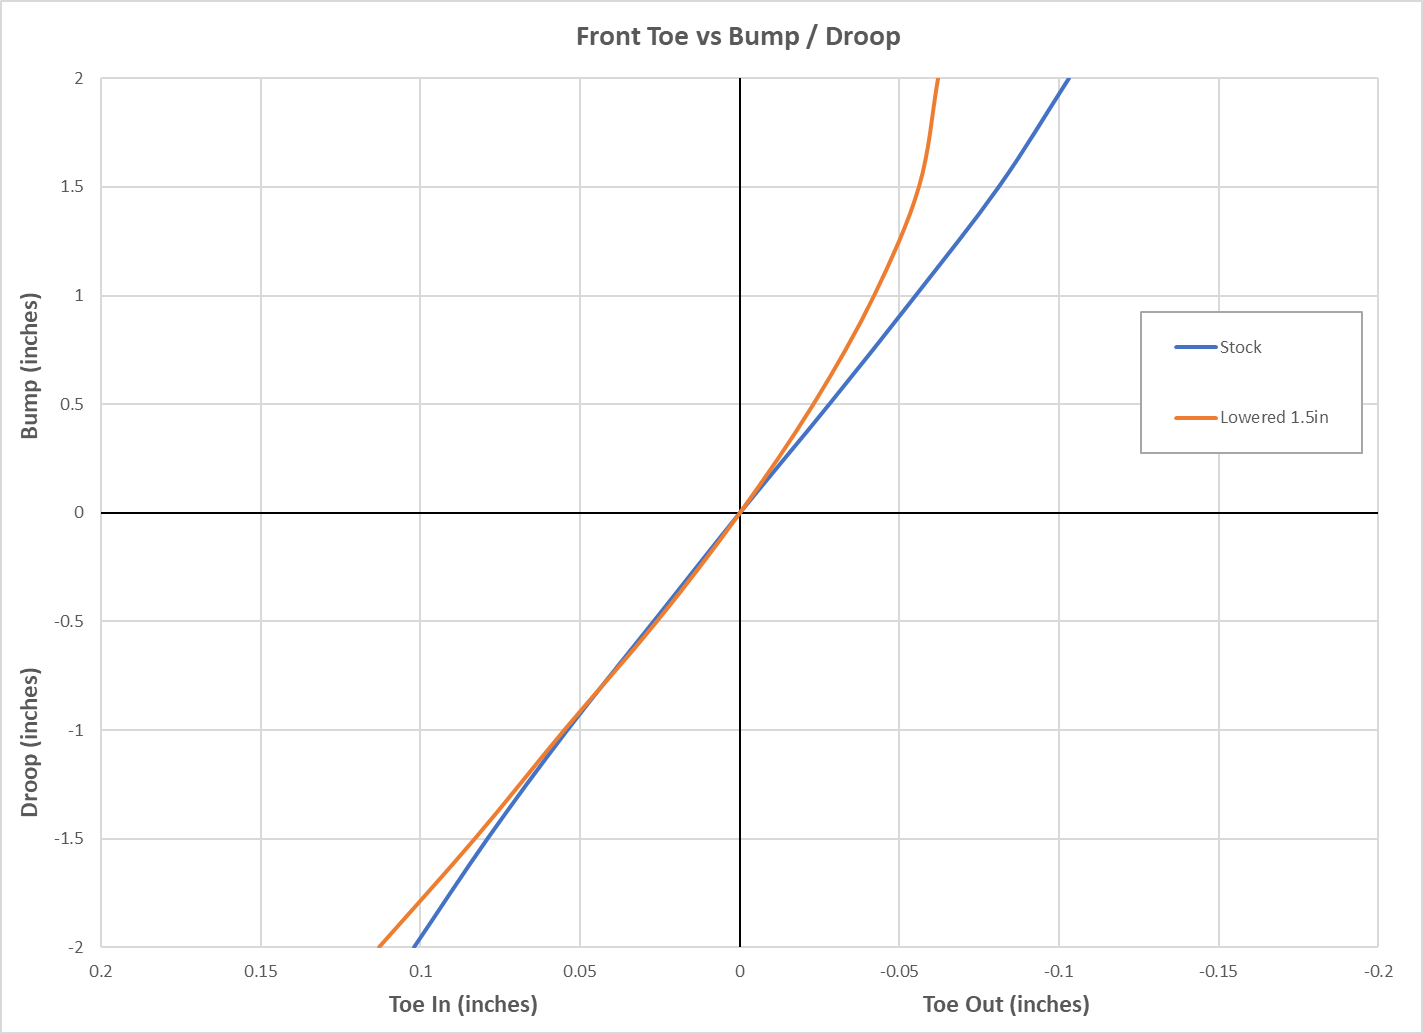
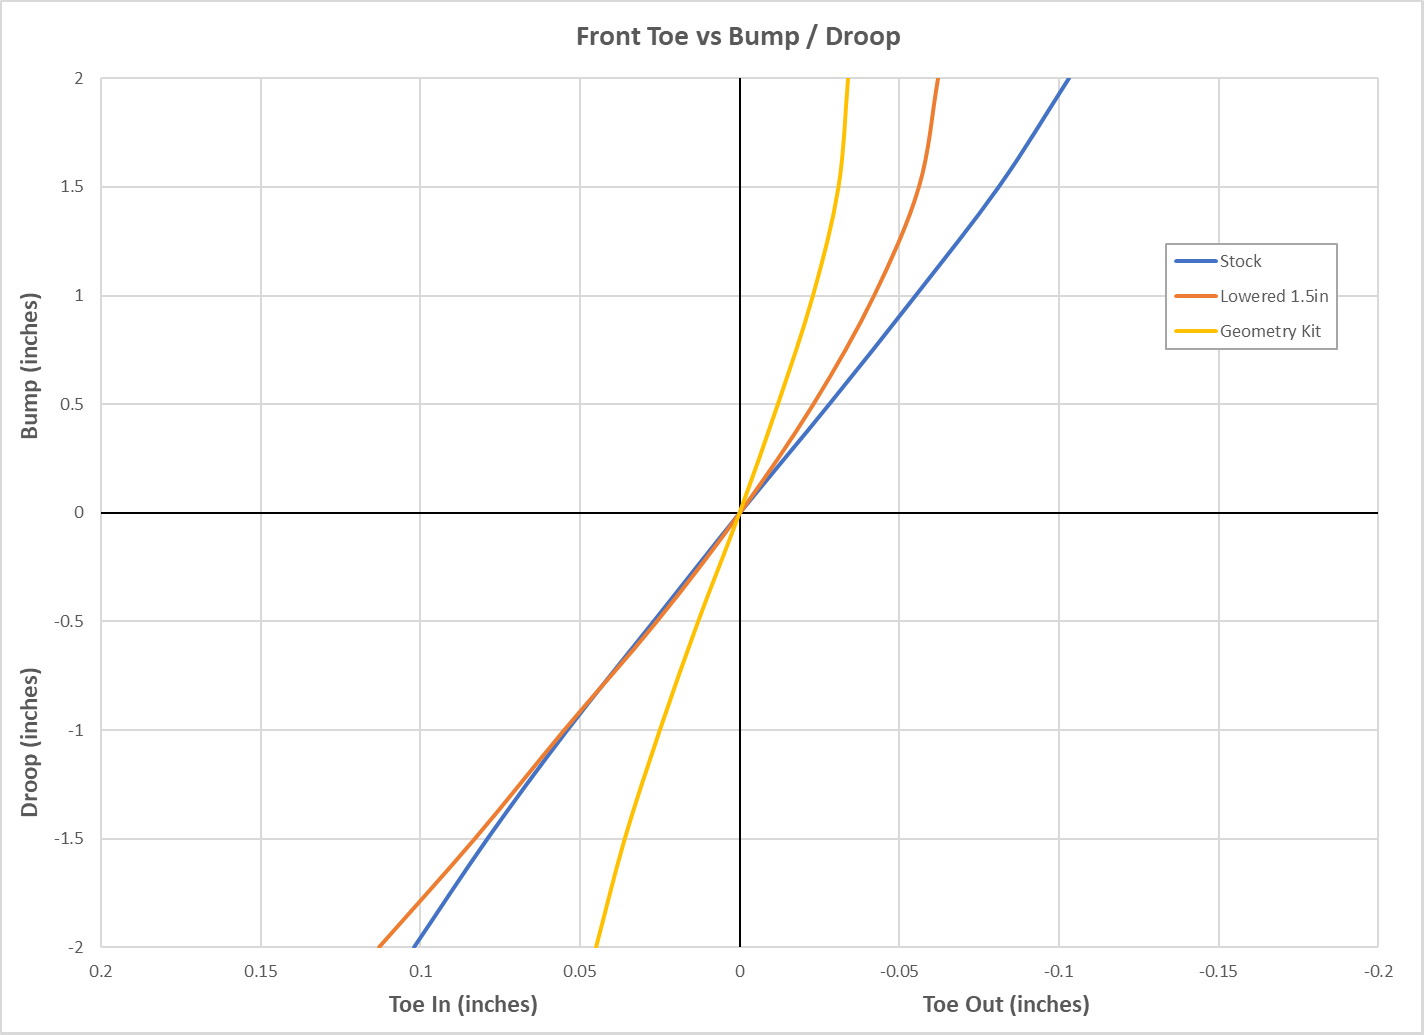
At the front we have toe out on bump and toe in on droop. Again, this creates roll understeer as the outside front tire toes out in a corner and the inside front toes in, steering the car towards the outside of the corner. The effect is that there is slightly less steering angle applied than the driver would expect.
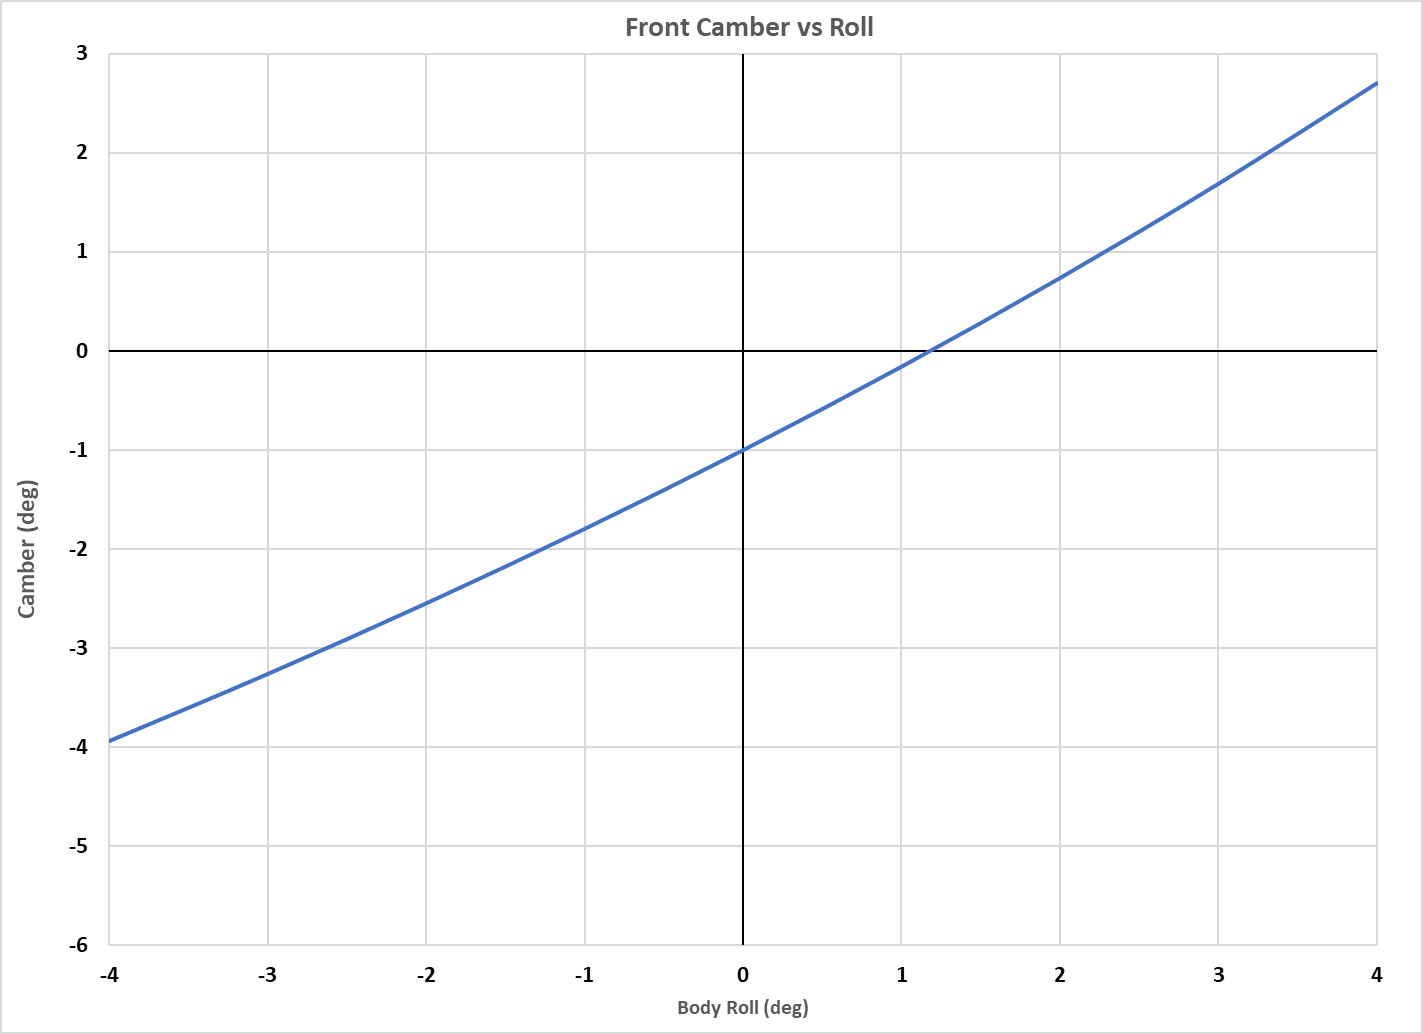
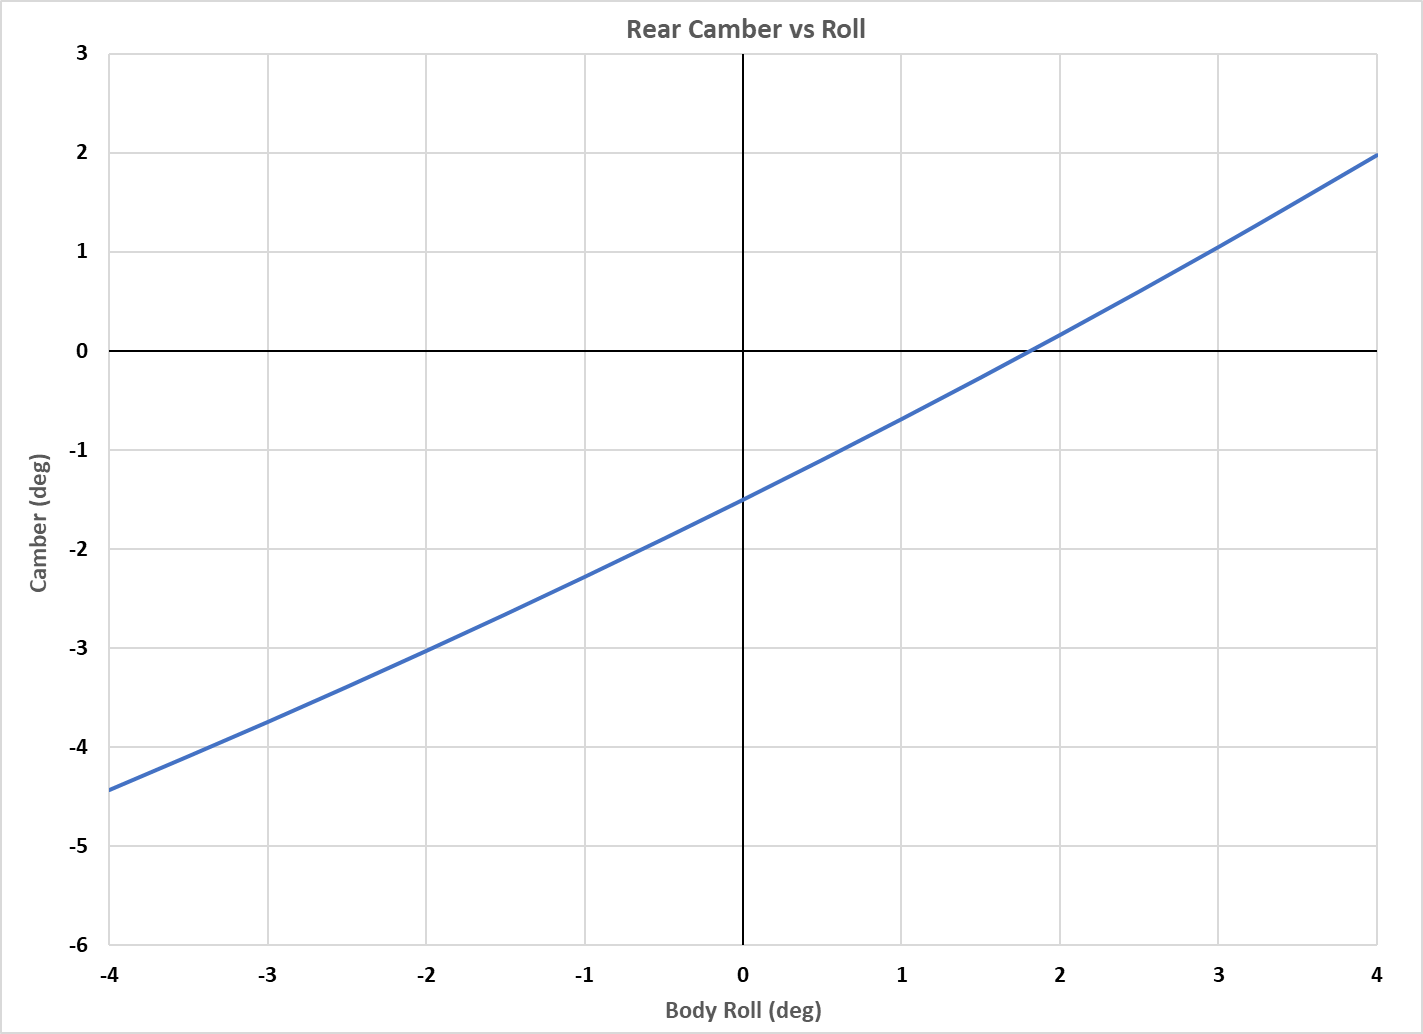
Camber
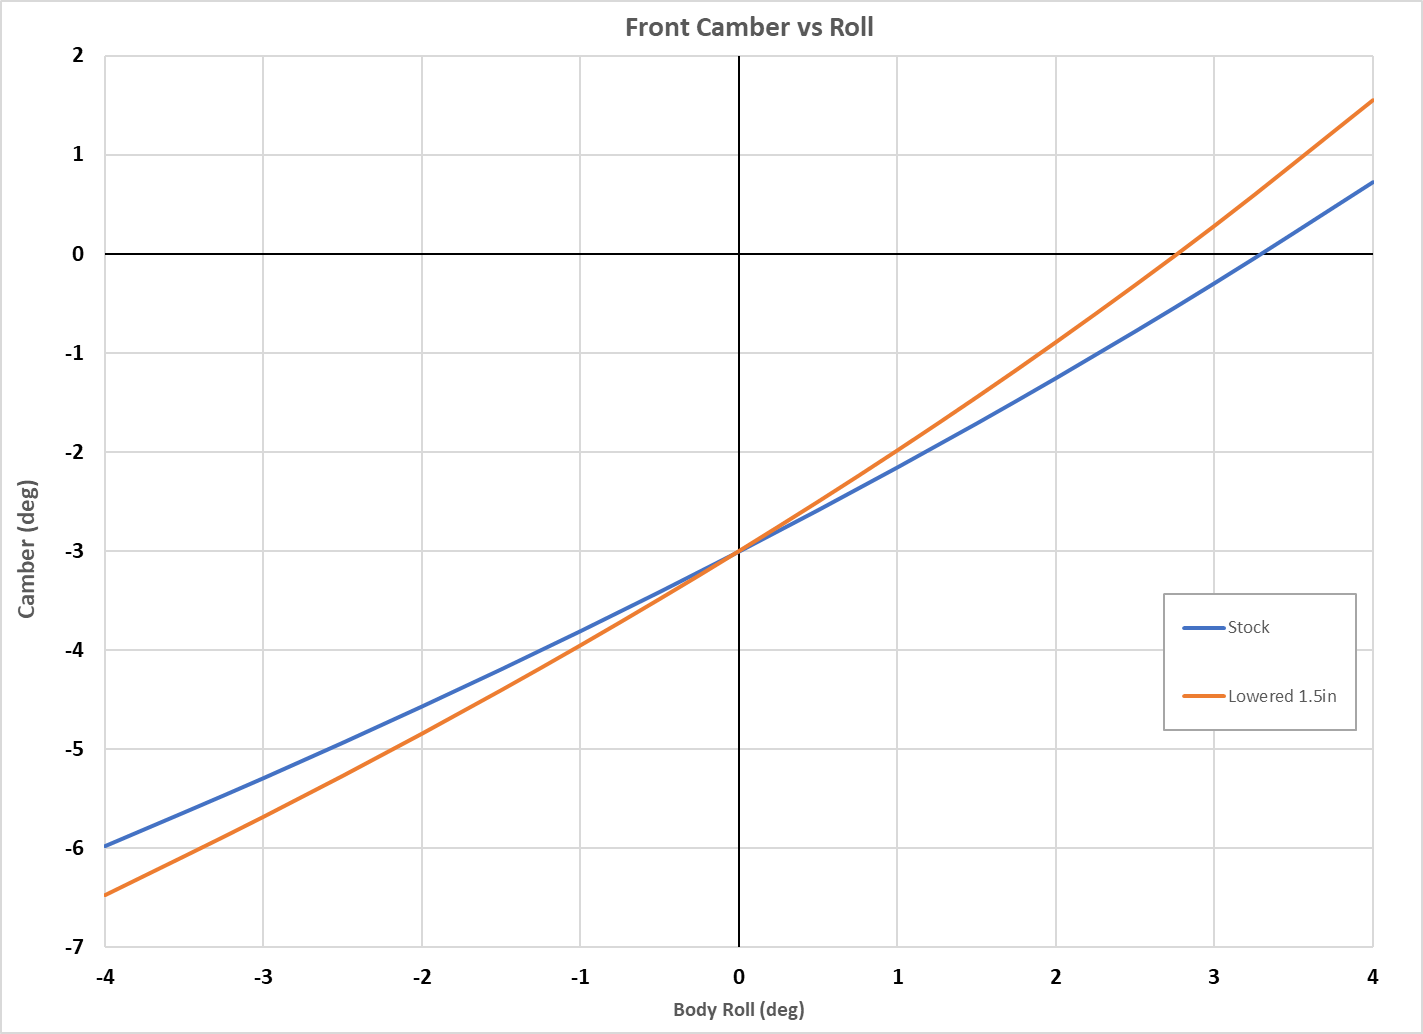
The stock camber curves on the MR2 are . . . not great. But this is the nature of strut suspension. Both front and rear looses about .75° of camber per degree of body roll. That means that with a stock alignment (-1° front, -1.5° rear) your front camber (on the outside wheel) is all gone at a little over 1° of roll, and the rear has reached zero shortly there after. This is why most performance alignments for the MR2 (or any strut suspension) call for large amounts of static negative camber.
Lowering
The second big question is what happens when you lower the car? Let's lower the car by 1.5 inches (from stock Rev1 height, about 1.12 inches on a Rev 2+). I will also change the wheel and tires to a fairly typical 17x8 front and 17x9 rear, +35 offset, with 235/40-17 front and 255/40-17 rear tires, and increase the camber to -3° front and rear.
| Roll Center Height | Front | Rear |
| Stock | 1.9" | 3.3" |
| Lowered 1.5" (stock geometry) | -2.6" | -0.5" |
The ride height change causes the roll centers to drop to -2.6" (below ground) in the front and -0.5" in the rear (compared to 1.9" and 3.3" stock). This means that while we lowered the car (and therefore the center of gravity) by 1.5", the roll centers dropped by 4.5" in the front and 3.8" in the rear. This is important because the distance between the roll center and the center of gravity effects how far the car will roll for a given cornering load and roll stiffness (spring rates, sway bars). Fortunately most lowering springs and coilovers are stiffer than the stock springs, but even so we are wasting some of that stiffness because of the compromised suspension geometry.
Note that the front roll center dropped more than the rear. This effectively stiffens the rear suspension relative to the front, which will create even more oversteer. One of the goals of the geometry changes that will be explained below is to raise the front roll center above the rear roll center, so that the roll axis slopes down toward the rear of the car.
Anti-dive on the front suspension is increased slightly to 28% from 24% at stock ride height, and anti-squat on the rear is reduced to 41% from 53% at stock ride height.
The lower offset wheels (+35 vs the stock +48) increase the front scrub radius from approximately zero to 0.36". This is less than you might expect given that the wheel offset changed by 0.51", but lowering the car does help reduce this somewhat.
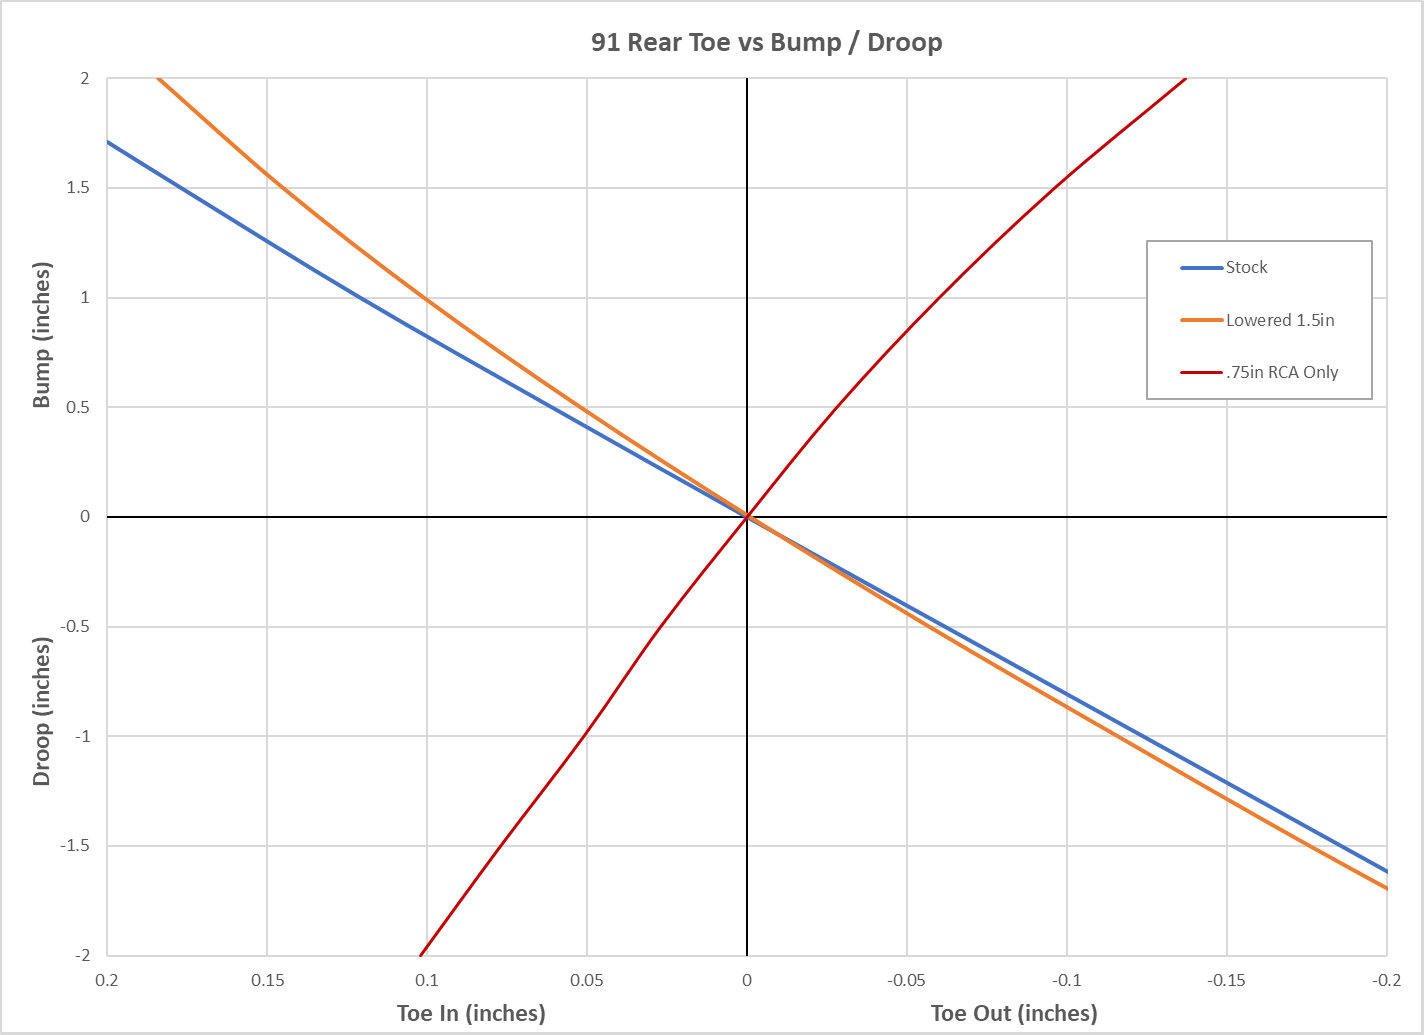
Toe
Due to the linear toe curve the Rev1 rear suspension doesn't respond too badly to lowering in this respect. Lowering somewhat reduces the amount of toe change, particularly in bump. However, note that the "stock" curve here is significantly flatter than it was in the graph above. This is because adding camber actually makes the rear bump steer worse due to the long toe arm on the rear knuckle. As the camber tilts the knuckle in, the toe arm drops, changing the angle of the tie rod. The effect of lowering roughly cancels out the effect of the added camber.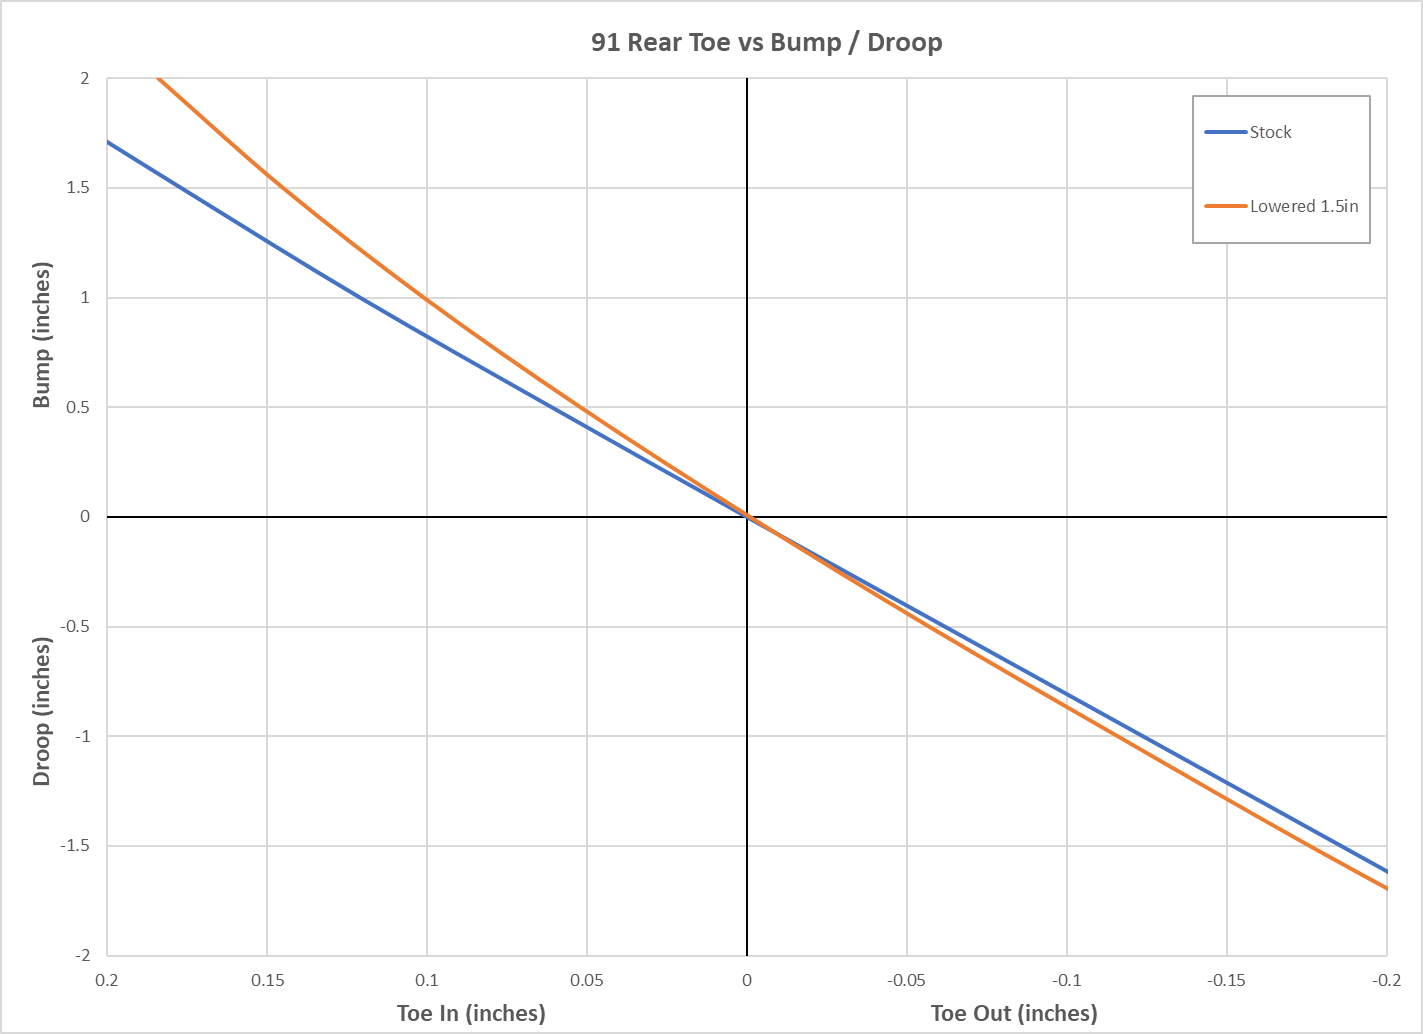
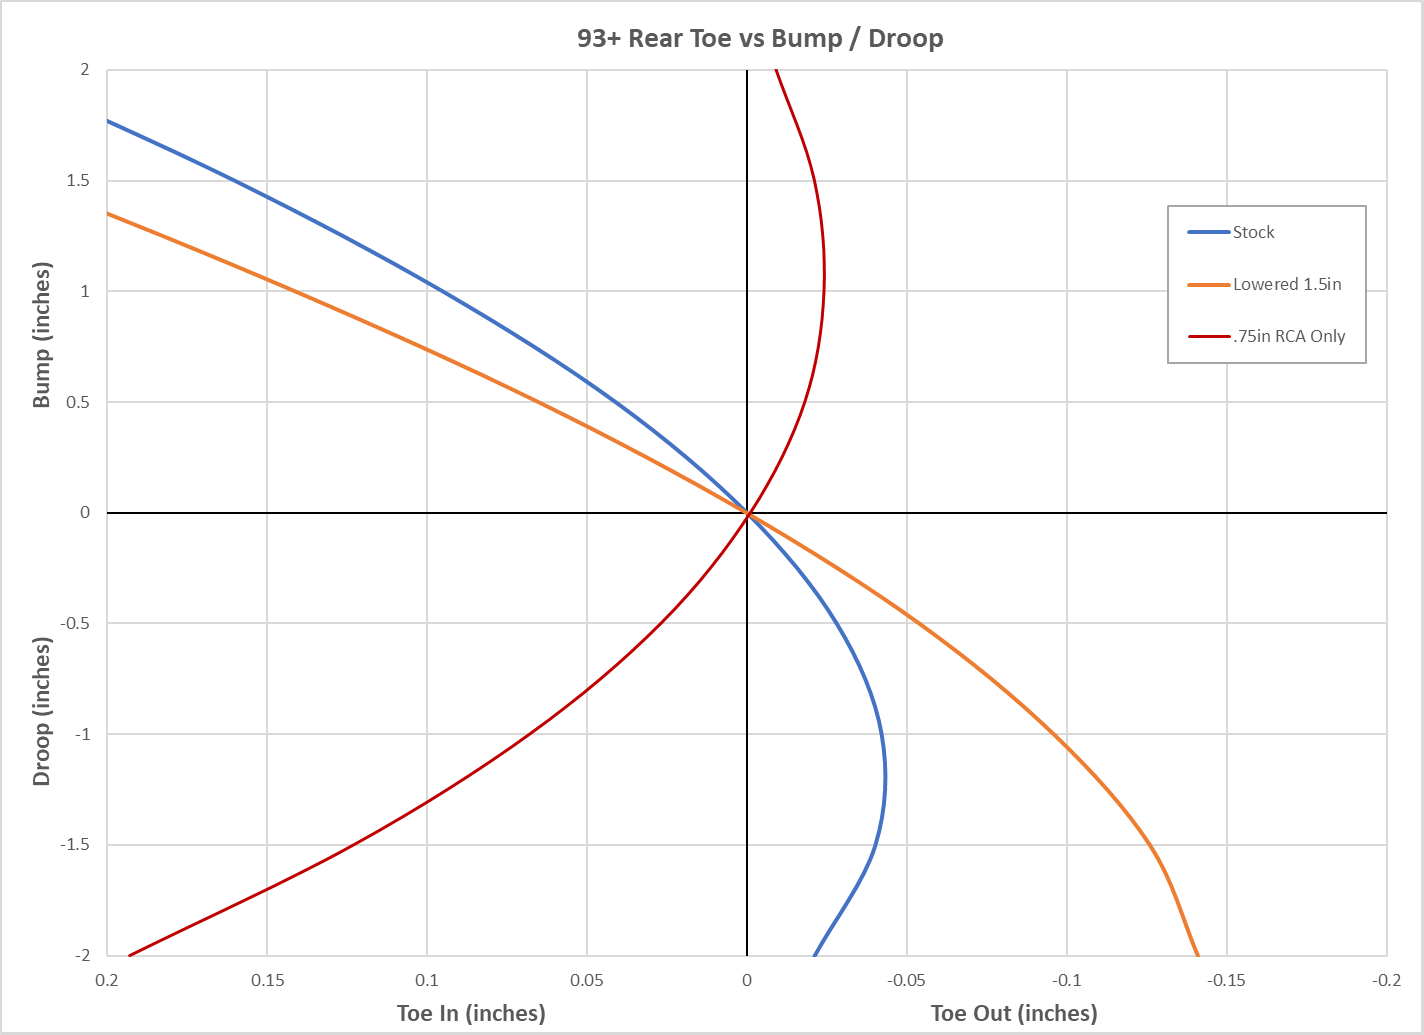
The Rev2+ also sees increased toe change as a result of the additional camber. However; unlike the Rev1, lowering the later suspension shifts it to a different portion of its nonlinear toe curve, and significantly changes the resulting behavior. As you can see, the Rev2+ now behaves much more like the Rev1, with toe in on bump and toe out on droop (although the amount of toe in on bump is even more extreme than it is on the Rev1). Essentially, most of the benefits the later suspension had in being easier to drive pretty much go away when you lower the car.
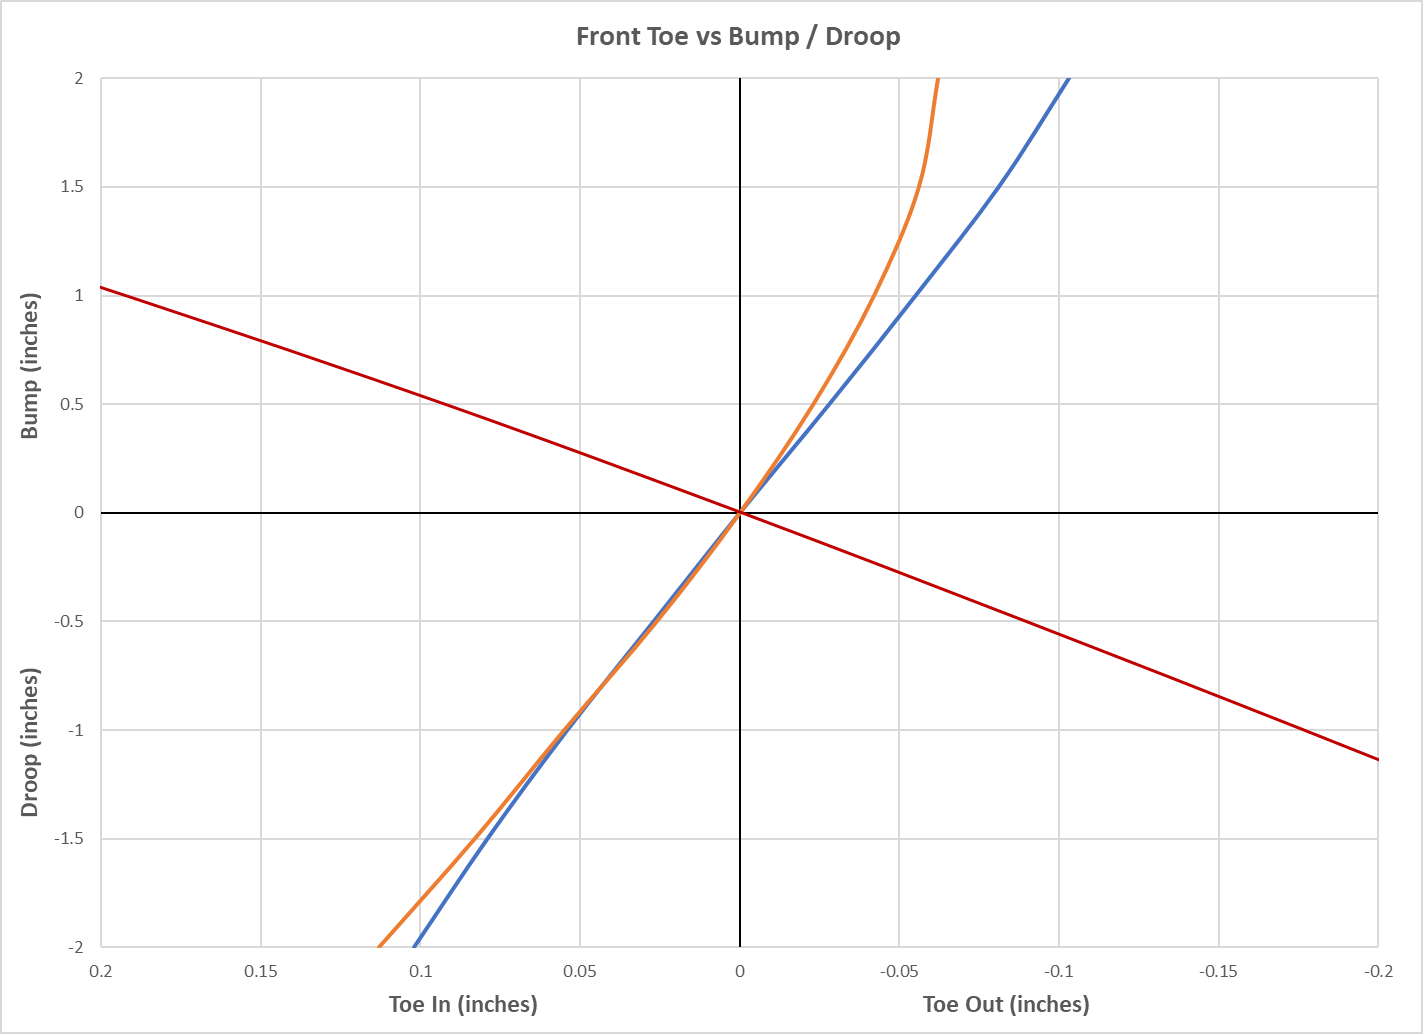
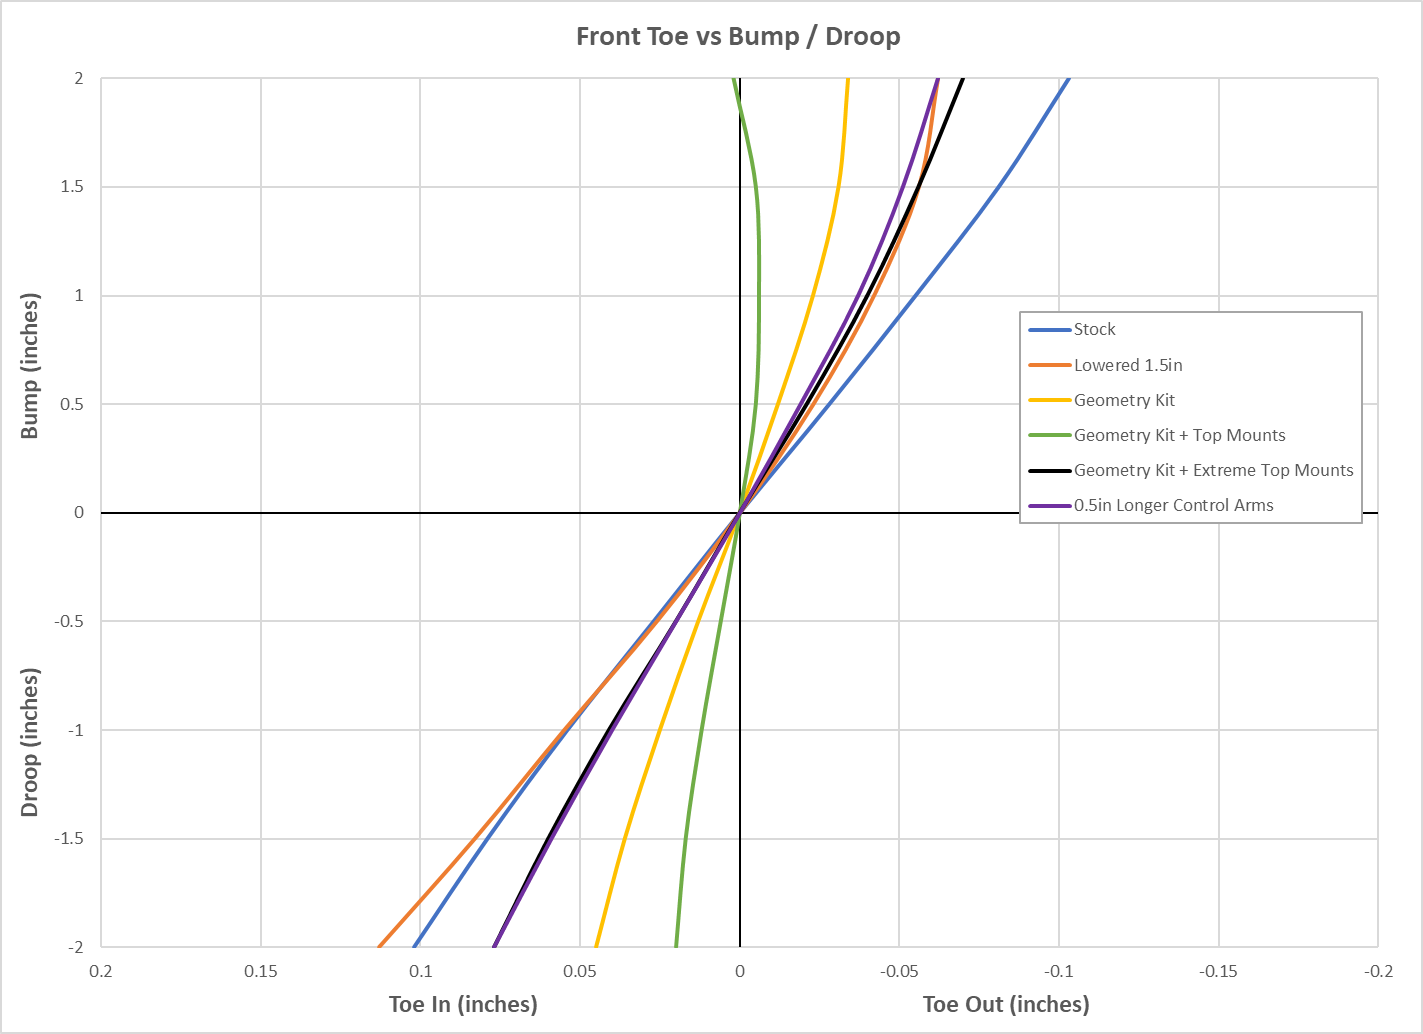
In the front, lowering has a moderate effect on the toe curve, but nothing too dramatic. The added camber also slightly reduces the amount of toe change, as you can see in the difference between the stock curve here and what is shown above for purely stock geometry.
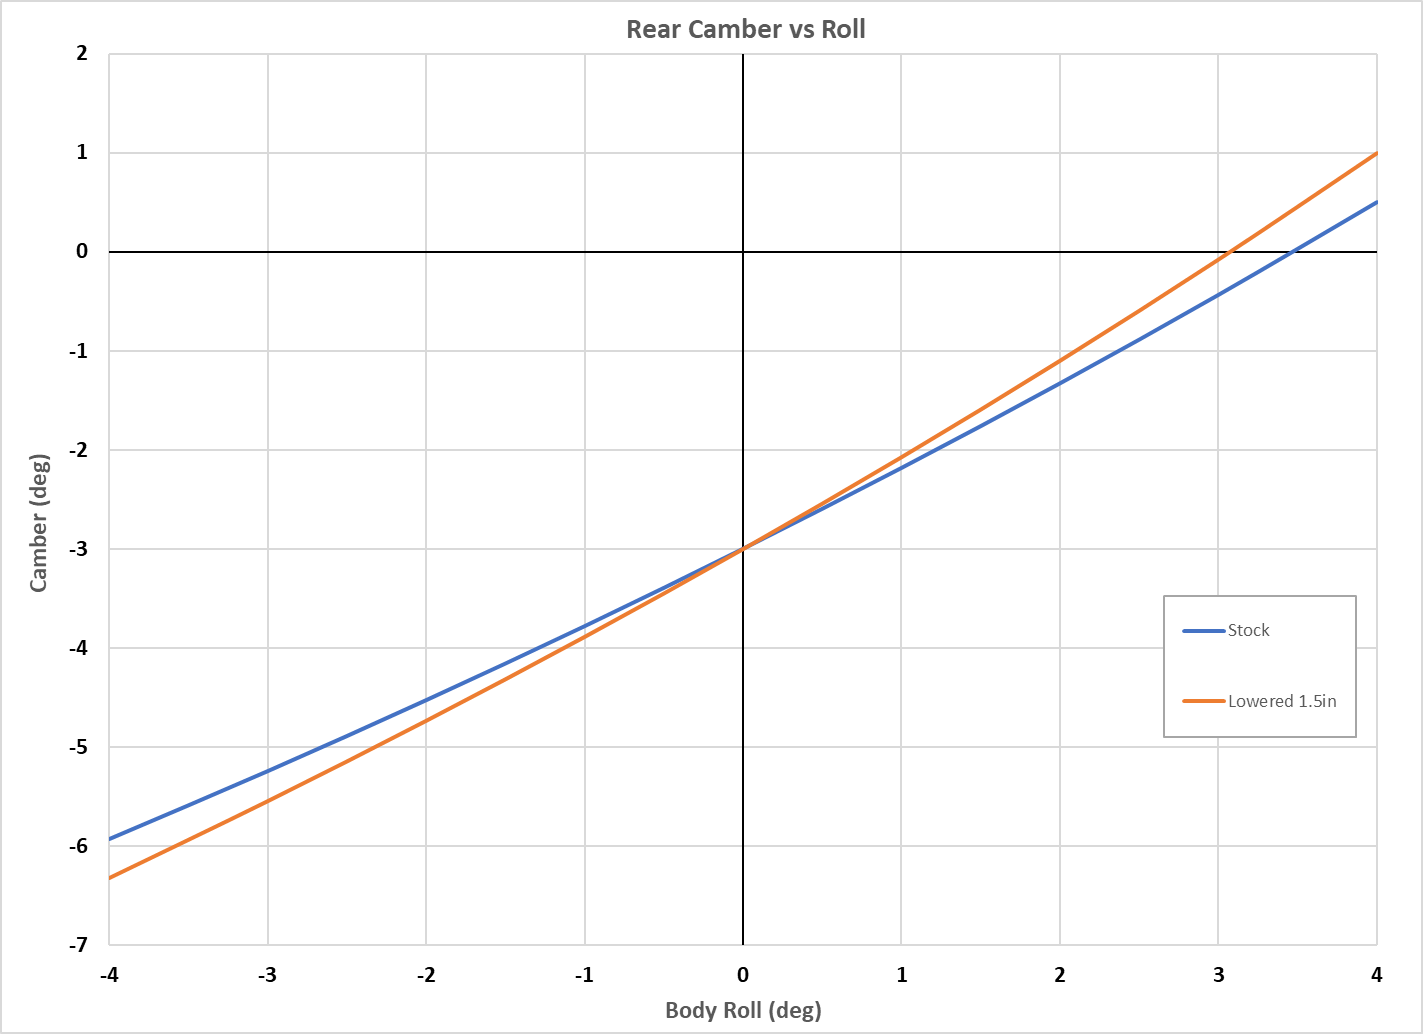
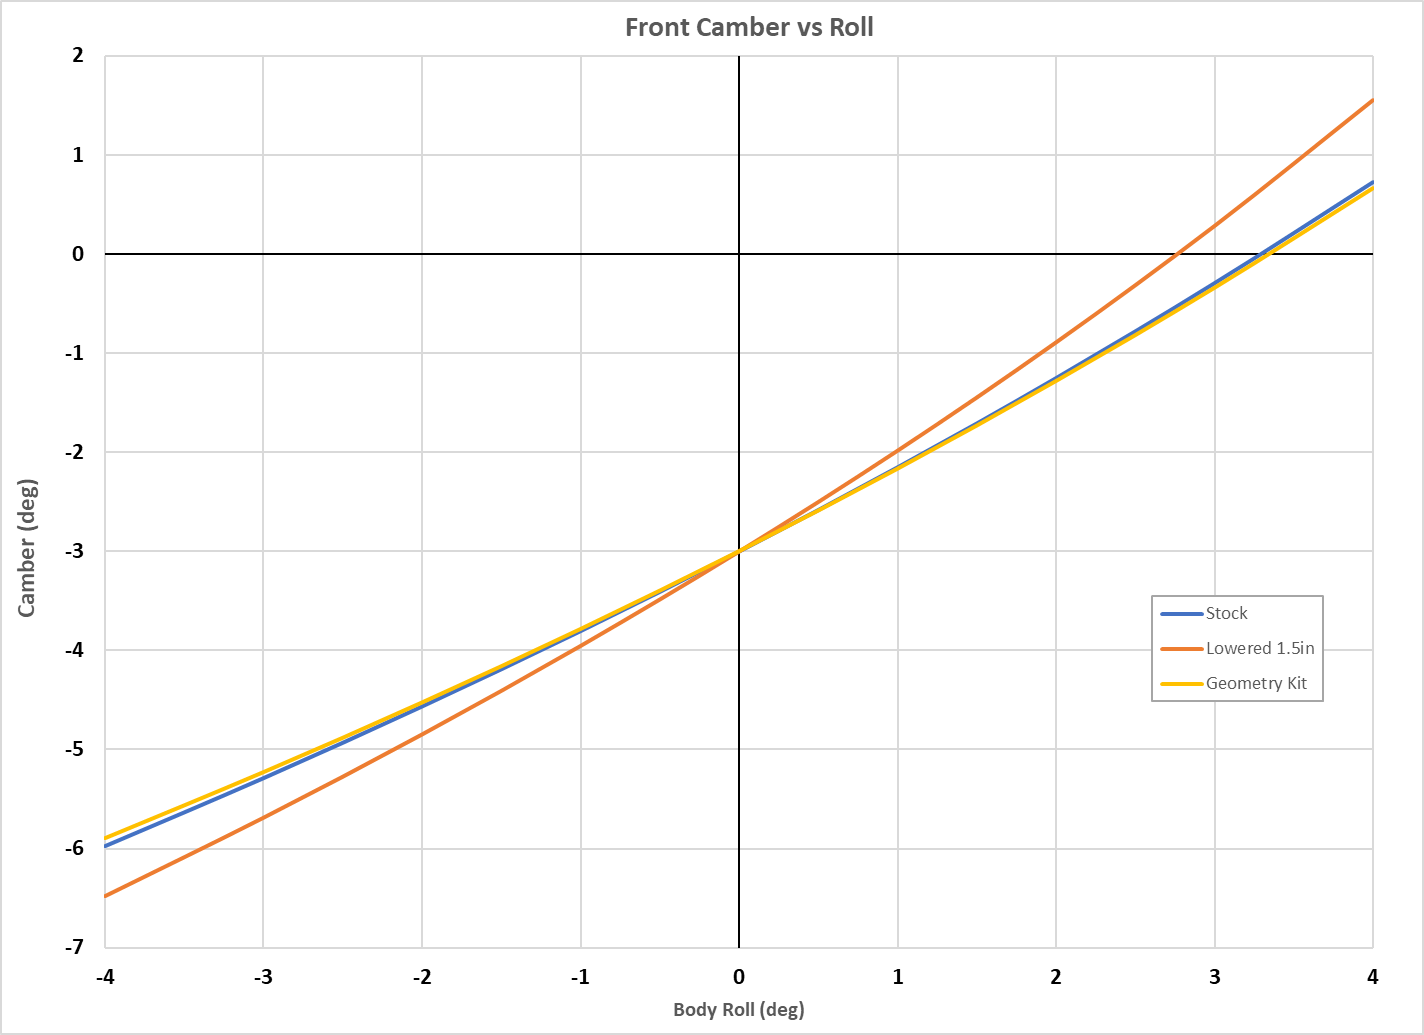
Camber
Lowering also makes the previously "not great" camber curves even worse. As you can see, we now lose a little more than 1° of camber per degree of roll in the front, and about 1° per degree in the rear.
Geometry Correction
OK, lowering the car messed up the roll centers, messed up the camber curves, and (at least on the Rev2+) messed up the rear toe curve. The solution is to put the suspension geometry back to stock without changing the ride height, which we do by spacing the ball joints and outer tie rod ends down. Applying my Suspension Geometry Kit raises the front roll center to 2.5" and the rear roll center to 2.9". Front anti-dive drops back to 23% and rear anti-squat is back up to 53%. Front scrub radius is increased to 0.76" due to the ball joint being spaced down.
| Roll Center Height | Front | Rear |
| Stock | 1.9" | 3.3" |
| Lowered 1.5" (stock geometry) | -2.6" | -0.5" |
| Lowered 1.5" (geometry kit) | 2.5" | 2.9" |
Toe
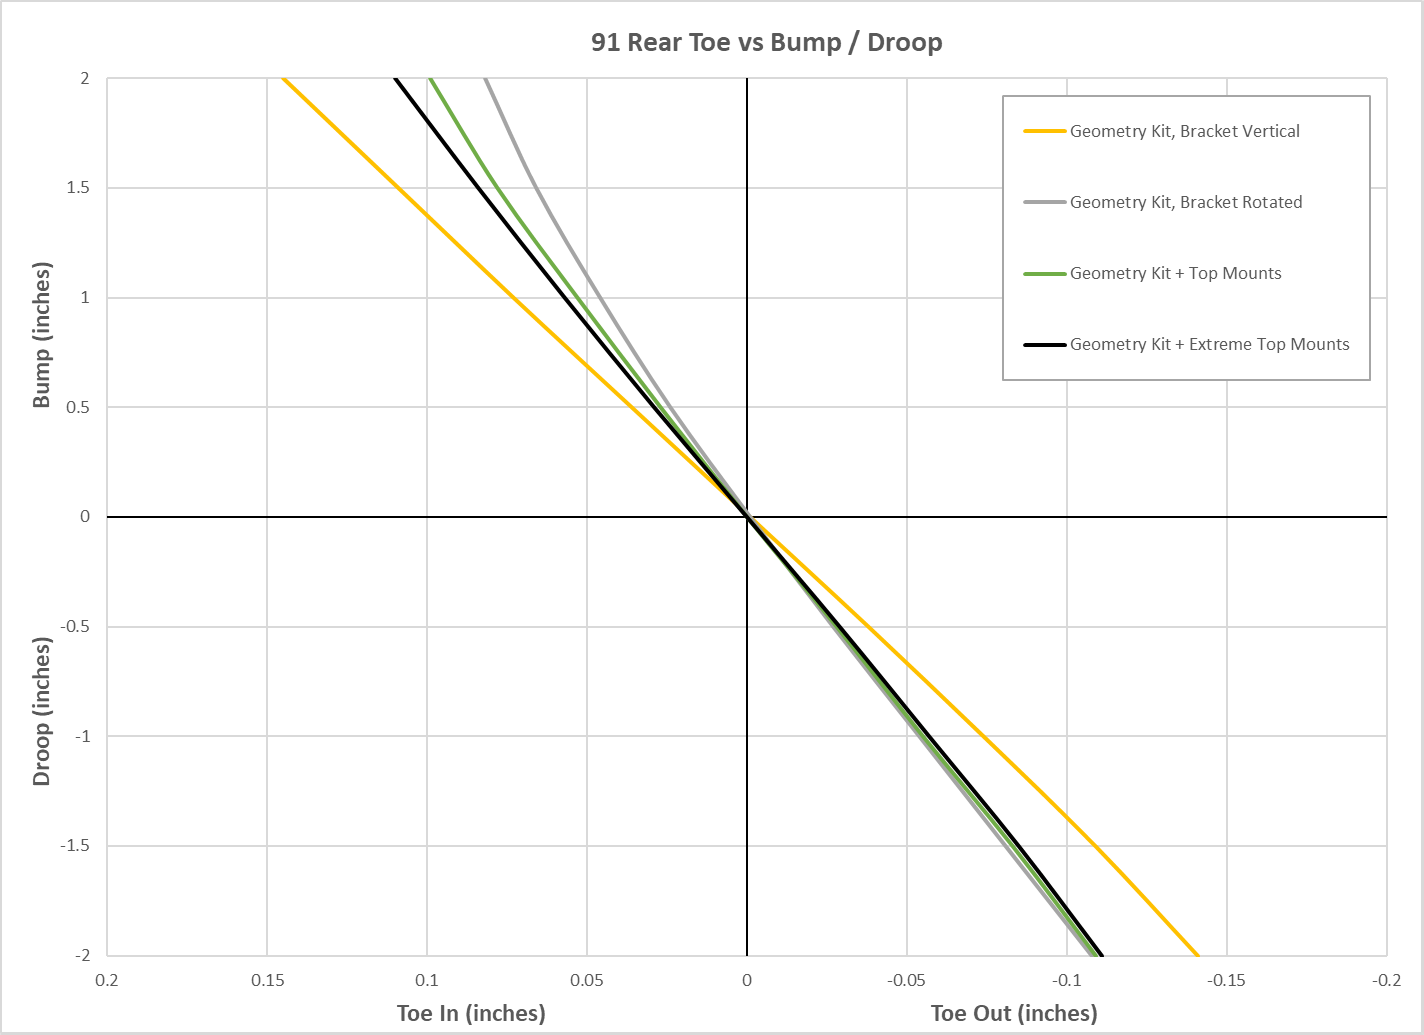
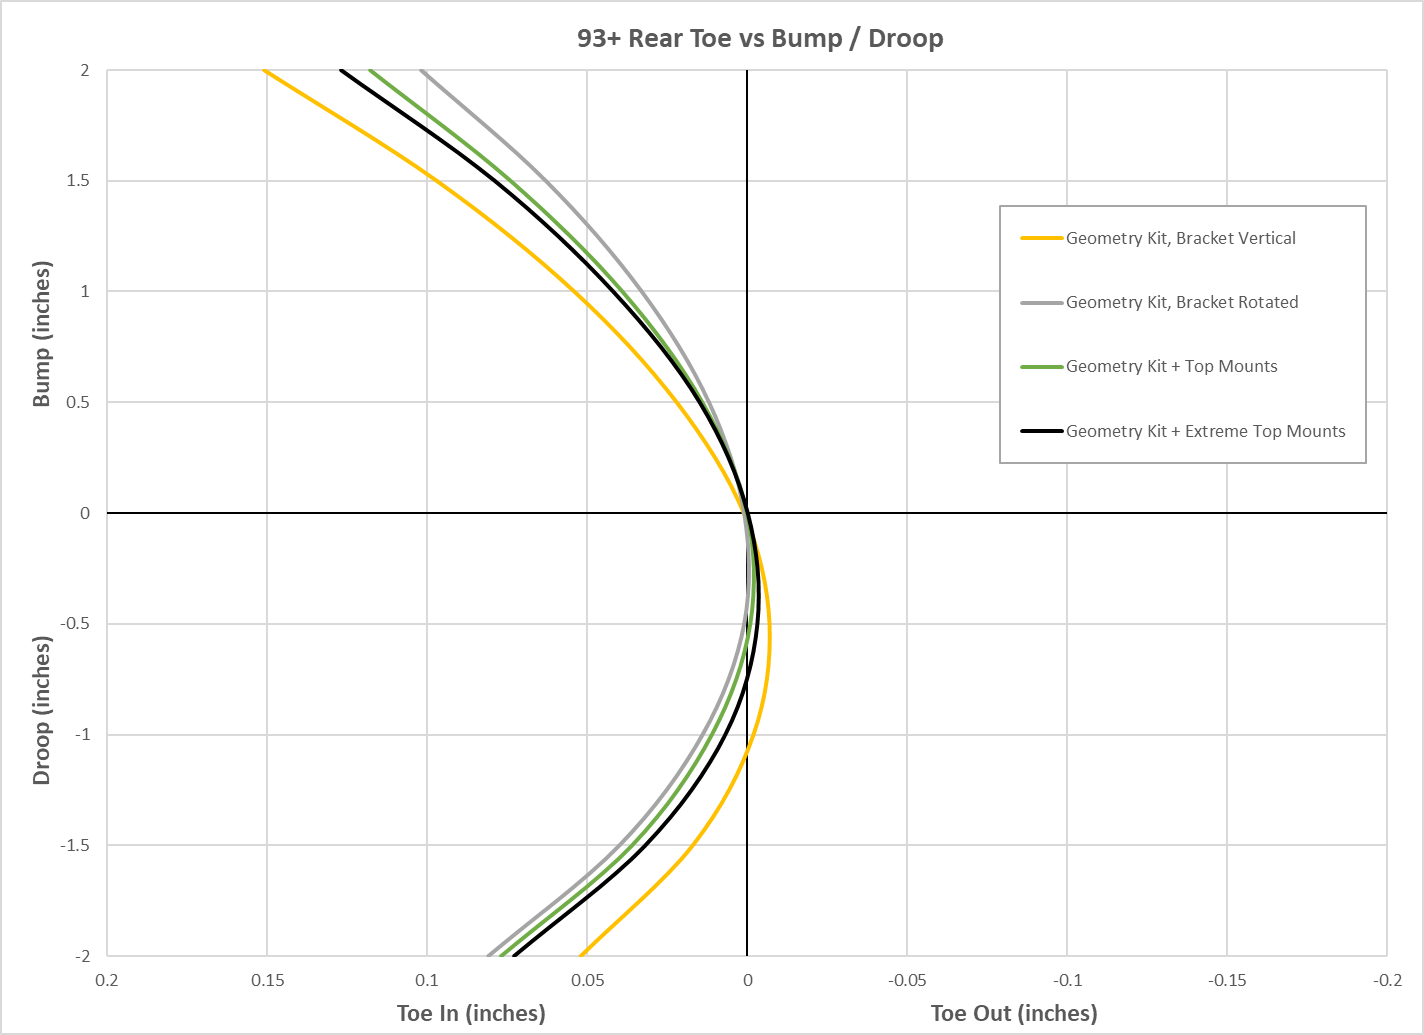
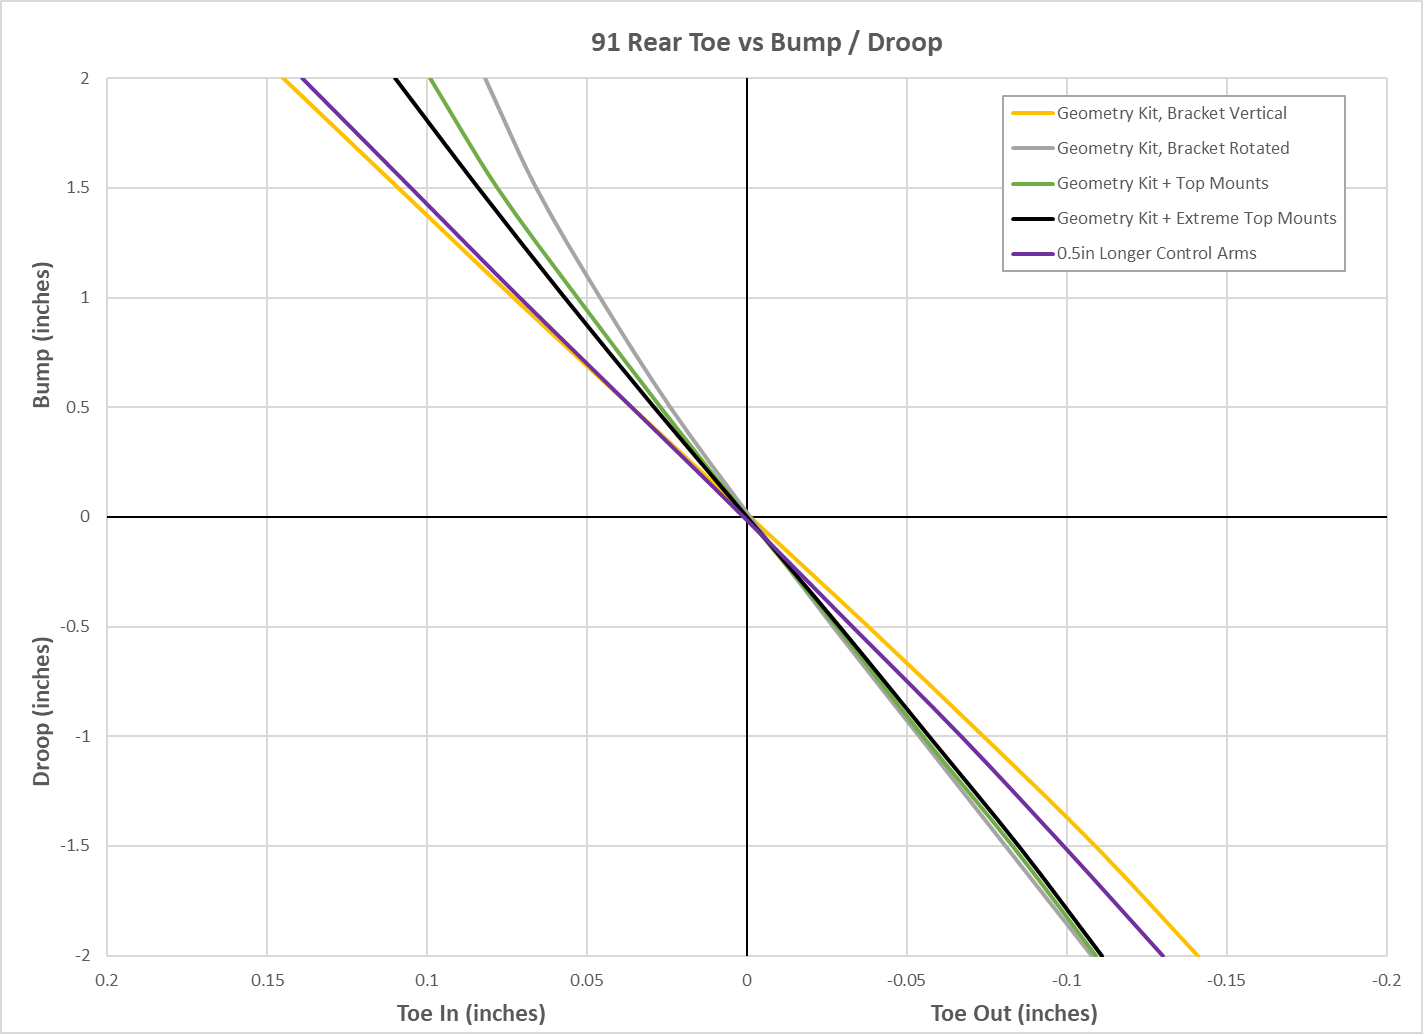
My Geometry Kit was originally designed so that there were two ways to install the rear tie rod brackets. Installing it vertical drops the tie rod pivot by 1.25" to match the 1.25" roll center adjuster. Rotating it inward shortens the tie rod by about 1/2" and raises the tie rod pivot point by about 1/4". Both positions also move the pivot point rearward about 1" compared to stock. The effects on the toe curve of these two positions are shown below. The rearward movement of the pivot reduces the toe change some, and the bracket rotation reduces it even further (more so on the Rev1 than on the Rev2+, although it has an effect there as well). The current kit uses a new bracket design that can only be installed in the rotated position.
In my experience, the effect of rotating the bracket on the Rev1 rear suspension was a profound improvement on the handling of the car. Not only was it much easier to drive and much easier to catch if it started to slide, but I was also able to reduce static rear toe from about 1/4" total toe in to 1/8" total toe in. This caused my rear tires to last roughly twice as long even under autocross conditions.
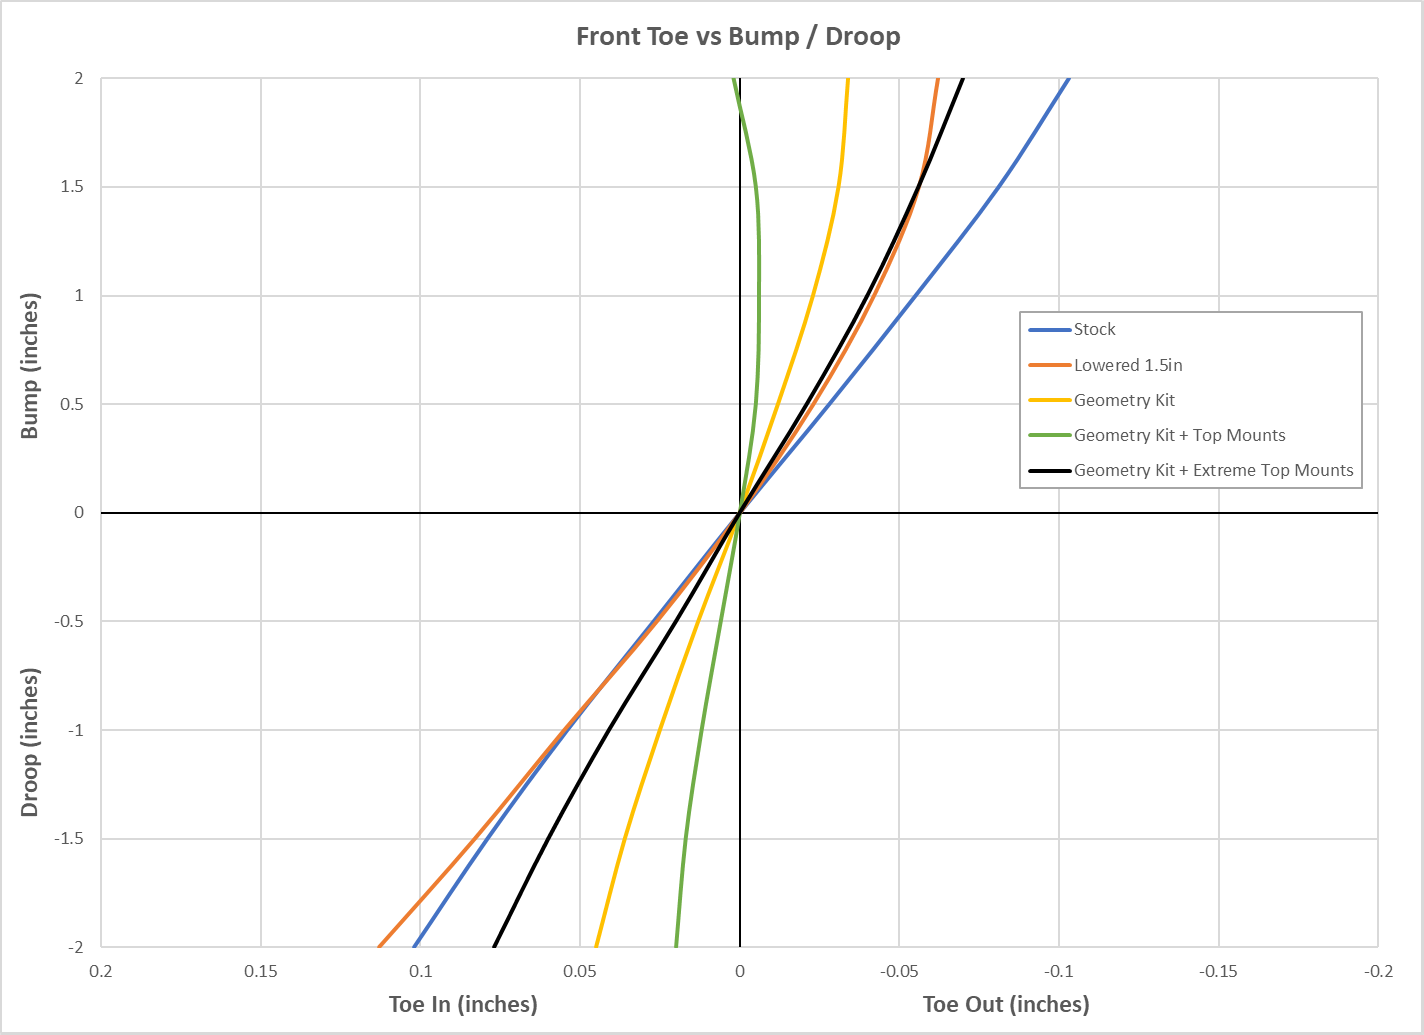
In the front, the kit has slightly less tie rod correction than it does roll center correction, in order to reduce front bump steer. The resulting toe curve is shown below.
Camber
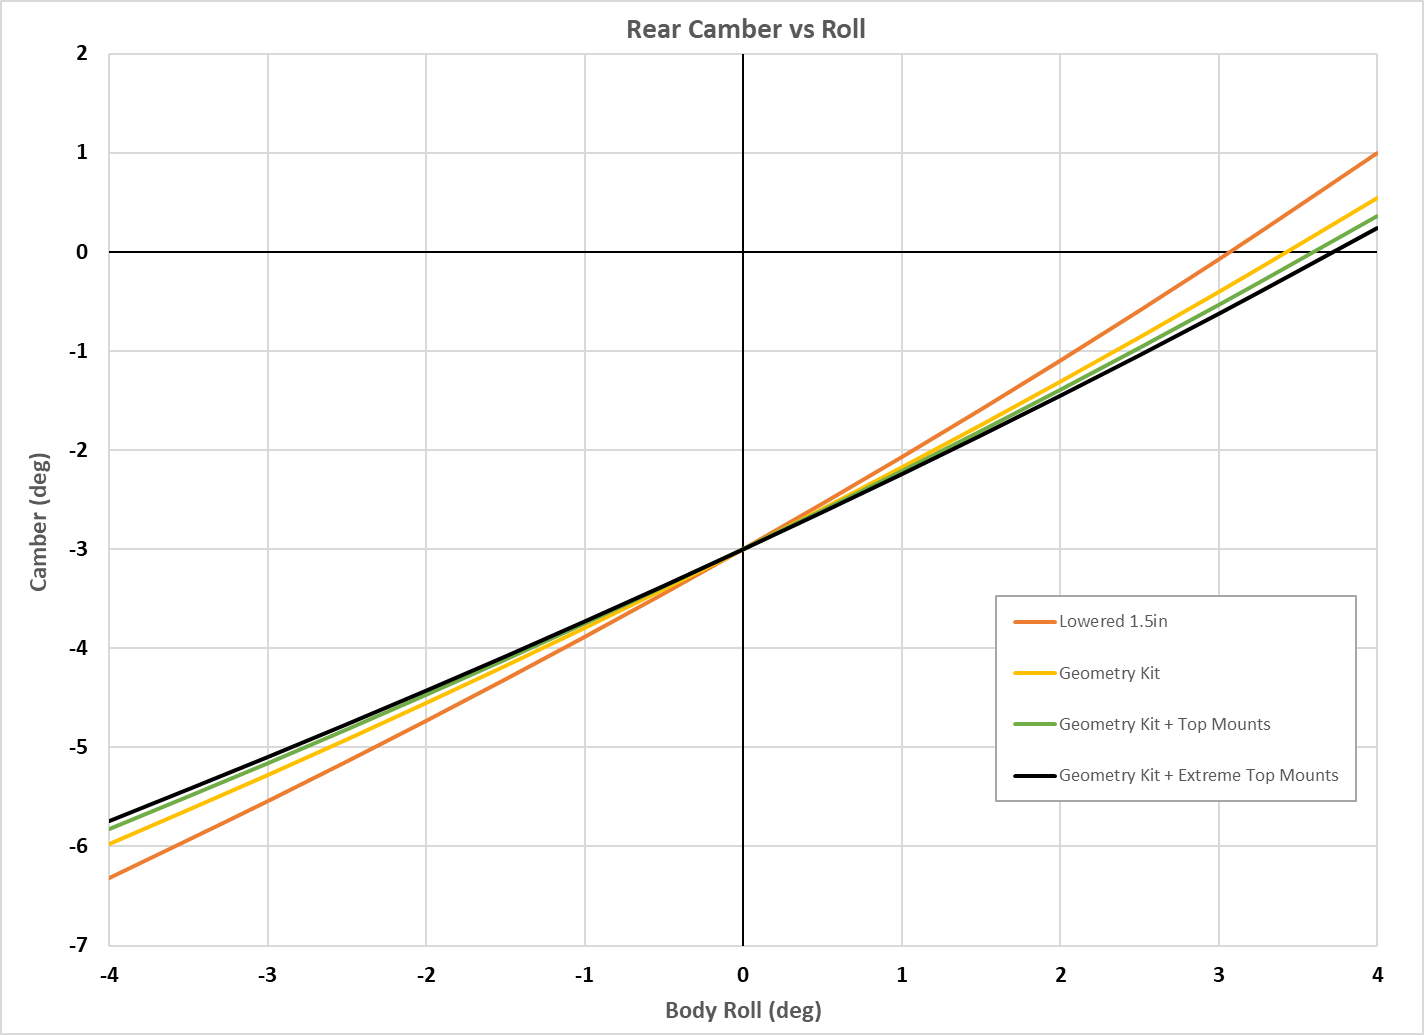
With the geometry kit the front camber curve is restored to slightly better than stock, and the rear camber curve to almost as good as stock. Keep in mind, we lowered the car 1.5" and then applied front RCAs that are 1.75" thick and rear RCAs that are only 1.25", hence why the rear curve is still not quite as good as stock.

RCAs Without Tie Rod Correction
What happens if you try to correct the roll centers without adjusting the tie rods to match? Let's take a look at the toe curves that result from installing 0.75" RCAs and leaving the rest of the geometry stock.
On the Rev1 rear suspension, the toe curve is basically reversed from stock, with toe out on bump and toe in on rebound. On one hand this should provide great stability under braking . . . On the other hand it will make the car twitchy under throttle and will create a roll oversteer condition where the rear wheels tend to steer to the outside of the corner. I would expect this to make the car very prone to oversteer and unable to put down power on corner exit.
On the Rev2+ rear suspension, you now get LOTS of toe in under droop, and minimal toe change on compression. This might actually work, at least it isn't going to toe out very much every time you try to accelerate. It still will tend towards roll oversteer, however, and the lack of any added toe in on compression will hurt stability under power. More static toe will probably be required.
In the front, the toe curve is again reversed from stock, and shows roughly 0.2" of toe change per inch of suspension travel. I would expect the car to be bump-steering itself all over the road!
Also, keep in mind that a 0.75" RCA isn't really enough to correct for the lowering that we did. So the RCAs by themselves have ruined the toe curves, and haven't completely fixed the roll centers OR the camber curves. If we applied thicker RCAs to correct the camber the toe curves will get even worse.
Strut Top Mounts
Another way to improve the camber curves on a strut suspension is by tilting the strut inward at the top. The goal here is not to add additional static camber. Since the MR2 has adjustable camber where the strut meets the knuckle we can adjust strut angle without adding static camber. Tilting the strut in and then removing camber at the knuckle connection also improves tire clearance, which the MR2 can definitely use more of, especially in the front after switching to coilovers.
Camber
I sell two types of top mounts for the MR2: "standard" and "extreme". The standard front top mounts shift the strut top rearward (for more caster) and 1.35" inboard. The extreme front top mounts shift it inboard an additional 0.75". The results on the camber curve is shown below. They also increase caster from ~2.5° to 6°, and raise the roll center by 1" (standard) and 1.5" (extreme). This puts the front roll center at 3.5" (standard) or 4" (extreme) above ground. Additionally, the standard top mounts reduce the front scrub radius to 0.22", and the extreme top mounts reduce it further to down to -0.08" (steering axis now intersects the ground outside the tire center instead of inside). Anti-dive is increased to 28%.

The standard rear top mounts shift the strut top in by 0.75", and the extreme mounts by an additional 0.5". The effects on the camber curves are not quite as great as on the front, since we are adjusting by a smaller amount and the strut is taller. However, when it comes to camber curves on a strut suspension you have to take what you can get. The roll center is raised by 0.2" (standard) and 0.4" (extreme), putting the rear roll center at 3.1" (standard) or 3.3" (extreme) above ground.
At this point we have achieved a rearward sloping roll axis as mentioned previously, although especially with the extreme mounts the roll centers might be getting a little bit too high. However it is it is quite common to want to lower the car a bit more at this point anyway. Lowering the car an additional 1/2" drops the front and rear roll centers by 1.3" (down to 2.7" front and 2" rear above ground with the extreme mounts).
| Roll Center Height | Front | Rear |
| Stock | 1.9" | 3.3" |
| Lowered 1.5" (stock geometry) | -2.6" | -0.5" |
| Lowered 1.5" (geometry kit) | 2.5" | 2.9" |
| Lowered 1.5" (geo kit + top mounts) | 3.5" | 3.1" |
| Lowered 1.5" (geo kit + extreme mounts) | 4.0" | 3.3" |
| Lowered 2.0" (geo kit + extreme mounts) | 2.7" | 2.0" |
Toe
Tilting the strut in with top mounts does have an effect on the toe curve, although for the most part the effects are relatively small. In the front the standard top mounts reduce toe change (mostly due to the added caster raising the tie rod pivot point), and the extreme top mounts then increase it again. Keep in mind that at this point front bump steer is adjustable by adding or removing spacers! Adding spacers above the tie rod will increase toe out on bump while removing spacers will reduce toe out on bump. A little goes a long way here, so if you try to adjust bump steer (especially if doing it by feel without a bump steer gauge) I would change it by no more than 0.05" at a time.
In the rear, tilting the strut in does increase toe change some on both the Rev1 and Rev2+ suspension. Rear bump steer can be adjusted to some extent by adding washers between the outer rod end and the drop bracket (spacing the rod end rearward).
Longer Control Arms
Lengthening the control arms is another way to improve the camber curve and raise the roll center. In the front this also can help clear larger tires as it moves the steering axis out reducing the chance of larger diameter tires rubbing the inner fender at high steering angles. Lengthening the control arms by 0.5" (front and rear) raises the roll centers by an additional 0.2" (front and rear), and reduces the front scrub radius by another 0.2", down to -0.28" (all of these numbers assuming the extreme top mounts are installed). The camber curves are improved as shown below.
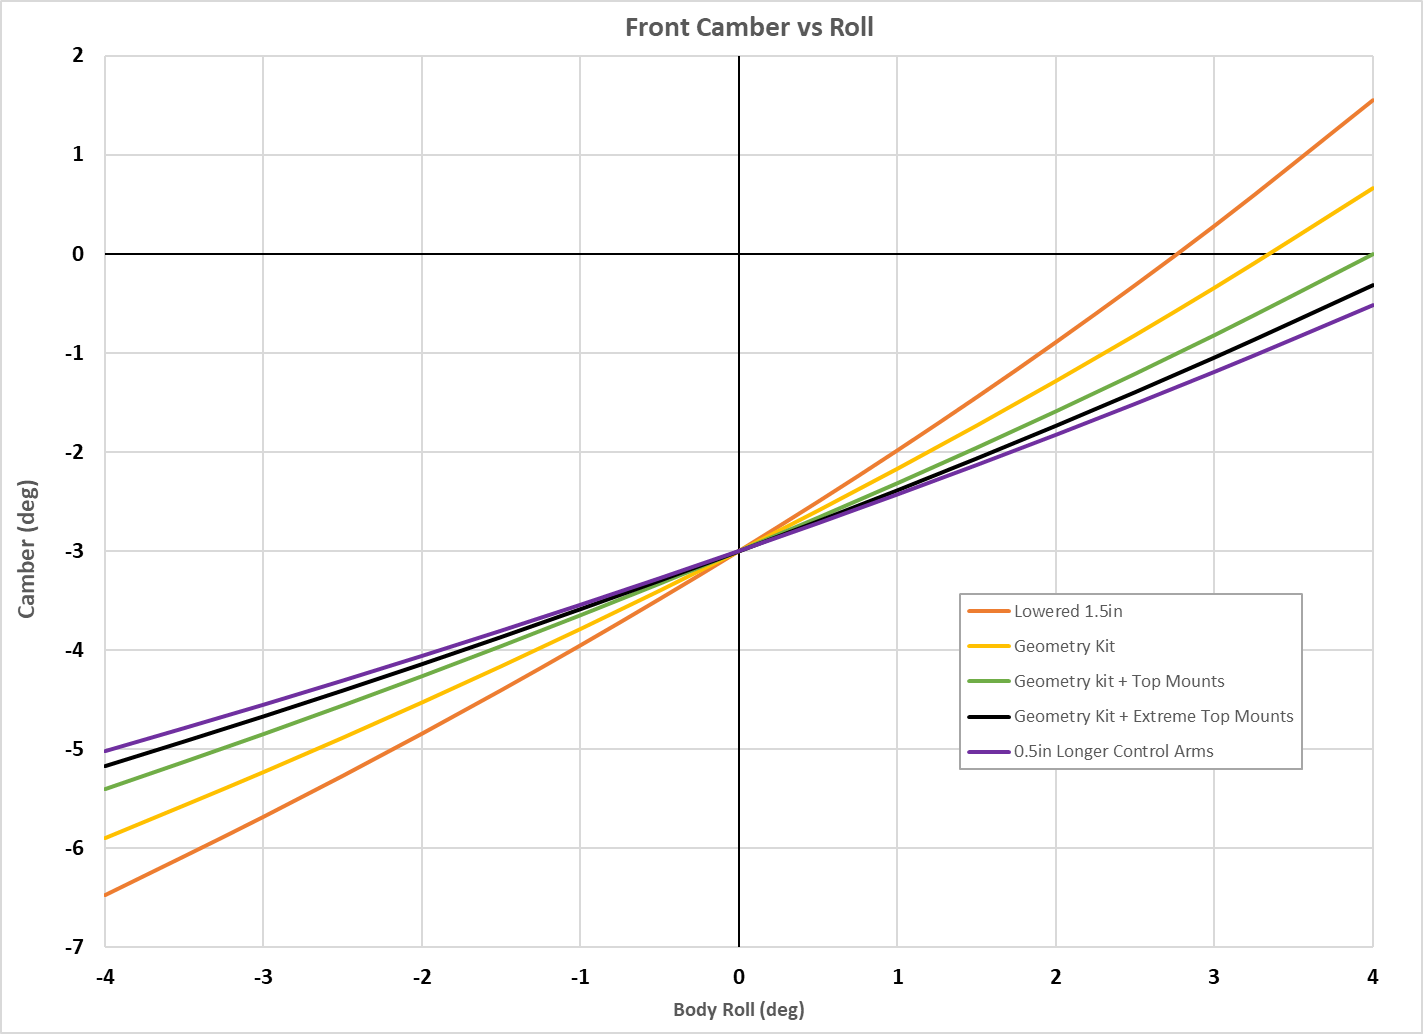
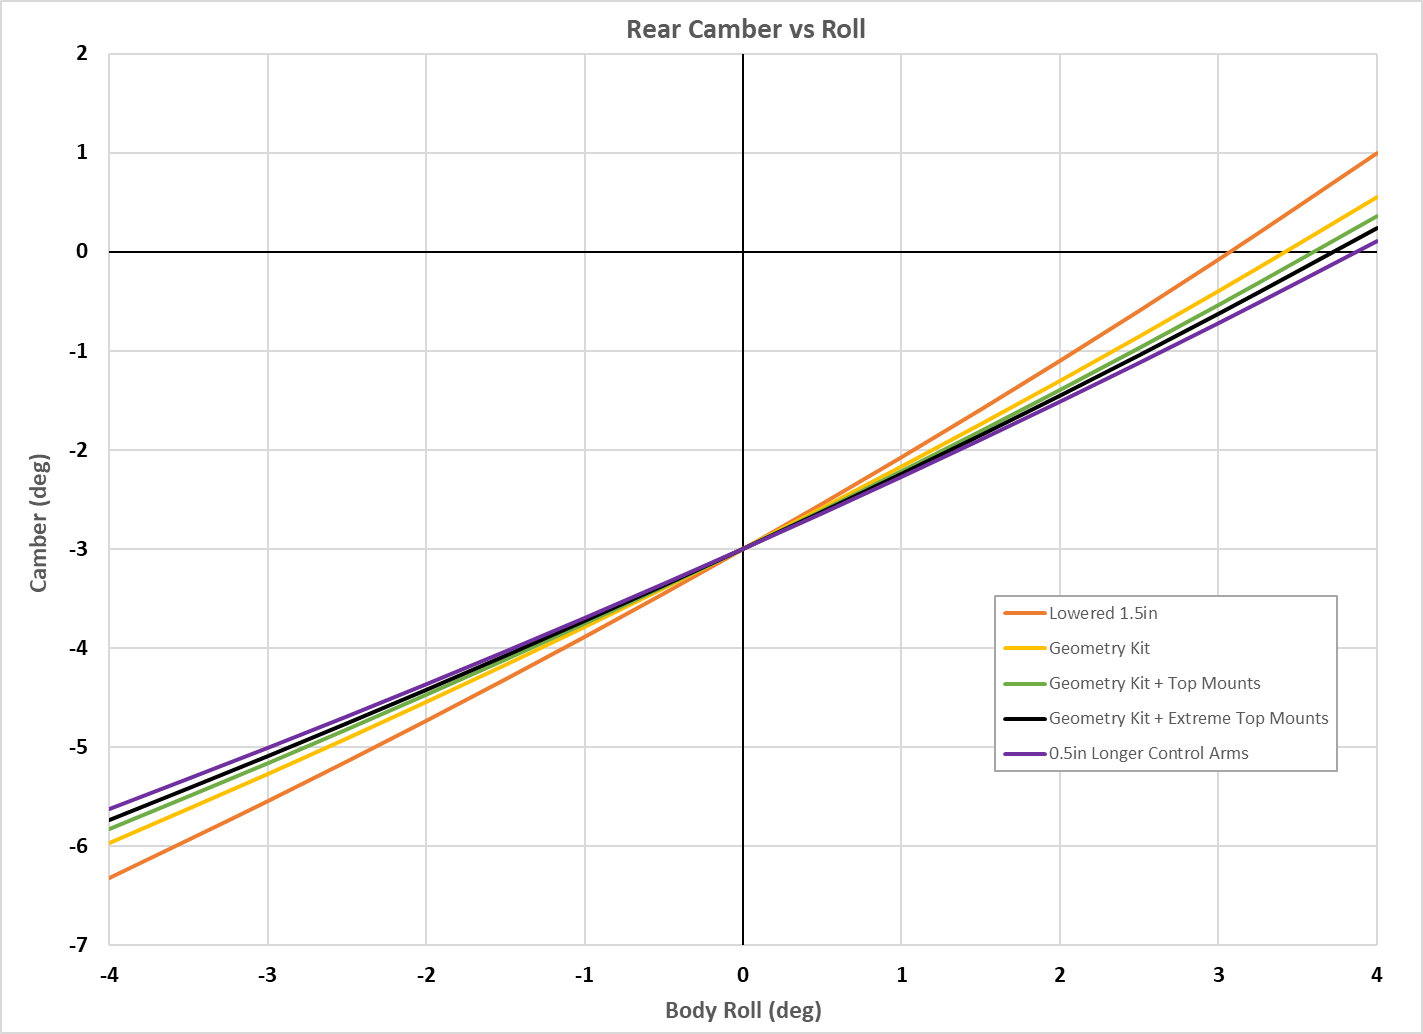
Not a huge improvement in camber curves, but it is something. The longer control arms don't effect the front toe curve very much (and remember we can adjust that), but unfortunately they do have a relatively large effect on the rear toe curve.

Hopefully, this has demystified some of the MR2's suspension geometry characteristics, as well as better explaining why I designed the suspension parts that I sell!