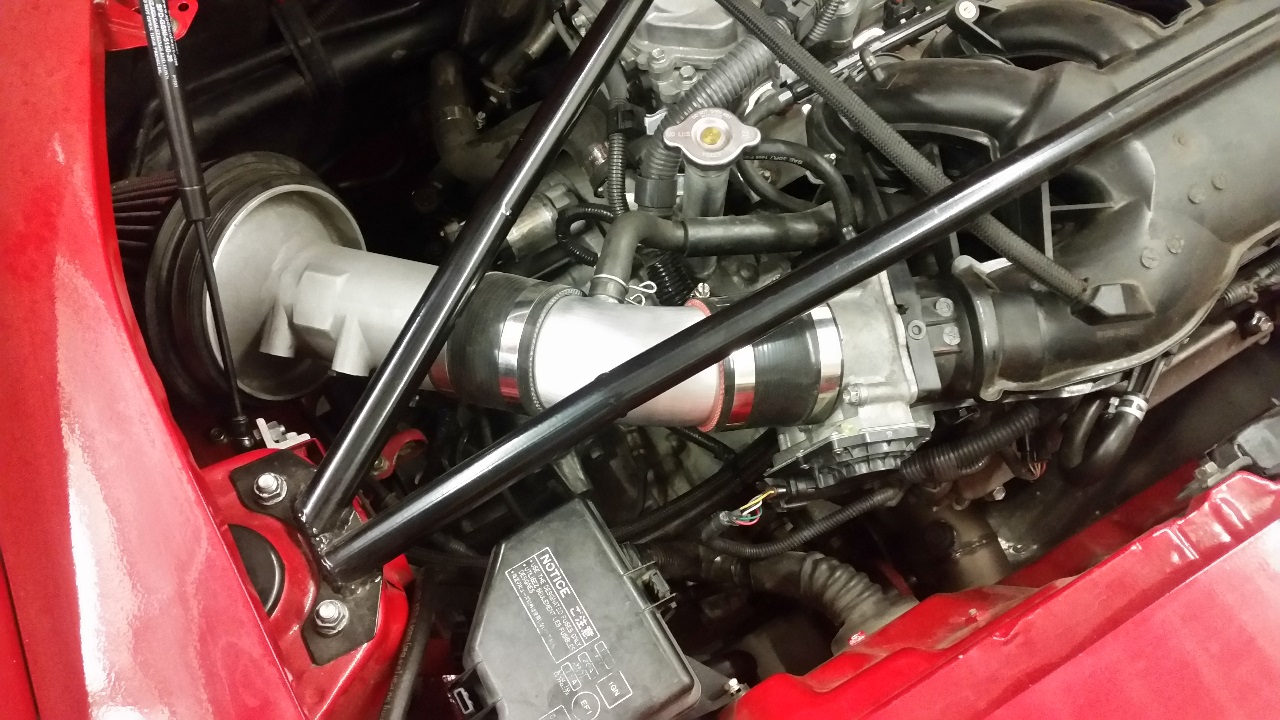
Toyota rates the 2GR at 269hp (at the flywheel), give or take a bit depending on the application. My swapped MR2 initially dyno'd 280hp (at the wheels). Assuming 15% drive train loss, that's 330hp at the flywheel, or a gain of 61hp vs stock and a specific output of 94hp per liter. Not bad for a stock motor with intake / headers / exhaust, but that doesn't mean there isn't room for improvement!
This article was originally published October 17th, 2018 and was updated with new information December 6th, 2019 and January 6th, 2020. Click here to go to the latest additions.
Intake
The intake pipe has been a headache for many with 2GR swaps. While for some a 3" intake pipe seems to work just fine, many others have issues with high fuel trims when using a 3" intake, even though that is basically the same diameter pipe as is found in the stock air box. The issue is that small variations in how the air flows through the pipe can produce big differences in the readings of the mass airflow sensor (MAF). To illustrate this I ran some simulations in Solidworks of flow through a 3" pipe with a sharp edged inlet as found in the stock Rav4 airbox.
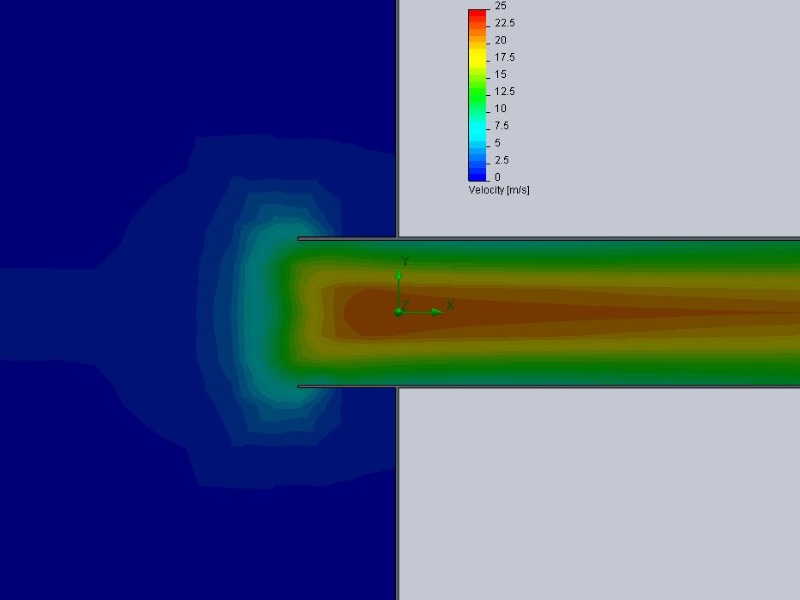
As you can see, there is a spike of high velocity air in the center of the pipe where the MAF sensor takes it's reading from, and a low velocity boundary layer along the sides. The stock ECU is calibrated to read correctly only with this high velocity spike present.
When you put a velocity stack on the end of the same piece of pipe, the velocity profile in the pipe changes dramatically as shown below.
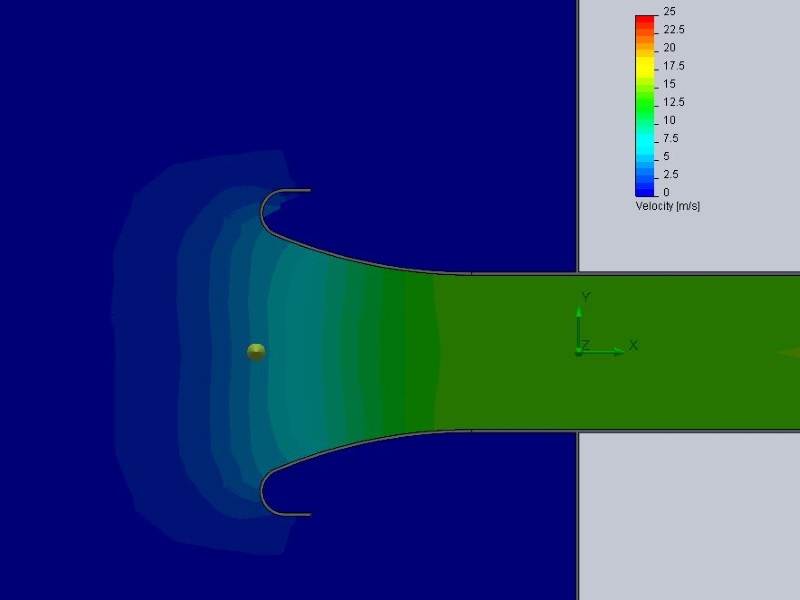
Notice that the high velocity spike is gone, replaced with a much more uniform velocity. This is good for flow and performance, but not good for the stock ECU getting an accurate reading from the MAF sensor. Many cone filters incorporate some degree of velocity stack into their design, leading to this problem. Even without a velocity stack, cone filters seem to have some of the same effect on the flow.
To confirm all of this in the real world, I purchased a stock Rav4 air box off of eBay, and did some bench testing using my shop vac as an airflow source. The results from that test are shown in the table below.
| Test Configuration | Mass Air Flow (g/s) |
| Stock Rav4 Air box | 68 |
| 3" pipe, 8" length before MAF sensor | 60 |
| 3" pipe, 2" length before MAF sensor | 70 |
| 3" pipe with velocity stack | 54 |
| 3" pipe with cone filter | 54 |
As you can see, the stock airbox produces significantly higher sensor readings than the 3" pipe with a velocity stack or filter. A longer length of 3" pipe also produced lower readings, while a short length of 3" pipe with no filter produces readings very similar to the stock air box. Note that this does not indicate that the stock air box actually flows better, only that it causes the MAF sensor to report more airflow. Since the mass flow rate of air is one of the most important inputs to the ECU, you can see why this would be a problem! You can read more about my testing and lots of other theory in this thread on the MR2OC Forums.
Enter Marc from Frankenstein Motorworks. He made a custom cast aluminum MAF pipe made with a built in velocity stack, and produced a custom calibration for the ECU to match. He sent me one to test out.
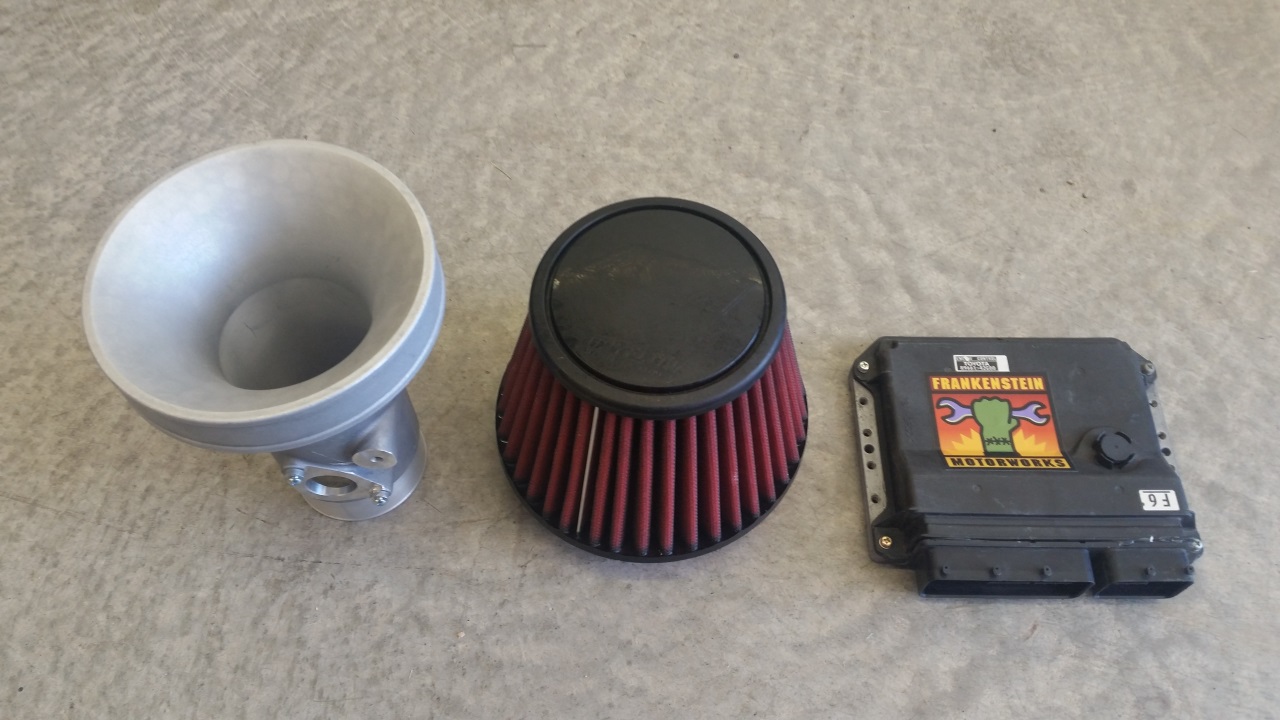
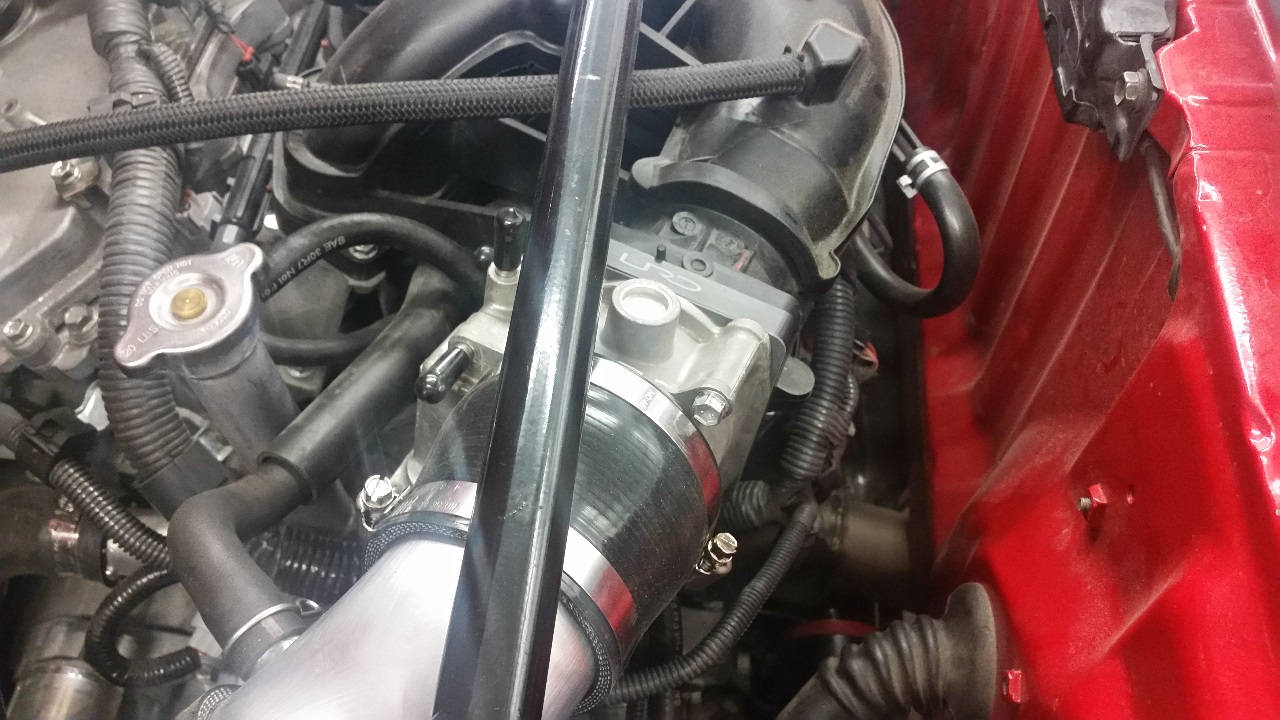
Installed with an elbow for the PCV port and a simple bracket it looks like this. I have a one piece version of this elbow and bracket for sale here.
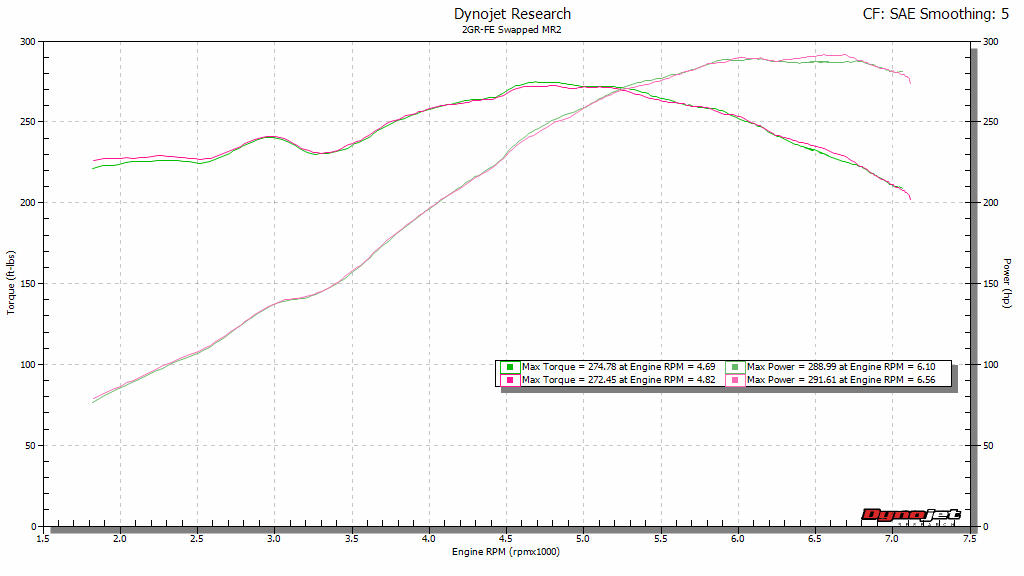
This setup improved my fuel trims tremendously. Previously, with a 3" intake I had very high positive trims (+30% in some areas). High enough that I had error codes for lean conditions and MAF sensor errors. I had resorted to using a 2.75" intake to compensate. With Marc's intake and ECU I am now down to having trims of around +5%, exactly like they should be. I went back to the same dyno that I had used previously, and with just the intake and ECU gained 5hp and about 12ft-lb of torque! It's possible some of that was day to day variations, but not a bad gain none the less. It also runs considerably leaner at full throttle / high RPM (about 12.2:1 compared to stock at about 11.2:1), which not only helps power but should improve fuel economy a little at the track. The new curve does show a dip right around peak power and would likely have shown an even bigger gain without that dip, but we aren't done here!
Intake Manifold
There are, as far as I have been able to find, three main styles of intake manifolds that Toyota has used on the 2GR in various years and models. This doesn't even count the additional variations found on the direct injection versions and other variations of the motor. There wasn't any data out there on if the different manifolds had any difference in performance potential, so I decided to buy them all on eBay and test them! The three styles are shown in the chart below, along with some of the part numbers and applications that they can be found in.
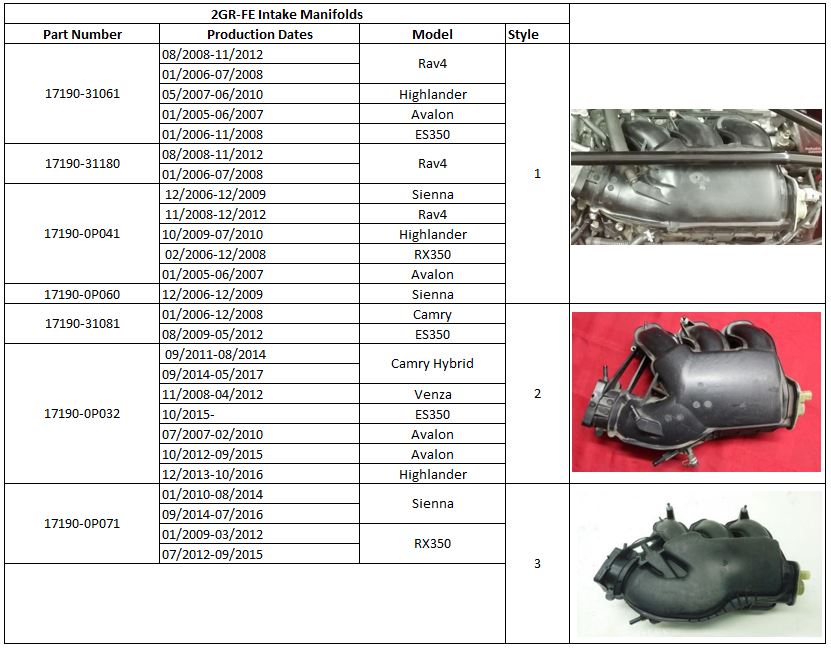
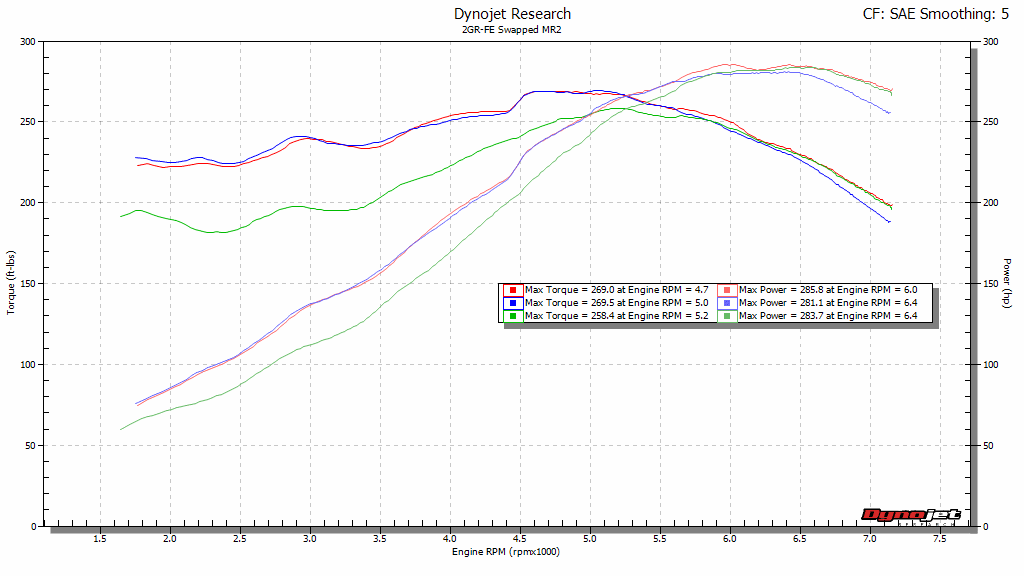
My Rav4 motor came with manifold #1, and that is the manifolds used in the dyno graphs above. In the same dyno session where I tested the new intake, I also brought along manifolds #2 and #3 to test. First, I swapped from #1 to #2.
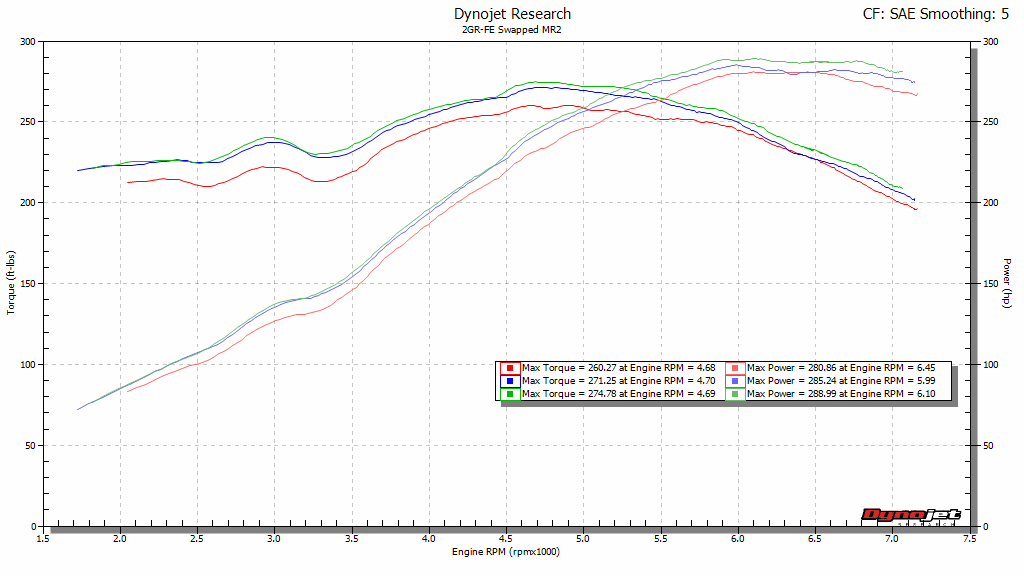
Not bad, a gain of 4hp and it all but eliminated the dip at high RPM. For a manifold that can be purchased on eBay for 50-75 bucks, not bad at all.
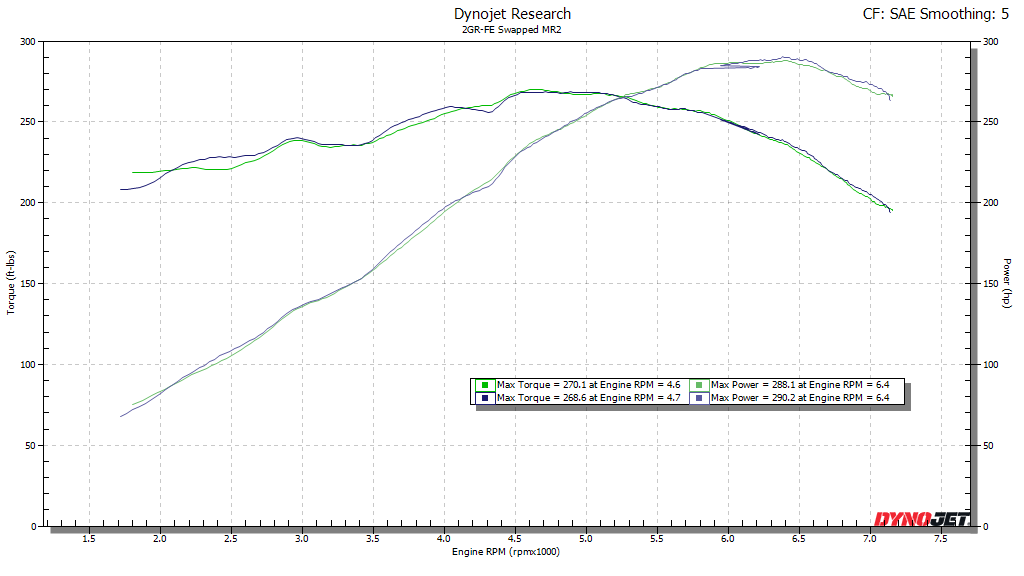
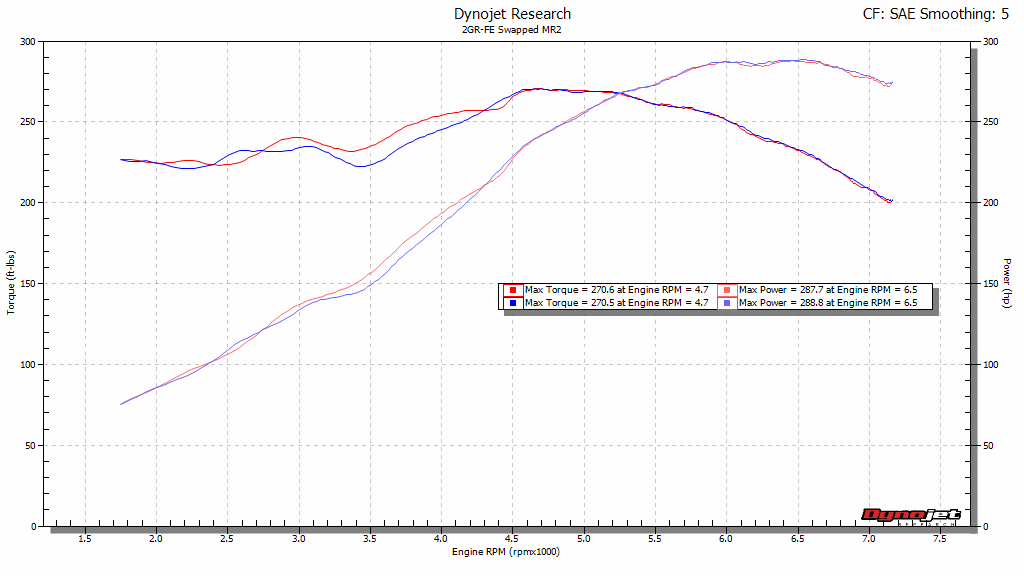
Next I swapped to manifold #3. These results were a bit less impressive.
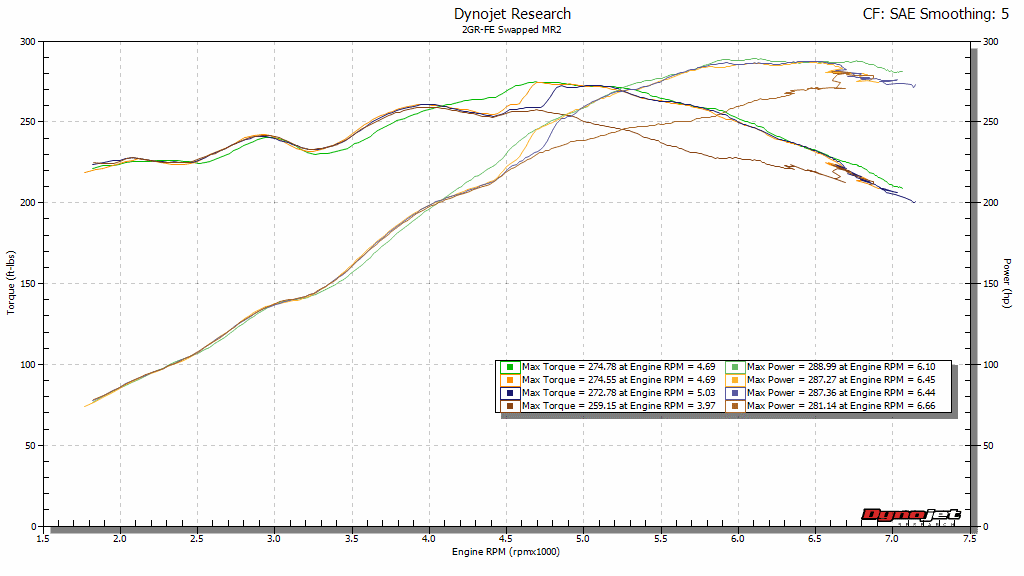
The green curve is manifold #2, while the yellow, blue, and brown curves are three consecutive pulls with manifold #3. All showed an improvement in low end torque, then a big torque dip in the mid-range. The first two recovered from this dip to produce similar peak power, while the third pull did not. My suspicion is that there are two things going on. One is that this manifold was more optimized for low end torque, at the expense of other areas, and two is that something about the ECU tune isn't working with this manifold. Another MR2 owner with a 2GR independently did this same test shortly after I did, with similar results.
In addition to the power problems with manifold #3, it has another problem. Physically, it is HUGE compared to the other two, causing my custom built strut bar to not fit. It is also much more rare on eBay, making it most costly. Bottom line, if you have manifold #3 (found primarily on the Sienna and RX350 motors), you may want to consider swapping it to manifold #2.
(Further independent testing by Frankenstein Motorworks has found virtually no difference between the #1 and #2 manifolds. I don't know why #2 showed more power in my testing, maybe improvements in the ECU tune over the last few years negated any difference in the manifolds? Regardless, it seems that there really isn't any reason to bother with swapping a #1 for a #2, but definately swap out a #3 for either of the other two if you can).
Larger Throttle Body
As mentioned previously, Toyota rated the 2GR at 269hp. They chose to put a 70mm throttle body on it. Compare that to the 5.7L 3UR-FE V8 that they put in the Tundra and other large SUV's, which they rate at 381hp, and chose to put a 76mm throttle body on. Given my estimated crank horsepower at this point of ~350hp, I am much closer to that 381 number than to the original 269 number. With that in mind, I was hoping that installing the larger throttle body from the 3UR would be worth a few hp.
Underdog Racing Development sells an adapter to mount the 76mm throttle body on the 2GR manifold. It is marketed for the Tacoma, but it turns out that it fits our manifold as well. The actual inlet to the manifold is 73mm, and the adapter has a nice taper to adapt the 76mm throttle down to match. Since the stock throttle body to intake joint is sealed with an O-ring, a gasket isn't readily available for joint between the new throttle body and the adapter. So I drew up a gasket in CAD and had a friend with a laser cutter cut a gasket out of gasket sheet. Here it is installed:
On the dyno, the gains were not quite what I had hoped for. Almost 2hp at the top end, and not much else. Not a great gain for the price ($65 for the adapter and about $100 for a throttle body on eBay). Perhaps with cams or other flow enhancing mods the throttle would become more of a restriction and it would be more worthwhile. It also has the side effect of causing all of the idle speeds to rise by about 100RPM. I haven't noticed any significant effect on throttle response, but in theory it will also make the throttle slightly more sensitive as well.
Exhaust Restriction
At this point I found myself wondering if my Berk Technology muffler might be in any way restricting exhaust flow. So, just for kicks, I removed the exhaust on the dyno and did a couple of pulls with just the headers and Y-pipe. As you might expect, this made a LOT of noise, but no additional power. It actually showed a very small loss even, mostly in the mid range. I may at some point build a new muffler section to drop some weight off the back of the car, but it isn't likely to make any more power. This test was done with the 76mm throttle body installed. Blue is with the Berk Technology muffler installed, green is open y-pipe.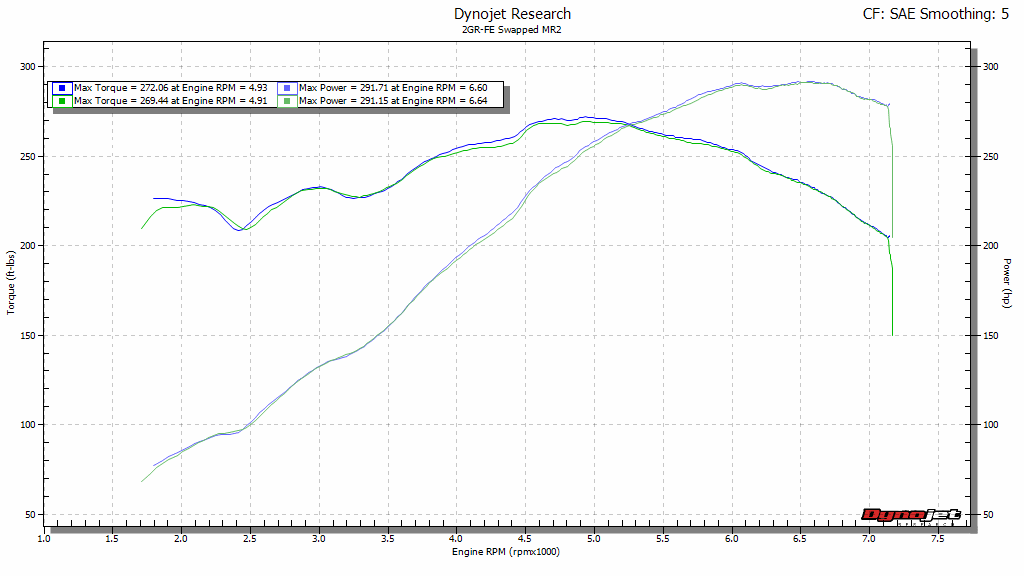
I also tested open headers at about this time. Technically an elbow and about a 1' section of pipe, with the AFR sensor mounted in it. There was no y-merge or other connection between banks in this test, making it a true dual exhaust system. This is shown in blue below, and made virtually no addition power vs the y-pipe and Berk muffler (green).
VVTi, ACIS and Future Tuning
In the process of testing various ECU maps for Marc, I also ran a few pulls with the cam solenoids un-plugged to see just what effects the VVTi is having on the power curves. The dyno below shows a baseline pull (red), the exhaust cam unplugged (blue), and the intake cam unplugged (green).
As you can see, the intake cam timing changes add significant low end and mid-range, and the exhaust timing adds top end by adding cam overlap. Marc and I are continuing to pursue optimizations to the cam maps, and if I come up with any magic map that shows significant improvements I will add the results here.
I also tested the effects of unplugging the ACIS system. ACIS is a flap in the intake manifold that effectively varies plenum volume and runner length to tune intake resonance. The results of unplugging it are shown below.
As you can see, the ACIS system provides a pretty significant improvement in torque from 2800 to about 4300 rpm. However, it is opening just a little too late, causing a loss of torque at about 4400. I should be able to take control of this away from the ECU and instead control it with my Race Capture data logger, allowing me to fine tune the opening point.
Update December 6th, 2019
Lower Manifold Porting
I have read of others seeing gains from porting and polishing the lower intake manifold casting, but never any description of exactly what is done to it, or what kind of gains are possible there. But of course I had to try it. I ended up completely smoothing out the injector boss on the inside of the manifold, as shown below in the before and after photos below. I also smoothed what casting lines there are (minimal), and removed the casting texture as well.
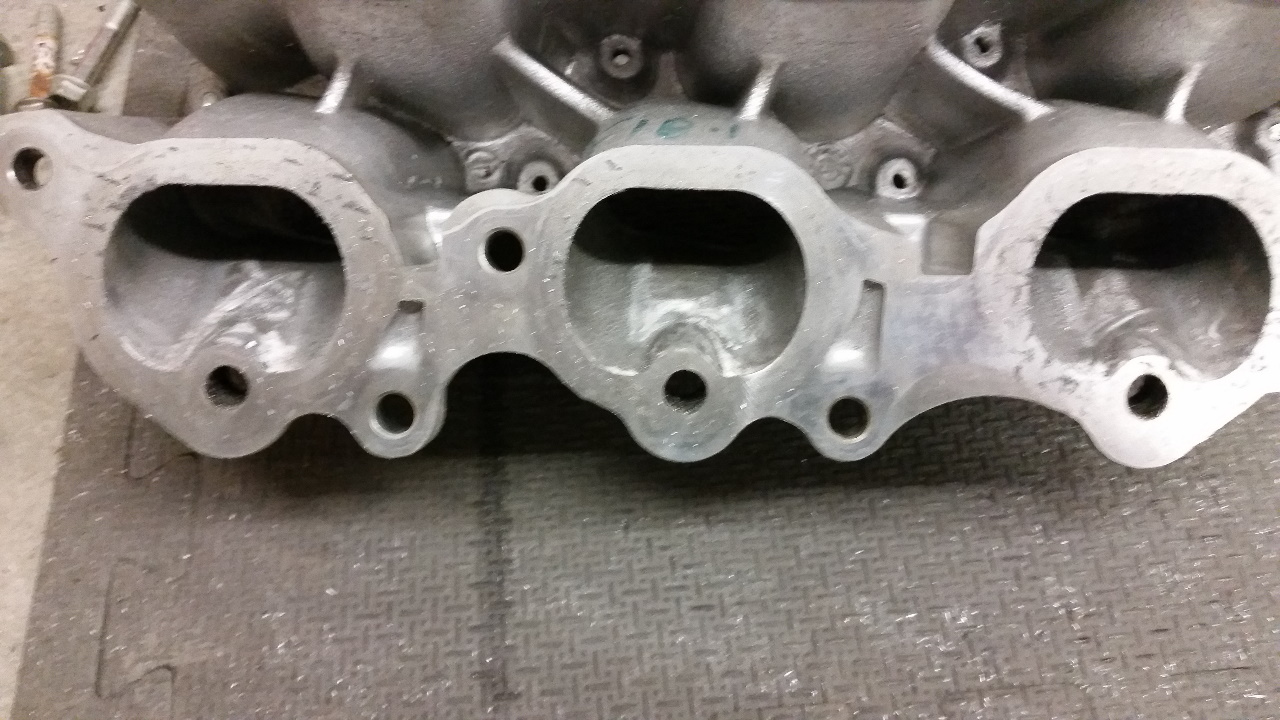 |
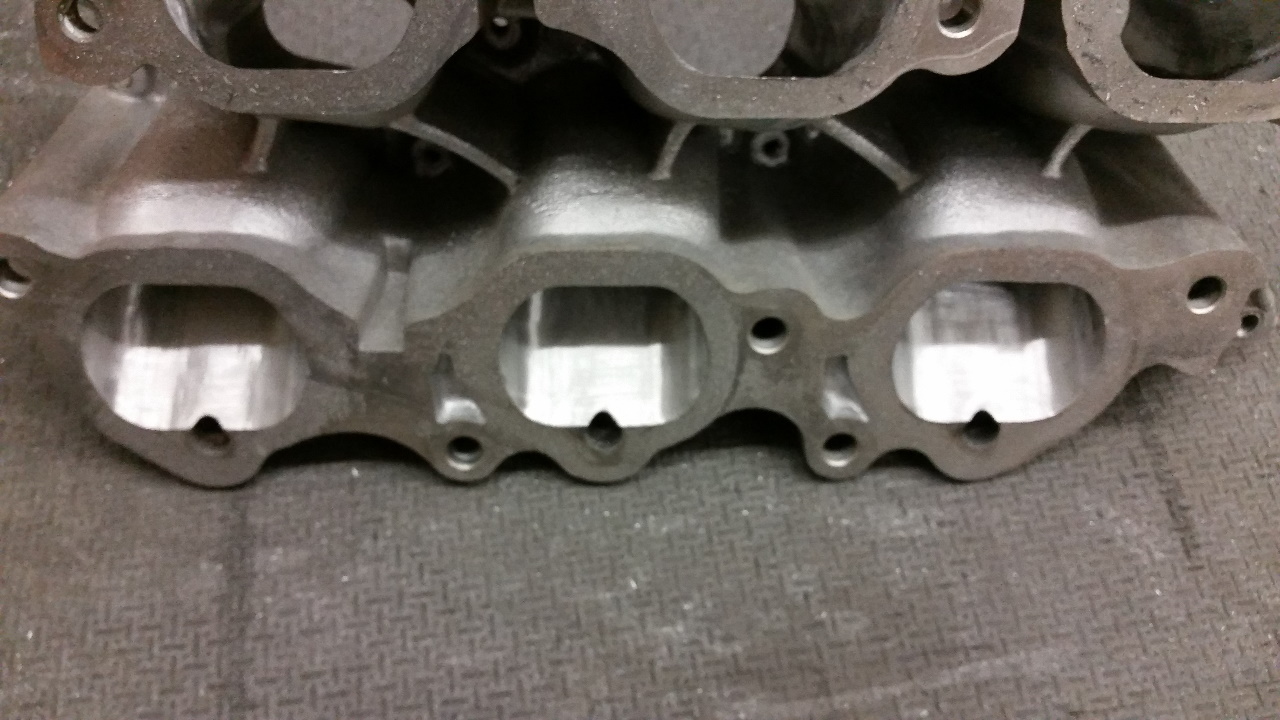 |
The dyno below shows the results. Ignore the gains below 5000rpm, those are due to some refinements in the VVTi maps. But the gains above 5300rpm I believe are due to the lower manifold porting work. 5hp, for free! I believe this is the best, and perhaps the only completely free power gain so far documented on the 2GR. Unfortunately the before and after on this one were not on the same dyno or the same day, but the peak torque number matches almost exactly to what I have seen in the past on previous dynos, so I believe the results are accurate.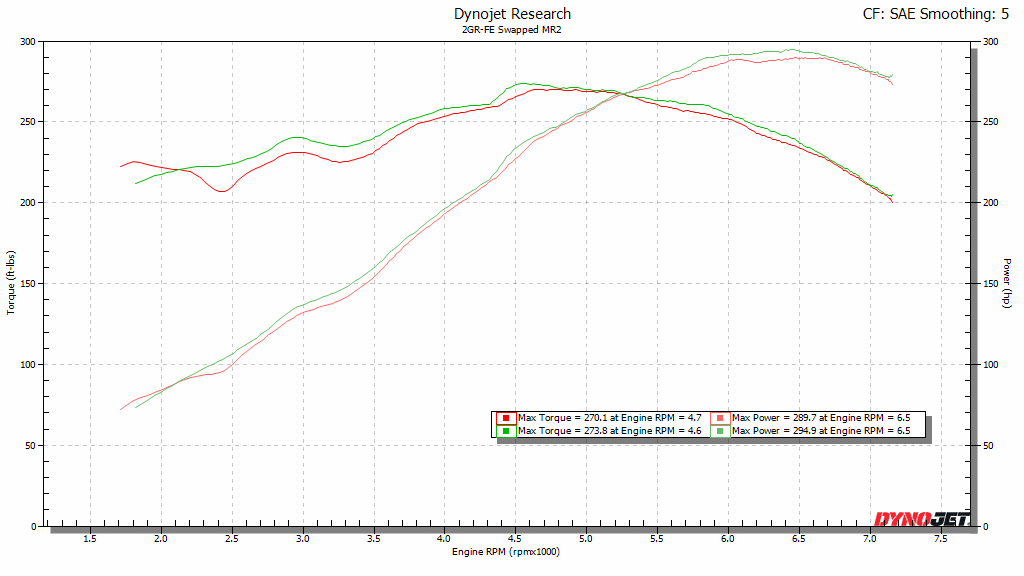
Caution! Others have found that there is a significant amount of variation in the castings for these lower intakes, causing some people to break through into the injector seal area when completely removing the injector boss as I showed here. Others are able to remove the boss completely flat without issue. Proceed at your own risk, and be prepared to buy a new lower intake on ebay if you break through. You may wish to leave a slight hump around the injector area to avoid this.
X-Pipe vs Y-Pipe
Another area of improvement I keep reading about are the gains due to a true dual exhaust with an x-pipe, as compared to the y-pipe. I will admit I was skeptical. But I like building things, so I built another complete exhaust system using 2.25" piping and a Borla muffler with a built in x-pipe.
My current "other" exhaust system is my 3" Borla with catalytic converter and I wanted to eliminate the cat as a variable. So I first compared the X-pipe to an open Y-pipe setup, with the muffler and cat removed. I had previously run an open Y-pipe test (as mentioned above) and saw no difference in power compared to the Berk muffler, so I figured this would be a good comparison. Results below. In short, huge mid-range gains, and a small gain above 6500rpm as well.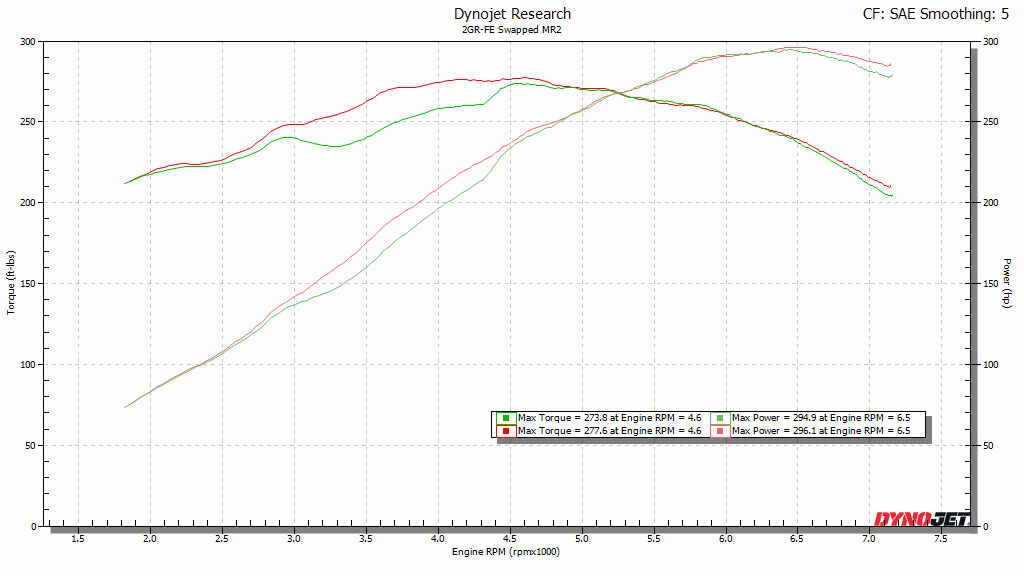
With that test complete, I re-installed the muffler and catalytic converter to the y-pipe and ran a couple more dyno pulls. The results are a little dumbfounding, but here they are:
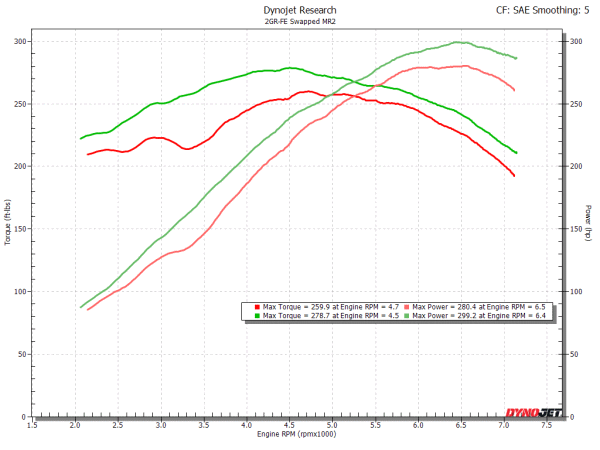
That's right, I broke the 300whp mark! On a re-flashed stock ECU, without cams! I can't exactly explain it, but there it is. All three exhaust configurations were tested on the same dyno, within about an hour of each other. And all three configurations were tested at least 2-3 times, with less than ±1hp variation.
The question is... Can I build an exhaust system that combines the best of these into one?
Update January 6th, 2020
Documented in my Dual Exhaust Build post my X-pipe V2 attempted to do just that. This system replaced the single Borla with built in x-pipe with a custom fabricated X-pipe, dual Magnaflow catalytic converters, and dual Borla mufflers. It made a little more power than the original X-pipe system, but didn't quite match the best Y-pipe pulls.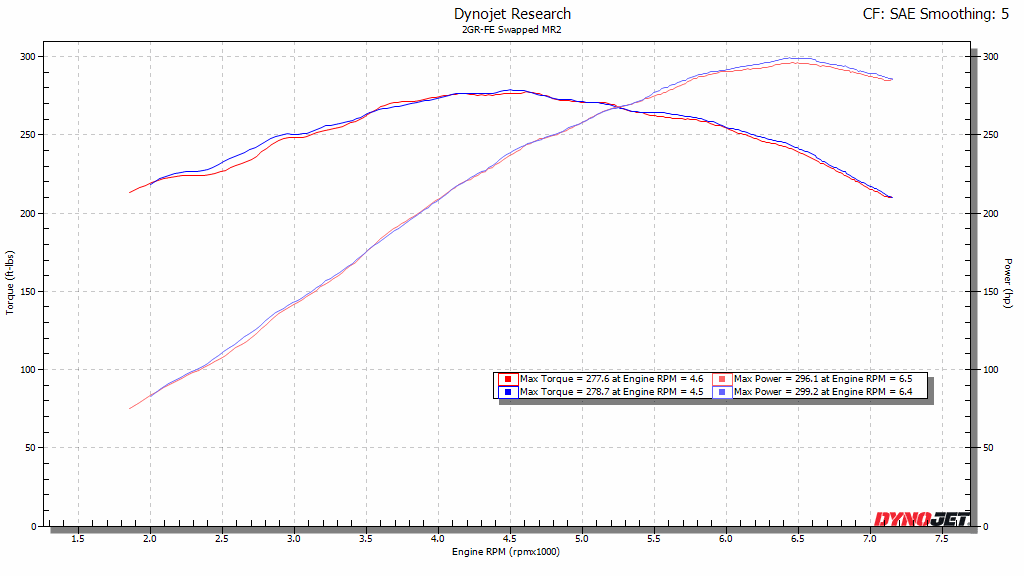
Here is the V2 X-pipe compared to the Y-pipe with Borla center exit. Much better in the 2500-4500 range, but the Y-pipe with cat and helmholtz resonator beats it in the 4500 to 6500 range. Still the overall power band of the new X-pipe system is much better and without a doubt it is the system that will stay on my car.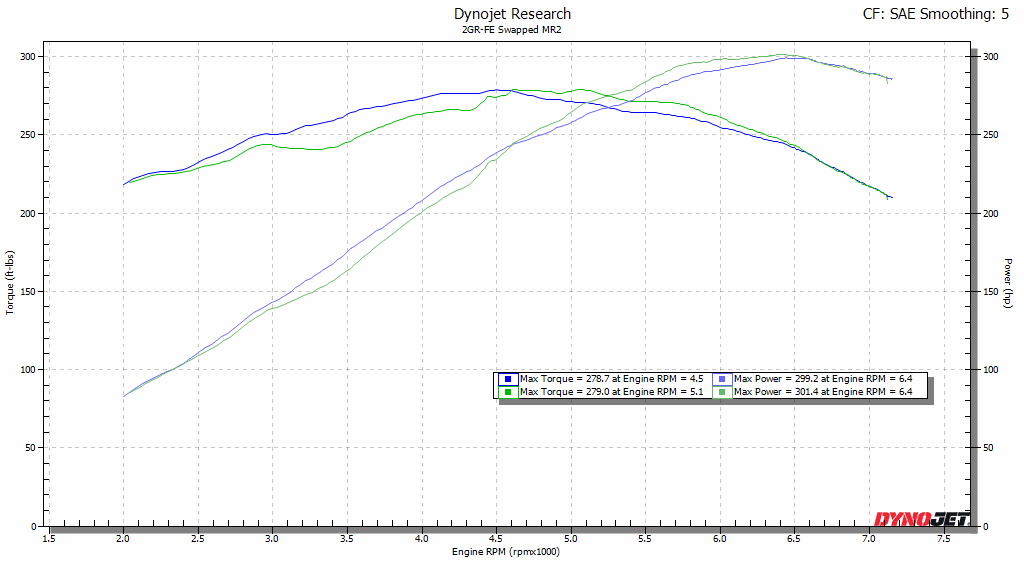
So there you have it, few things that can improve the performance of your swapped 2GR. End result 299whp, or 352hp at the flywheel assuming 15% drive train loss. Compared to where I started back in 2017, that's 18whp gained at 6400rpm, and 44ft-lb of torque at 3300rpm!
