Coolant Expansion Tank
Coolant Expansion Tank
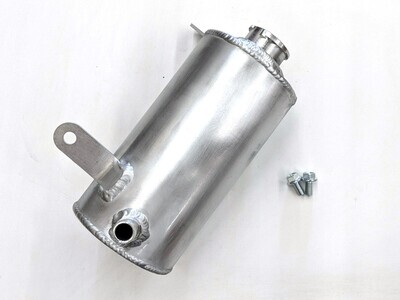
Replace the coolant overflow tank on the MR2 with a modern pressurized expansion tank. This eliminates most of the hassle associated with bleeding the air bubbles out of the MR2's cooling system, and reduces the risk of a sudden drop in coolant pressure causing local boiling within the motor. See my blog on the subject for more details. For 2GR and other engine swaps, this also allows you to skip modification of the coolant neck to add the filler cap.
Expansion tank mounts to the left side strut tower using existing threaded holes. Includes tank and mounting hardware only. You will need to supply a length of 5/8 heater hose for connection to the heater return line, and a length of 1/4" hose to run from the radiator bleeder back to the expansion tank.
These are semi made-to-order. I will attempt to keep a couple in stock, but it will depend on demand.
Made in the USA!
Installation Notes (Click Here!)
1. As noted above and in my blog, the large bottom port on the tank connects to the heater return line, or other port on the water pump inlet side of the motor. You can simply T it into the heater return line. Make sure you use the heater return, not the feed. (On the 2GR-FE this is the lower port, on the metal pipe that runs through the V. The port on the water neck under the throttle body is the feed to the heater.)
2. The small port on the tank must be at minimum connected to the radiator bleed port in the front of the car. Optionally you can also T the heater core bleed into the radiator bleed line, but creating a reliable connection to the heater bleed port is more difficult. If you choose not to connect to the heater core you will still need to bleed that manually, but making the radiator self bleeding will still be very helpful.
3. If installed with the 2GR I recommend adding a line from the 2GR's bleed port (between the cylinder heads, to the right of the intake manifold). This port is 1/4" BSP thread. Or you can manually bleed this point on initial fill. On other motors (such as the 3S/5S), you will need a bleed line from the water outlet neck to the expansion tank.
4. The tank should be filled about half full when cold. You need about 3.5-4 inches (89-102 mm) of air space in the tank to allow for coolant expansion. If you over fill it, it will push coolant out of the radiator cap when hot. On initial fill, run the engine for a few minutes with the radiator cap off and monitor the level in the tank. The system should self bleed (assuming bleeder lines from the radiator and heater core), but only with the engine running. You should be able to see a steady stream of coolant from the bleeder line (looking through the radiator cap with a flash light). You may need to rev the engine a little to see this, at warm idle there may not be enough flow to purge the bleed lines.
5. The tank will take the same type of radiator cap as the stock MR2. However, I recommend a 20psi cap for most applications (the stock MR2 cap is 13psi). Stant part numbers for higher pressure caps can be found below.
| Stant Part # | Pressure (psi) |
| 10267 | 20 |
| 10265 | 18 |
| 10233 | 16 |
| 10227 | 13 |
Fuse Box (10)


