E-Series Shift Shaft
E-Series Shift Shaft
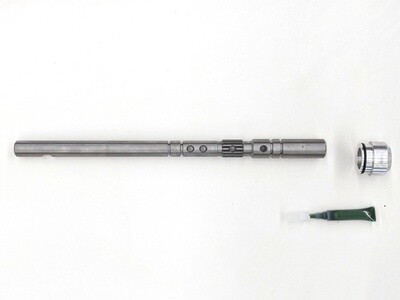
This part allows you to convert a "rear shift" (FWD) E series transmission (E153, E350, E351, E352) from a Camry, Scion, etc to "front shift" to install in the MR2. The shift shaft has multiple snap ring grooves and pin holes to accommodate all variations of these transmission that I am aware of. Simply match them up with the shaft you remove from the new transmission and install the shift hardware from the new transmission in the same locations.
Available with a back cap to close off the original rear shift opening, sealed with an O-ring and retained with green locktite (included). Also available without the cap for those repairing a broken shaft in an MR2 transmission, or if you have an MR2 back cap to use on your Camry transmission.
You will need the shift lever and shift bellcrank from an MR2, either E153 OR S54 transmission to complete the conversion. Please contact me if you are interested in a reproduction of these parts, I will consider it if there is demand.
Made in the USA!
In my blog post about the E351 swap, I showed a tube that I used to drill the transmission case without disassembly. A drawing of that part can be found here for those who wish to make their own.
For those with a 3D printer, here is the STL file for the tube.
To the best of my knowledge, this part will work with any E153 OR any E350 / E351 / E352 transmission, see the mygarageiscoolerthanyours.com/information/e-series-ratios for details on models and years and the various gear ratio / final drive options available. Installing the E350 / E351 / E352 "narrow E-series" transmission in the SW20 requires a new rear mount bracket, available from Frankenstein Motorworks.
Yes (10)